INLINE SOFTWARE USER GUIDE
Room Overview
Click the corresponding number icon to jump to its section.
Status Card
Feed Cycles & Zones
Feeding on Demand
Active Recipe Detail
Nutrients
Day Storage Tank
Refill Tank
1.  Status Card
Room Title.  Your room's name is displayed here. You can change this by going to Rhythm Logo > Configuration > ROOM # > Change the title from here by clicking directly on the name box. Max 3 characters.
Sunrise & Sunset.  You can set up your room’s Sunset (lights off) and  Sunrise (lights on) in ROOM CONFIGURATION settings. Rhythm needs this information to operate schedules correctly.
Room Gauge.  This displays the week's progression and lighting/watering status.
Lights in room are currently ON.
Room is currently WATERING.
Room is on HOLD and will not be fed.
The green checkmark icon in the upper right hand side of the card represents that the room is currently in the feeding queue. The digit to the left of the green icon is what number in the queue the room is in.
Next Feed.  The next time your room will feed will be displayed here. You cannot edit from this card, instead use the Active Feed Cycles card to edit feed cycle time slots.
Feed Report.  Check all the details of every previous feed in the room up to one week ago.
Some of the data that will display on your feed report is whether or not the feed was scheduled or manual, what time the feed happened, what week the room was in, the volume watered, the final pH/EC/temperature values delivered, and the flow rates and volumes per each zone.
Sometimes an error page will display. This means either 1) nothing was fed or 2) there is an internal service error.
Hold Function.  Some software versions allow puting the room on HOLD from the Room level screen. If your version does not, you can go to "Today's Feed Cycles" and press HOLD ALL.
Important
HOLD will not reset on the next calendar day. You must manually deselect it to resume feeding. HOLD will also NOT stop rooms from feeding that have already entered the Queue.
Day Storage Full Manual.  For systems utilizing a day storage tank, the Full Manual icon provides direct control over tank operations and distribution. This interface allows operators to bypass automated schedules for maintenance, cleaning, or emergency irrigation.

Motorized Valve: Toggles the main output valve of the storage tank.
Recirculate: Activates internal tank agitation to ensure nutrient solution homogeneity.
Tank Dump: Initiates a full drainage protocol for the tank.
Manual Transfer: To move contents to specific zones, press "Transfer" and select the target tables or zones from the distribution grid.
Auto Shutoff.  When enabled, the system will automatically terminate manual processes once the programmed cycle is complete, preventing over-watering or pump burnout.

Low Level Shutoff.  This feature should remain enabled during standard operation and should only be disabled when performing a complete tank evacuation for deep cleaning.
Moisture Sensors.  This button will only appear if you have moisture sensors incorporated into your system. Clicking on it will show you an overview of your sensors and the room averages.
Each card will show your sensors (the quantity varies per user). You can enable or disable them by clicking on the upper left hand toggle. Each card will display:
Sensor Location: You can label where your sensor is in the room. Click below the text "Location" to reveal a text box. Max 8 characters.
Current Readings: Live readings of moisture content/saturation level, EC and temperature.
Sunrise/Sunset: This will display the max and mins at sunset and sunrise.
Dry Back Period: Max is the most saturated the media got (by sunset), Min is the minimum (starting at sunrise), and Dry Back is the difference.
The left side menu shows the general room averages of all of the sensors combined. You can also navigate to other rooms if there are many zones within your room.
Moisture Sensor Configuration.  Click the upper left hand Configuration icon to reveal the config menu. You can enable Safety Events or Moisture Alerts here.
Safety Events. You can create irrigation events to trigger at certain moisture levels. Enter the percentage in which you'd like these events to trigger. The suggested level based on sensor manufacturer specs is usually around 30%. If the moisture level of the medium goes below 30% in this case, Rhythm will send an email or text alert and start watering in the increments you set.

Click "Configure Durations" to enter the durations for each zone to be feed (i.e. 2 minutes per zone).
2.  Feed Cycles & Zones
Feed Cycles.  Feed cycles are each watering event that occurs in the room, denoted by colored water droplets.
Gray droplet indicates no feed time scheduled.
Blue droplet indicates room was watered on designated cycle.
Red droplet indicates flow alarms. (High/low/no flow, pipe break, etc.)
If your room has Day Storage with multiple delivery schedules (i.e one reservoir setup to deliver on different schedules to different sections of a room or facility), your Feed Cycle card may look like the below. You can edit each feed cycle using the individual edit icons:
Feed Cycle Manager.  To edit feed cycles, click/press on the edit icon in the Today's Feed Cycles card.
Feed Cycle Manager.  Your watering cycles are displayed here. Each watering event is called a "cycle."

Any edits you make in the Feed Cycle Manager from the Room level screen will only remain in effect until the next recipe transfer date (date can be referenced in Scheduler). After editing here, you have the option to save the changes as a new recipe, in which you can override the current recipe as well.
Press to clear all of the cycles.
You can use this feature for crop steering methods (see below).
Press to save your room level edits to a new recipe.
Press to HOLD the room of any further feedings. You will need to press again to release the room from HOLD.
Auto Fill Periods.  Some users take advantage of Crop Steering by using "periods." You can set periods 1-3 to efficiently manage your shots. For example, if the room needs more frequent feedings with lower volumes in the morning, you can assign period 1 to shorter intervals and adjust the other periods accordingly for the rest of the day.
Auto Fill Instructions
1.  To utilize Auto Fill, you must first edit Cycle 1 in the Feed Manager. Do this by pressing the first cell labeled "Cycle 1. See Editing Cycles on how to edit cycles.

2.  Press "Auto Fill Periods."

3. For period 1, enter "1" for Start on Cycle. Then enter your feed time increments in hours/mins (i.e shots every 30 mins). Enter the cycle end for how many shots you want in period one.

4. Repeat the process for Period 2 if you require different intervals later in the day.
Editing Cycles.  To edit a feed cycle, press/click on the cell you'd like to change.
Editing Cycle Times
1.  Edit Cycle Time.  Enter your cycle time in the upper left box. This will be when the feed initiates. Click the toggle to use PM time.

2.  Select Type of Feed. In your recipes, you will have created Primary and Secondary nutrients. You can choose which subset you'd like to use here. Most often, it will be Primary. Line Clean is used for cleaning out the lines before/after/inbetween feeds and will have its own designated pump location (used for line cleaning products like Sanidate).

3. If necessary, input the required Pre-clean Volume in gallons (the amount you'd like flushed out of the lines before feeding). Designate the disposal location as either the AFS Machine watering room dump or the In-Room dump. Note: In-Room dump is the standard configuration for 95% of applications.

4. Input the desired irrigation time for each zone under Zone Duration. The system will automatically calculate the total volume for the room, as well as per-plant volume in gallons and milliliters (ml) on the right-hand panel.
Feeding Zones.  Your active feeding zones are shown here. These are usually tables within rooms, for example. You can click the edit icon to remove specific zones you don't want to feed. Changes made here will be permanent to the schedule in this room so if was meant to be a one-time change only, please remember to change it back after the feed.
Important
If you change the active zones while the room is currently feeding, the change will not reflect until the next feeding.
3.  Feeding on Demand
Feeding on Demand is a feature that allows for the immediate execution of a fertigation cycle outside of the pre-programmed automatic schedule. This is ideal for addressing unexpected environmental changes or specific crop stress markers in real-time.

If no active irrigation is occurring, the on-demand cycle initiates immediately upon volume entry and confirmation. If the system is currently feeding other rooms, the on-demand request is added to the end of the existing queue. To give an on-demand feed immediate precedence over other queued rooms, you must manually remove the preceding rooms in the queue.
Feed on Demand with Primary Recipe.   Your primary recipe is what is loaded into your room Scheduler. This can be found or changed on the bottom main menu once inside a Room page. Toggle on the "Primary Recipe" toggle to activate the "Feeding on Demand" configuration.

1) Here you can select whether you'd like to use Primary Recipe Nutrients, Secondary Recipe Nutrients, or Line Clean Nutrients (these are set up in Configuration under Nutrients > Clean and are designated nutrients like Sanidate, Green Clean, etc).
2) If necessary, input the required Pre-clean Volume in gallons (the amount you'd like flushed out of the lines before feeding). Designate the disposal location as either the AFS Machine watering room dump or the In-Room dump. Note: In-Room dump is the standard configuration for 95% of applications.
3) Input the desired irrigation time for each zone under Zone Duration. The system will automatically calculate the total volume for the room, as well as per-plant volume in gallons and milliliters (ml) on the right-hand panel.
Feed on Demand with Secondary Recipe.   This process will repeat as above but will use the Secondary Recipe assigned the in Scheduler:
Note: Secondary recipes are commonly used for routine Flush protocols, or special recipe days.
Feed on Demand with Wand Water.   If you plumbed a designated hose bibb in the room for hand watering purposes, you can use this setting to apply an on-demand feed to that line here.
4.  Active Recipe Details
Primary Feeding Times.  Your active recipes are displayed here. To EDIT them, click on Scheduler. (For more detail about using the Scheduler, click here.)
Active Primary/Secondary Days.  The Active Feed Days interface allows you to designate exactly when your Primary and Secondary recipes are deployed throughout the week.

Calendar Key
Blue Lettering:  Indicates the current day of the week.
Green Highlighted Box:  Indicates a day where a feed is actively scheduled for that specific recipe type (Primary or Secondary column).
Grey/Transparent:  Indicates a "dry" day or a day where that specific recipe is inactive.

Active Primary Feed Days:  Assign these to your standard, daily production nutrient profile.
Active Secondary Feed Days:  Assign these for specific special/weekly adjustments, such as a "flush" day, a nutrient-specific boost, or hardening-off formulas.
Edit Active Delivery Days.  Upon clicking the edit button in the upper right hand corner on the Active Recipe Detail card, you will be able to change the days in which the recipes will feed.

Please note: Changes made here will be overwritten to what is scheduled in the Scheduler on Transfer Day.

Feed Every Other Day. You can enable the green toggle to feed every other day. If you'd like today to be the first day to start feeding, click the "Active Feed Day" toggle.
5.  Nutrients
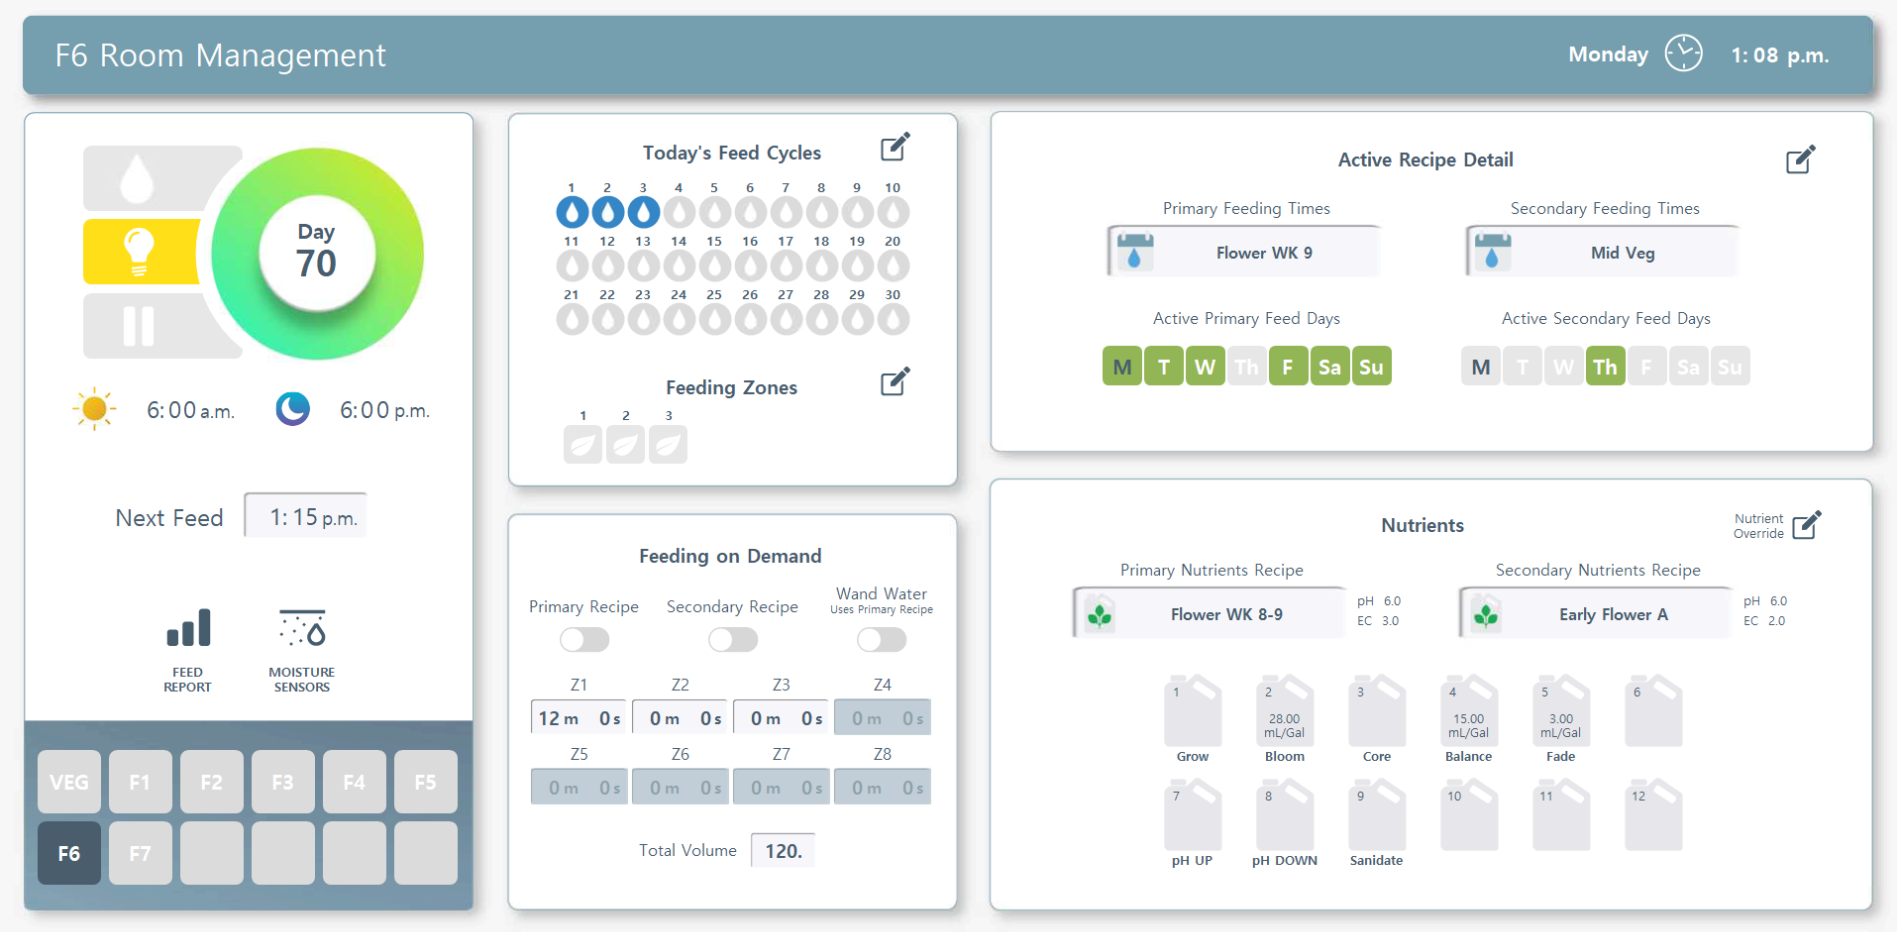
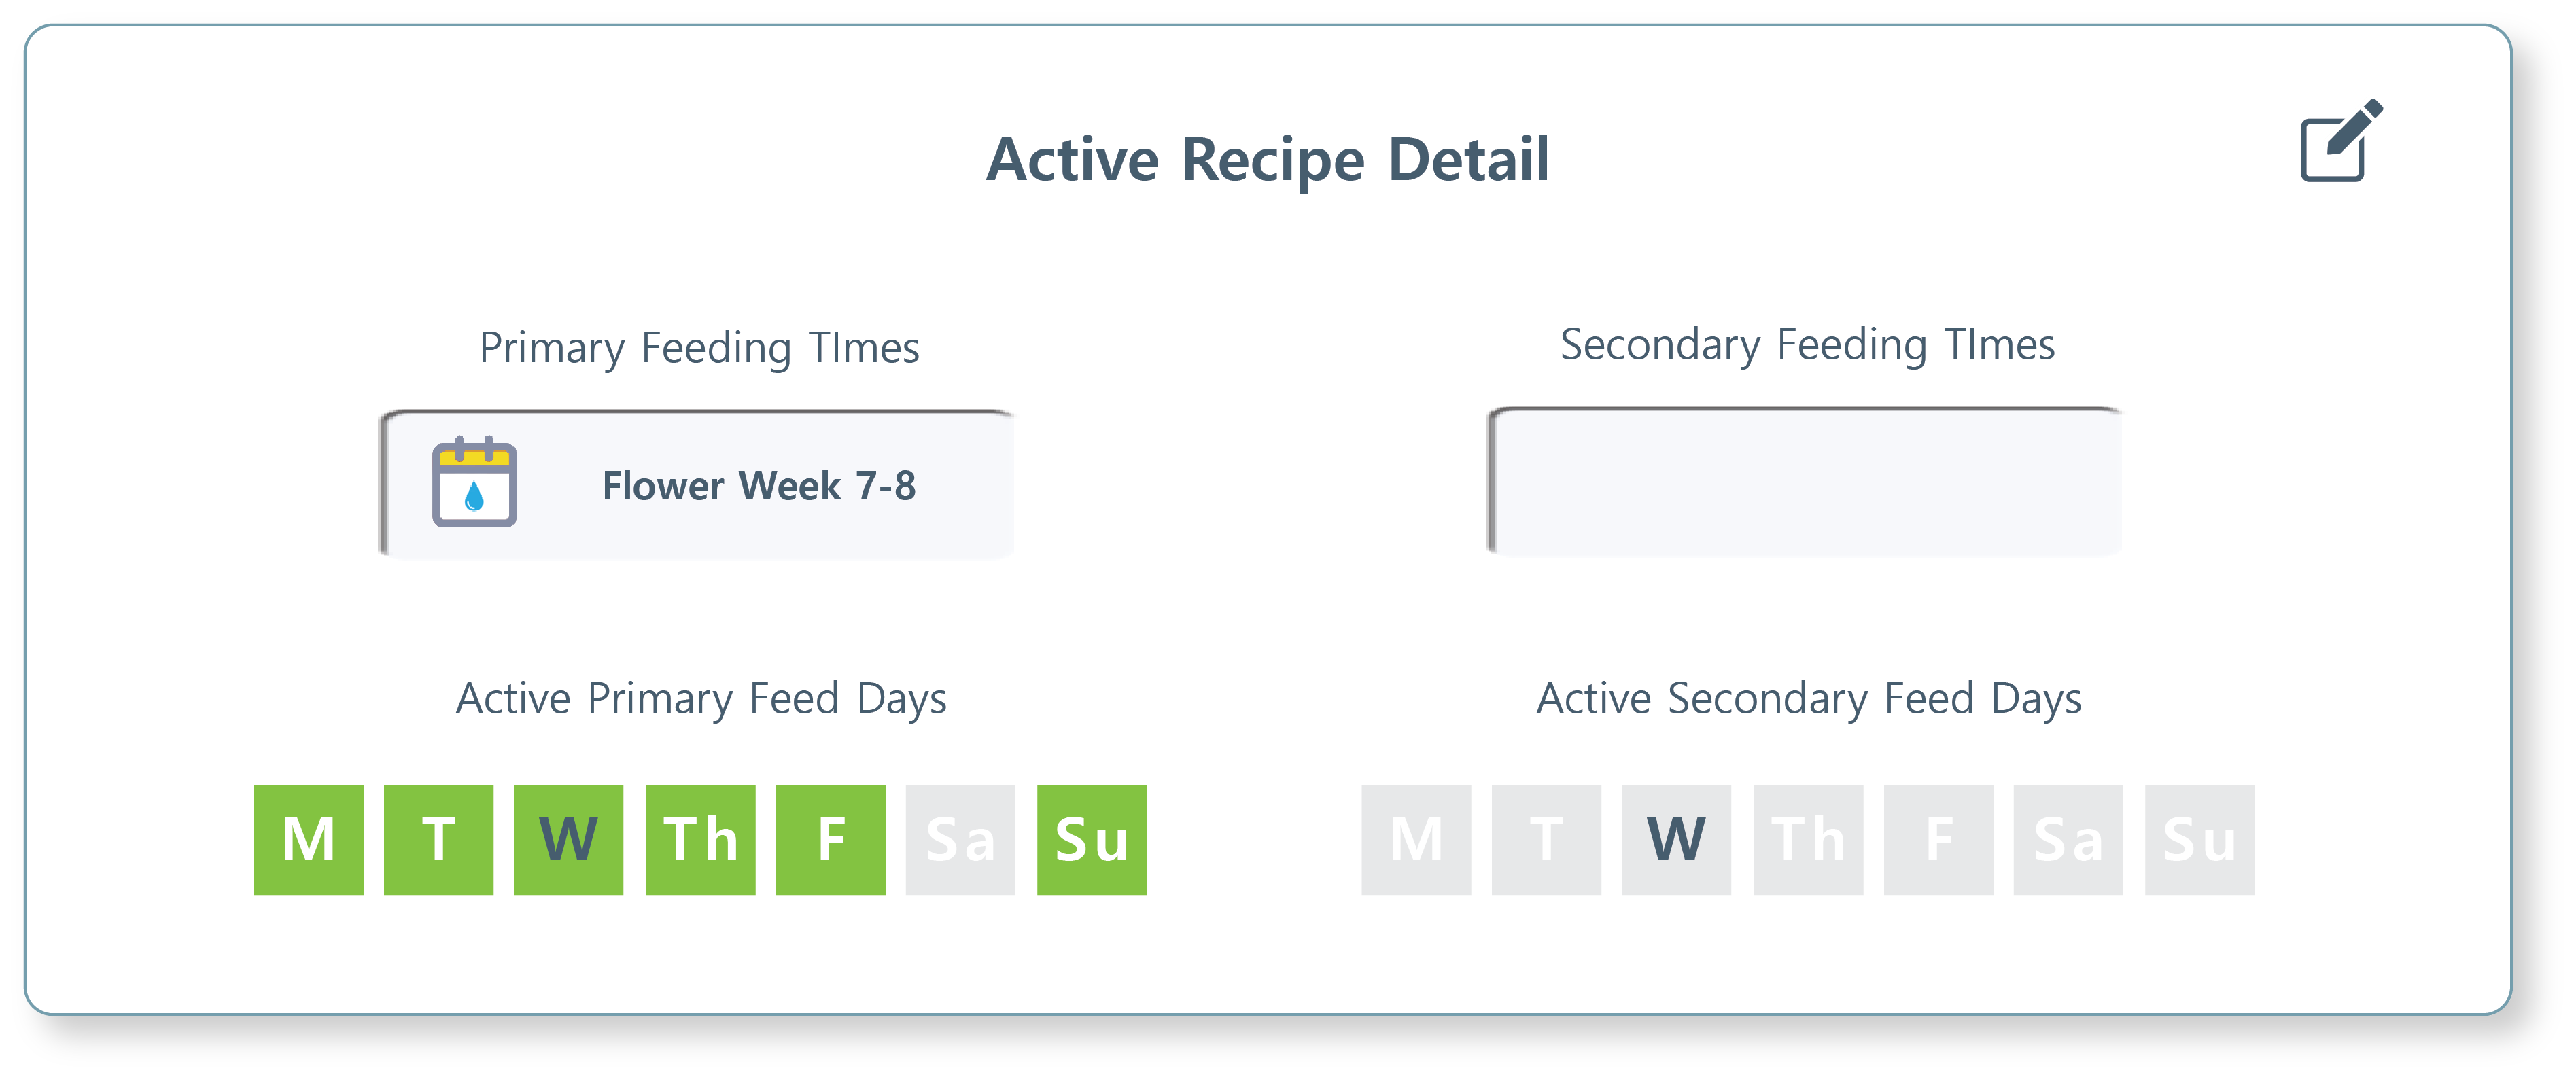
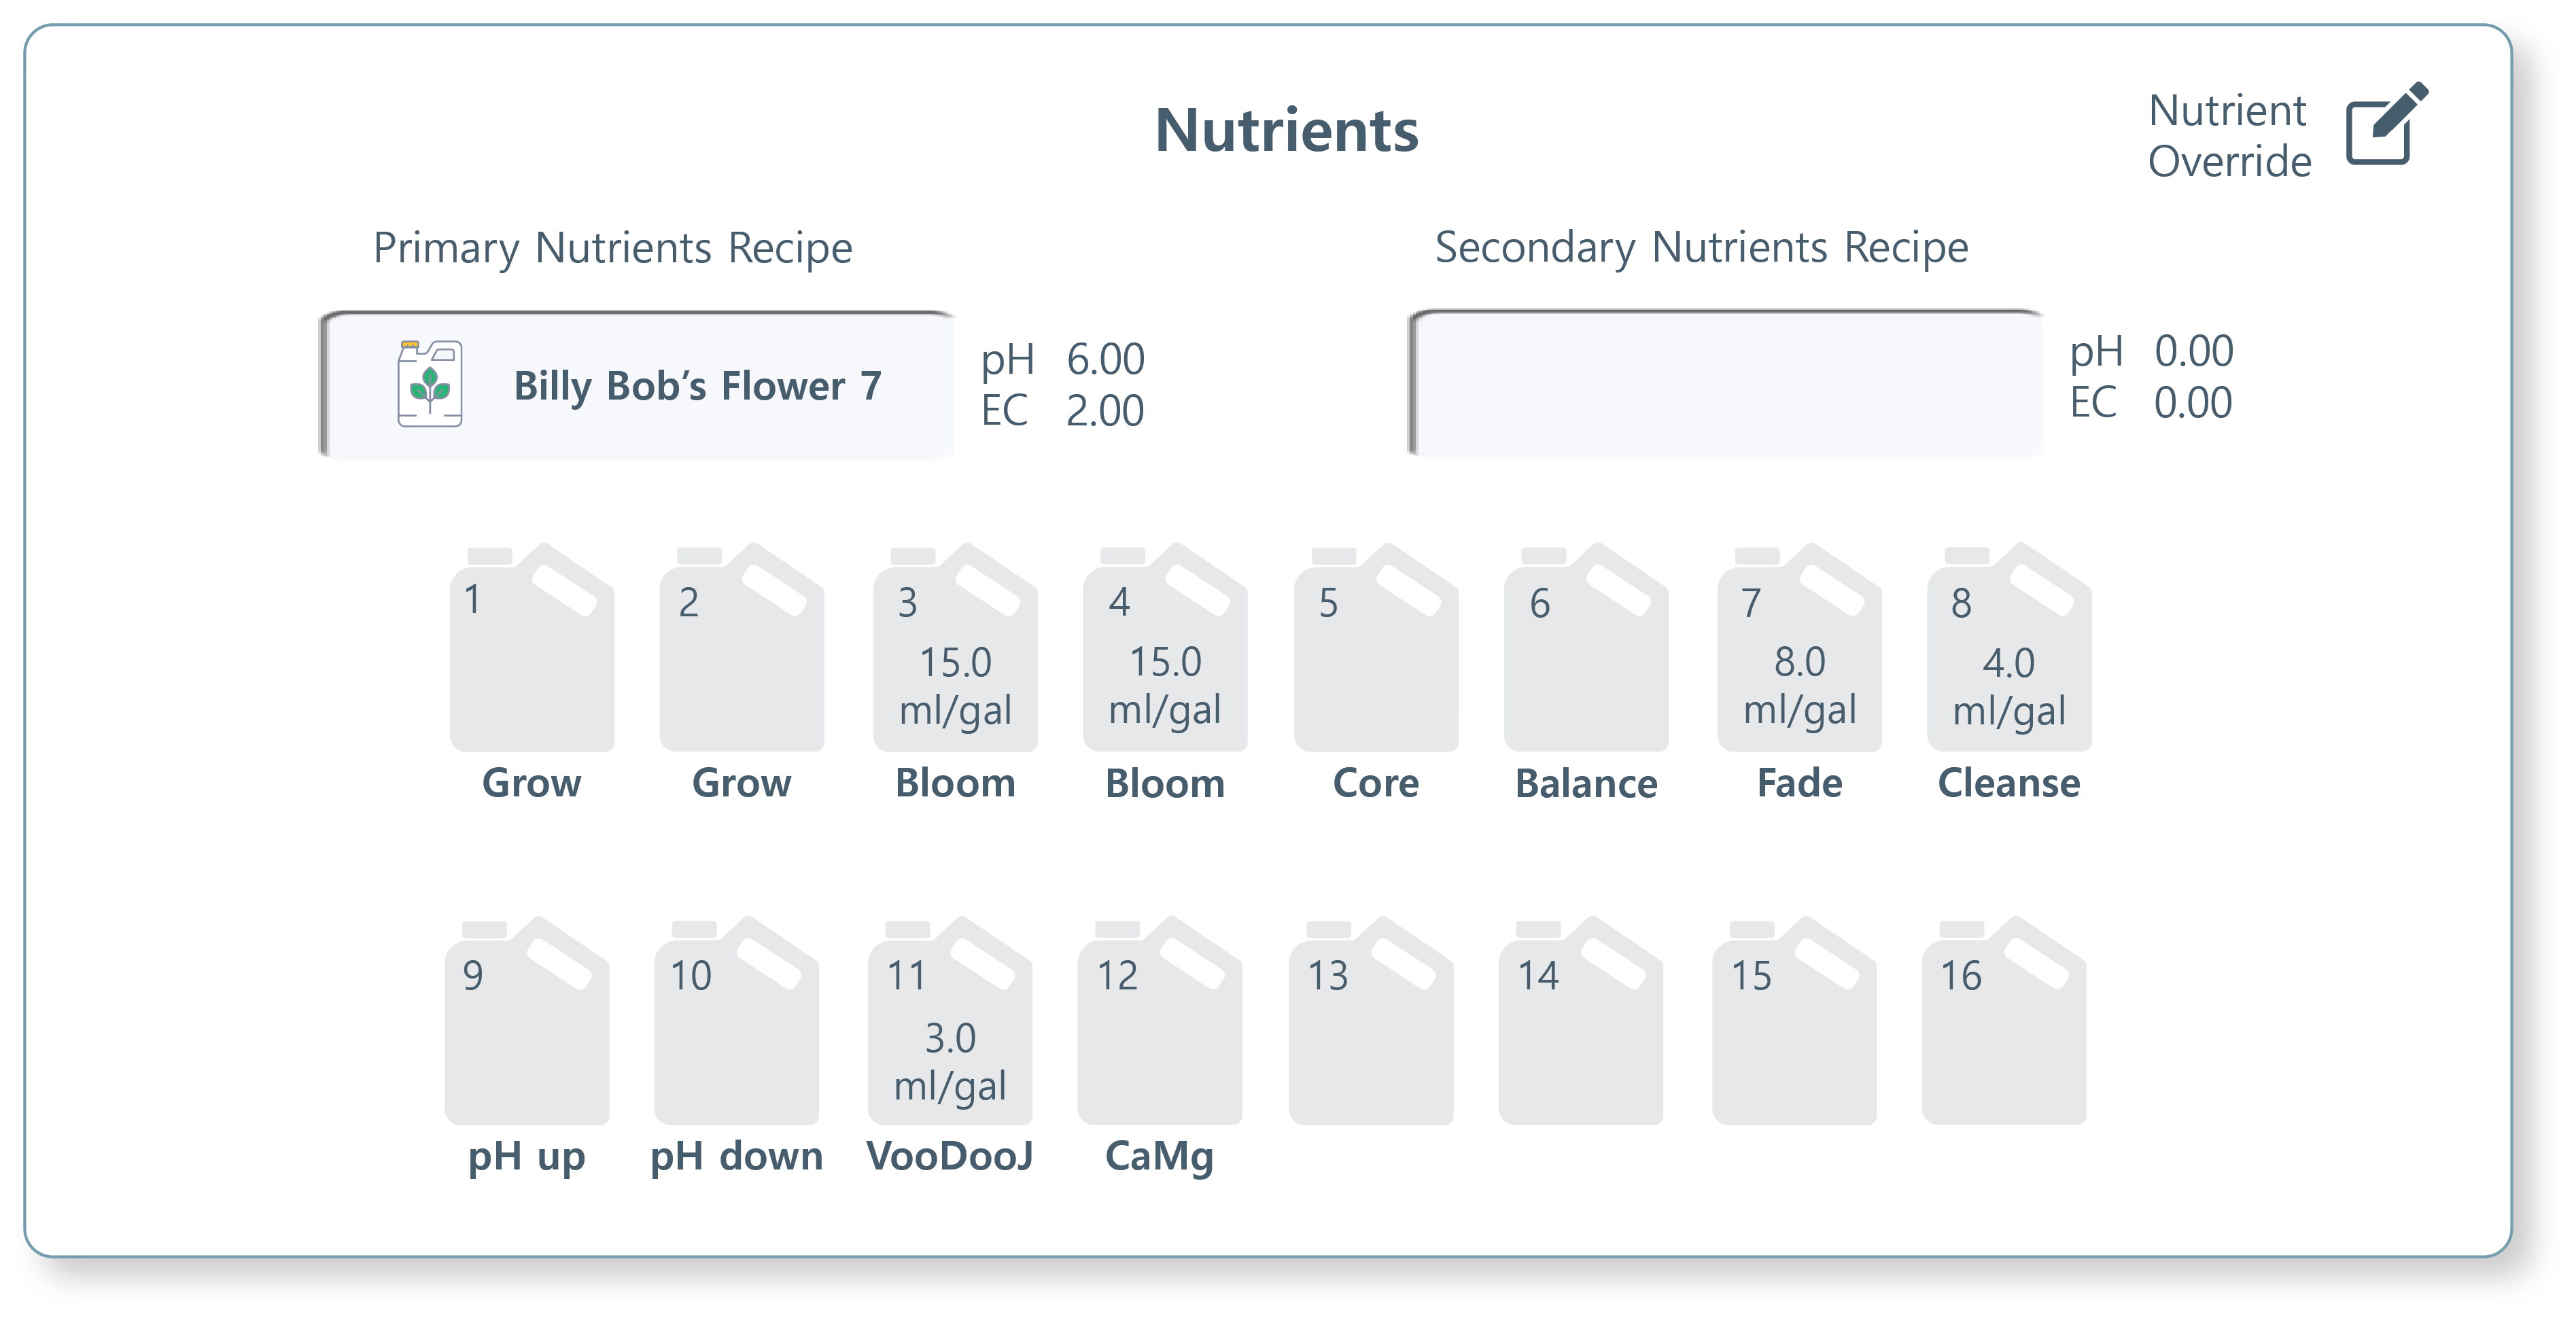
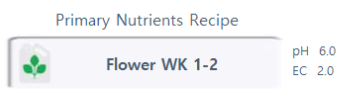
Primary Nutrient Recipes.  Your recipes are split into when to feed and what to feed. Displayed under the Nutrients card will be what to feed, called "Primary Nutrients Recipe" (connected to your Primary Feeding Times recipe. The loaded recipe will display and can only be changed using the SCHEDULER. pH and EC for this recipe will be displayed.

Secondary Nutrient Recipes.  Your recipes are split into when to feed and what to feed. Displayed under the Nutrients card will be what to feed, called "SecondaryNutrients Recipe" (connected to your Secondary Feeding Times recipe. The loaded recipe will display and can only be changed using the SCHEDULER. pH and EC for this recipe will be displayed.
Nutrient Icons.  The nutrient contents of your Primary Recipe will be displayed.
Nutrient Override.  Press/click on any nutrient icon to access the Nutrient Override manager. You can deselect, select, or edit any nutrient dosages, pH, EC or Auto Adjust percentages.

Please note: Any changes made here will reset on Transfer Day in the Scheduler.
Auto Adjust.  Auto adjust is a specialized Rhythm feature designed to dynamically modify nutrient dosages in real time to maintain precise  EC setpoints. During the initial system calibration, it is essential to utilize this feature to refine your recipes and establish baseline dosage accuracy. Auto Adjust operates by defining a maximum percentage bandwidth, allowing the system to automatically scale nutrient delivery up or down to reach the target EC.
Configuration Tips

• To preserve the balance of your formula, it is best practice to apply Auto Adjust to all active nutrients.

• If necessary, you can manually adjust the base concentration (ml/gal) within this menu first. **Pease note, changes made here will only change the active feeding and not directly edit the original recipe.

• In the Auto Adjust box, input the maximum allowable percentage change the system may use to reach the EC setpoint.
Recommended  Starting Parameters
Dosage Concentration

High Dosage (25-50 ml/gal)

Low Dosage (1-10 ml/gal)

Micro Dosage (< 1 ml/gal)
Suggested Max Change %

Start with 50%, monitor and adjust
Start with 100%

May require >100%
Note:  These numbers can be modified during live operation on the OVERVIEW page as well. Monitor the system's response to determine the optimal bandwidth for your recipe.
6.  Day Storage Tanks
DS (Day Storage) Tank Status.  A tank icon will display on your room screen if you have it feeding from a Day Storage tank. Current tank volume will display in gallons directly on the tank.

The red dotted line indicates the "low" volume level set in configuration. When the volume reaches this level, the system will stop the pump and no water will be moved to prevent dry running the pumps. You can also configure the system to alert you when the tank reaches this level as well. To set this up, please click "Tank Setup."

The white dotted line indicates the "refill" volume level set in configuration. When Auto Reservoir Refill is enabled, you can select a refill level setpoint and volume amount to automatically refill with. To set this up, please click "Tank Setup."

GPM (gallons per minute) will also be displayed when the system is moving water to the tank.
Filling. This icon will light blue when the tank is currently filling. You can do this on automatic schedules or you can manually fill the tank using "Fill Now" feature.
Feeding. This icon will light blue when the tank is currently feeding. You can do this on automatic schedules or you can manually feed from the tank by using "Feeding on Demand" feature.
Recirculating. This icon will light blue when the tank is currently recirculating. You can do this on automatic schedules or you can manually recirculate the tank using "Recirculate Now" feature.
Next Tank Refill.  This is an "at a glance" overview of when your next tank refill is scheduled.

Note: This is not when the room will feed from the tank. That time is located on the left hand card under "Next Room Feed."

To edit when a tank refills, click Feed Cycles.
Completed Refills.  Track how many tank refills have completed during the day.
Feed Cycles.  When accessing the Feed Cycle Manager from the "Feed Cycles" icon underneath the day storage tank icon, you are ONLY editing the times when the tank will REFILL, not when it actually feeds the room the contents inside the tank.

Please note: Under the DS Refill Cycle Manager, you will see several "zones" listed, but this is a coding effort, in practice there is only ONE true "zone" which is the tank itself.

For more information on how to edit and create cycles, please see Feed Cycle Manager section above.
Feed Days.  When accessing the Active Feed Days from the "Feed Days" icon underneath the day storage tank icon, you are ONLY editing the days when the tank will REFILL, not when it actually feeds the room the contents inside the tank.

Feed Every Other Day. You can enable the green toggle to refill every other day. If you'd like today to be the first day to start refilling, enable the "Active Feed Day" toggle.
Fill Now.  For an immediate manual tank refill, use the "Fill Now" feature to send a your Primary Nutrient Recipe to the tank.
Fill on Demand with Primary Recipe.

1) Here you can select whether you'd like to use Primary Recipe Nutrients or  Secondary Recipe Nutrients.
2) If necessary, input the required Pre-clean Volume in gallons (the amount you'd like flushed out of the lines before feeding). Designate the disposal location as either the AFS Machine watering room dump or the In-Room dump.
3) Input the desired irrigation time for zone 1 under Zone Duration. You will edit this in TIME but please refer to the right hand side of the screen for tank VOLUME calculation.
Nutrient Recipes.  The Active Recipe Detail card on your Room Page displays the specific nutrient profile currently assigned to that room. A valid Nutrient recipe must be loaded at all times for the system to function. Accessing the Nutrient Manager via the "Nutrient Recipes" icon (located beneath the Day Storage icon) allows you to perform a Nutrient Override. This is used for immediate, temporary adjustments to the current recipe. Any manual edits made through the Nutrient Manager will be overwritten if the Scheduler triggers a Transfer Day (a scheduled shift to a new recipe). If your Scheduler is configured with only a single recipe loaded on Day 1, your manual overrides will remain active indefinitely, as no scheduled transfer will occur to reset them.
Nutrient Override.  You can deselect, select, or edit any nutrient dosages, pH, EC or Auto Adjust percentages.
Tank Setup.  Press/click Tank Setup to reveal the Day Storage menu for automated recirculation, refill, level shutoff and alarms.
Reservoir Recirculation.  To maintain nutrient solution stability and prevent sediment buildup, the system includes an automated Reservoir Recirculation feature. This ensures that fertilizers remain in suspension and the solution stays oxygenated for optimal plant uptake.
Frequency & Duration: Use the "Recirculate every X hours" field to set the interval between agitation cycles, and the "for X minutes" field to define the run time of the pump.
Operational Window: Set a Start Time and End Time to restrict recirculation to specific hours to preserve hardware longevity.

The interface displays the Next Recirculation timestamp so operators can verify the schedule at a glance. You can reset the time by using the "Reset" button.
For immediate agitation, use the "Recirculate Now" toggle. This will trigger a one-time cycle for the specified duration without affecting the primary automated schedule.

Pro Tip: If you notice consistent sediment at the bottom of your tanks, consider increasing the frequency (reducing the hours between cycles) rather than just increasing the duration.
Auto Reservoir Refill.  The Auto Reservoir Refill feature automates the replenishment of your day storage or reservoir tanks using your primary recipe. By setting volume-based triggers, you ensure consistent nutrient availability without manual monitoring.

Refill Level Setpoint: This is your "low-water mark." When the tank’s volume drops to this specific gallon amount, the system will automatically trigger a refill event. Use Refill Volume amount to define how many gallons of the primary recipe the system will batch and deliver once the setpoint is reached.
Level Shutoff & Alerts.  The Level Shutoff & Alerts section allows you to establish critical volume boundaries for your reservoir. These setpoints act as failsafes to prevent mechanical damage and operational errors.
Low Setpoint: Once the reservoir volume hits the level you designate here, the system will automatically terminate all water movement to prevent the pumps from "dry running," which can cause rapid motor failure.
High Setpoint: This acts as an overflow prevention tool. If the tank volume reaches this peak during a refill or transfer, the system will initiate an auto-shutoff to prevent accidental overflows.
Alert Setpoint: This triggers a system notification when volumes reach a critical low. This serves as a final warning for the operator before the Low Setpoint safety shutoff occurs.

Pro Tip: Set your Alert Setpoint slightly higher than your Low Setpoint (i.e. Alert at 20 gallons, Low Shutoff at 10 gallons) to give yourself a lead time to address supply issues before the system hard-stops.
Day Storage Alarms.  The Alarms section allows you to establish critical thresholds for your nutrient solution's chemistry. When these levels are reached, the system triggers a notification, allowing for rapid corrective action. Operators should set Low and High boundary points for the following metrics--pH, EC and Temp. To avoid "nuisance alarms" (frequent alerts for minor, non-threatening fluctuations), it is recommended to set these boundaries slightly wider than your ideal target range. This ensures you are only alerted when the solution reaches critical levels that require immediate intervention.
7.  Refill Only Tanks
Automated Tank Refilling.  Depending on your facility's custom configuration, certain storage tanks may operate independently of the primary Rhythm nutrient delivery schedule. These tanks are designated for automated refilling, ensuring a constant supply for secondary applications.

Operational Use Cases: While the system maintains the water or solution levels based on your designated schedule, the distribution is managed externally through auxiliary timers, manual irrigation (i.e. tanks are plumbed specifically for hand-watering or wand stations, etc.)

Because these tanks are not "fed" by the central Rhythm system, they remain available for use even when the main fertigation system is in use.

GPM (gallons per minute) will also be displayed when the system is moving water to the tank.
Filling. This icon will light blue when the tank is currently filling. You can do this on automatic schedules or you can manually fill the tank using "Fill Now" feature.
Completed Refills. Track how many refills have completed during the day.