
SOFTWARE USER GUIDE
Recipe Builder
Click the corresponding number icon to jump to its section.

Recipe Navigation

Recipe Cards

Add Recipe
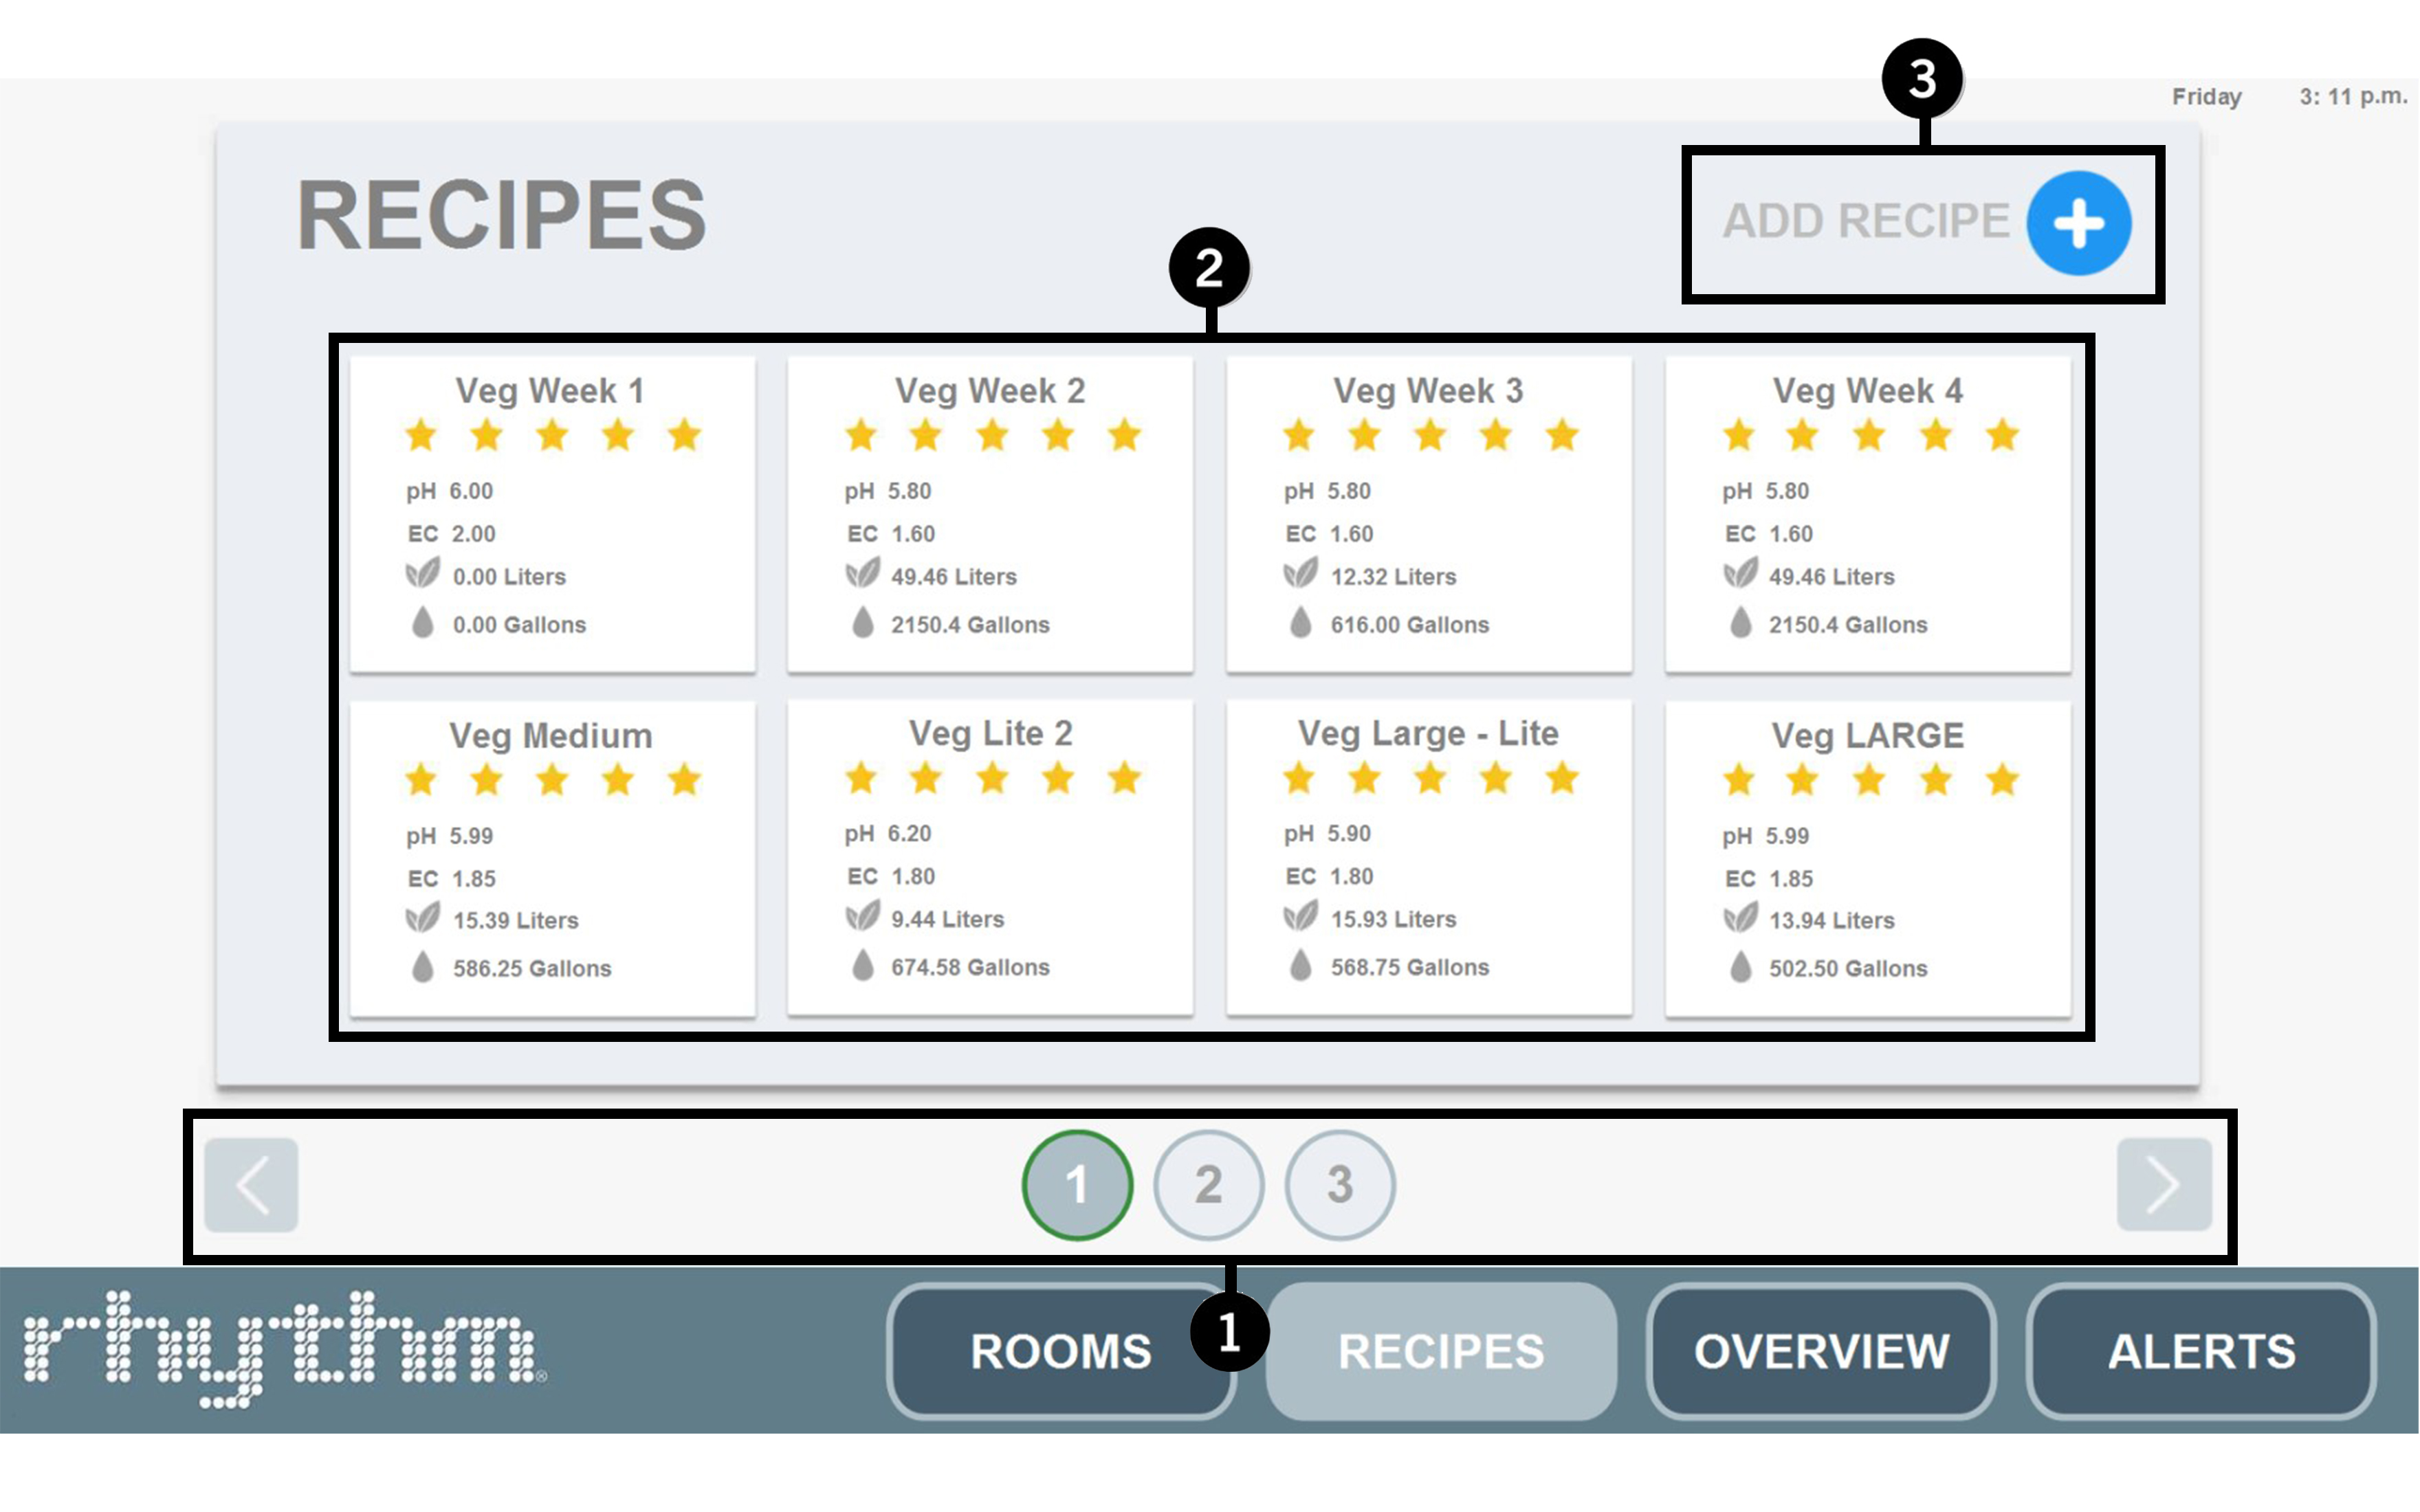
1. Recipe Navigation

Page Navigation. Navigate your recipe pages 1-12 by using the left and right navigation arrows. The software allows for up to 96 recipes. Keep in mind that one room may have several recipes depending on factors like EC levels, week of room, nutrients added, etc.

2. Recipe Cards
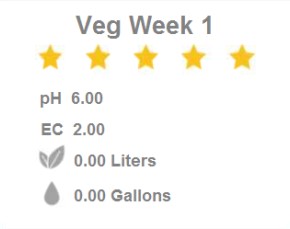
Recipe Card. Each recipe you can run will show here as a card. On the card itself, it will display the star rating, the pH and EC setpoints for the recipe, and estimated nutrients used (in liters) and RO used (in gallons) if this recipe were to run for the whole week. Your Recipe Card may look different depending on which version of software you are running.
Click on the recipe card to reveal the schedule set for that specific recipe:
Click on the recipe card to reveal the schedule set for that specific recipe:


Recipe Name. This is the name of your recipe and whether it is a Veg or Flower type feed. You can change this in "Edit Recipe" on the last page. See Add Recipe below for more details.

Star Rating. You can rate your recipes with the star system (1-5). Click directly on the number value to change the star rating. This can be helpful when testing recipes between members on your team. This may be absent from your software version.

Nutrient & Water Consumption. Press this button to reveal a popup displaying your estimated weekly nutrient usage (in mL) and RO water usage (in gallons) for this recipe only. You can select the room at the top to display the room specific values.
Note: This feature only works for scheduled feed recipes, not loop feed recipes.
Note: This feature only works for scheduled feed recipes, not loop feed recipes.

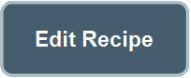
Edit Recipe. Edit recipes anytime by pressing this button. See Add Recipe below for more details on how to add or change a recipe.

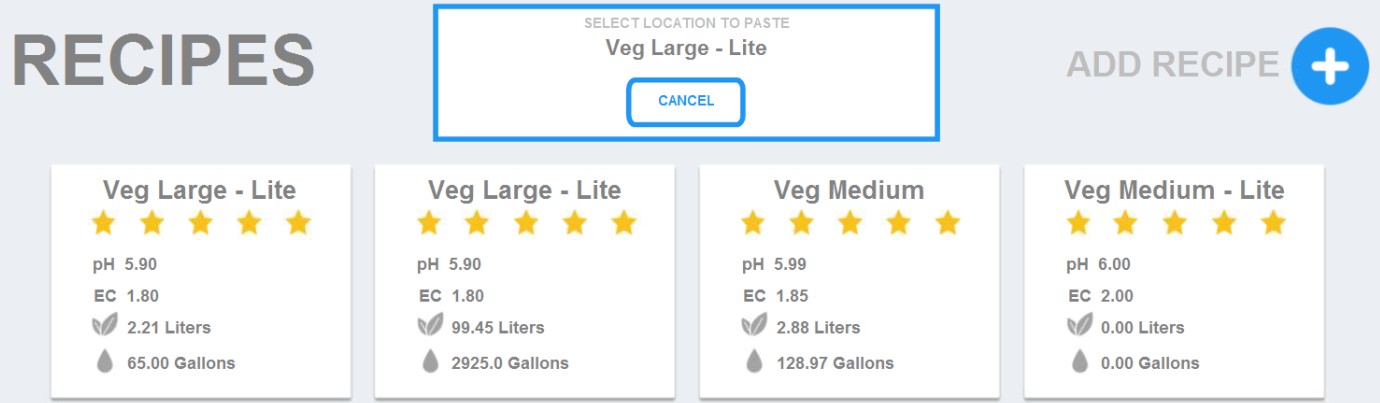
Copy Recipe. If you'd like to quickly add a recipe that only differs in minor details from another recipe, instead of creating a whole new recipe each time, you can quickly copy the recipe to any empty slot location.
A popup will appear when you press "Copy Recipe". Select any empty slot to place the copied recipe.
A popup will appear when you press "Copy Recipe". Select any empty slot to place the copied recipe.

Delete Recipe. Delete your recipe by pressing this button. A popup will appear to confirm the choice.


Number of Batches. If your recipe requires more gallons than your tank can hold, you will need to make additional consecutive batches of the same recipe. The number of batches will appear here and can be changed by editing the recipe and changing the number on PAGE 1 in the lower right hand corner.
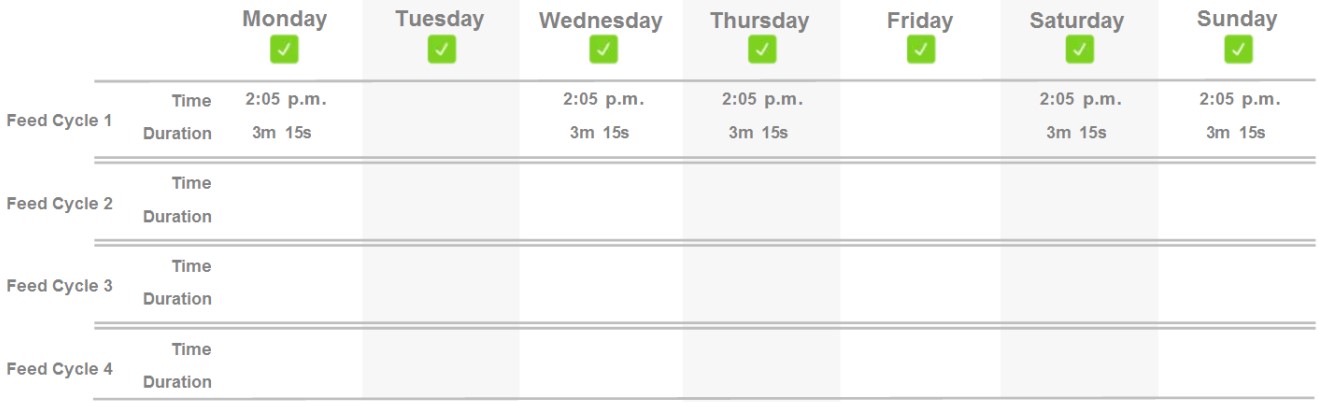
Recipe Schedule. The recipe schedule will appear here. For a "scheduled feed", it will display the days which the recipe will water, the time and duration of feed, and how many cycles will run. See Add Recipe below for more information on how to set up scheduled feeds.

This scheduled feed example shows two feed cycles at 4:05pm and 6pm every day of the week. You can see on Feed Cycle 1, that Monday and Friday feed for longer than the other days. This gives you the flexibility to feed different amounts on different days or to different zones. If you click on "edit recipe" you can see more details like how many gallons each zone will receive based on the duration you set.
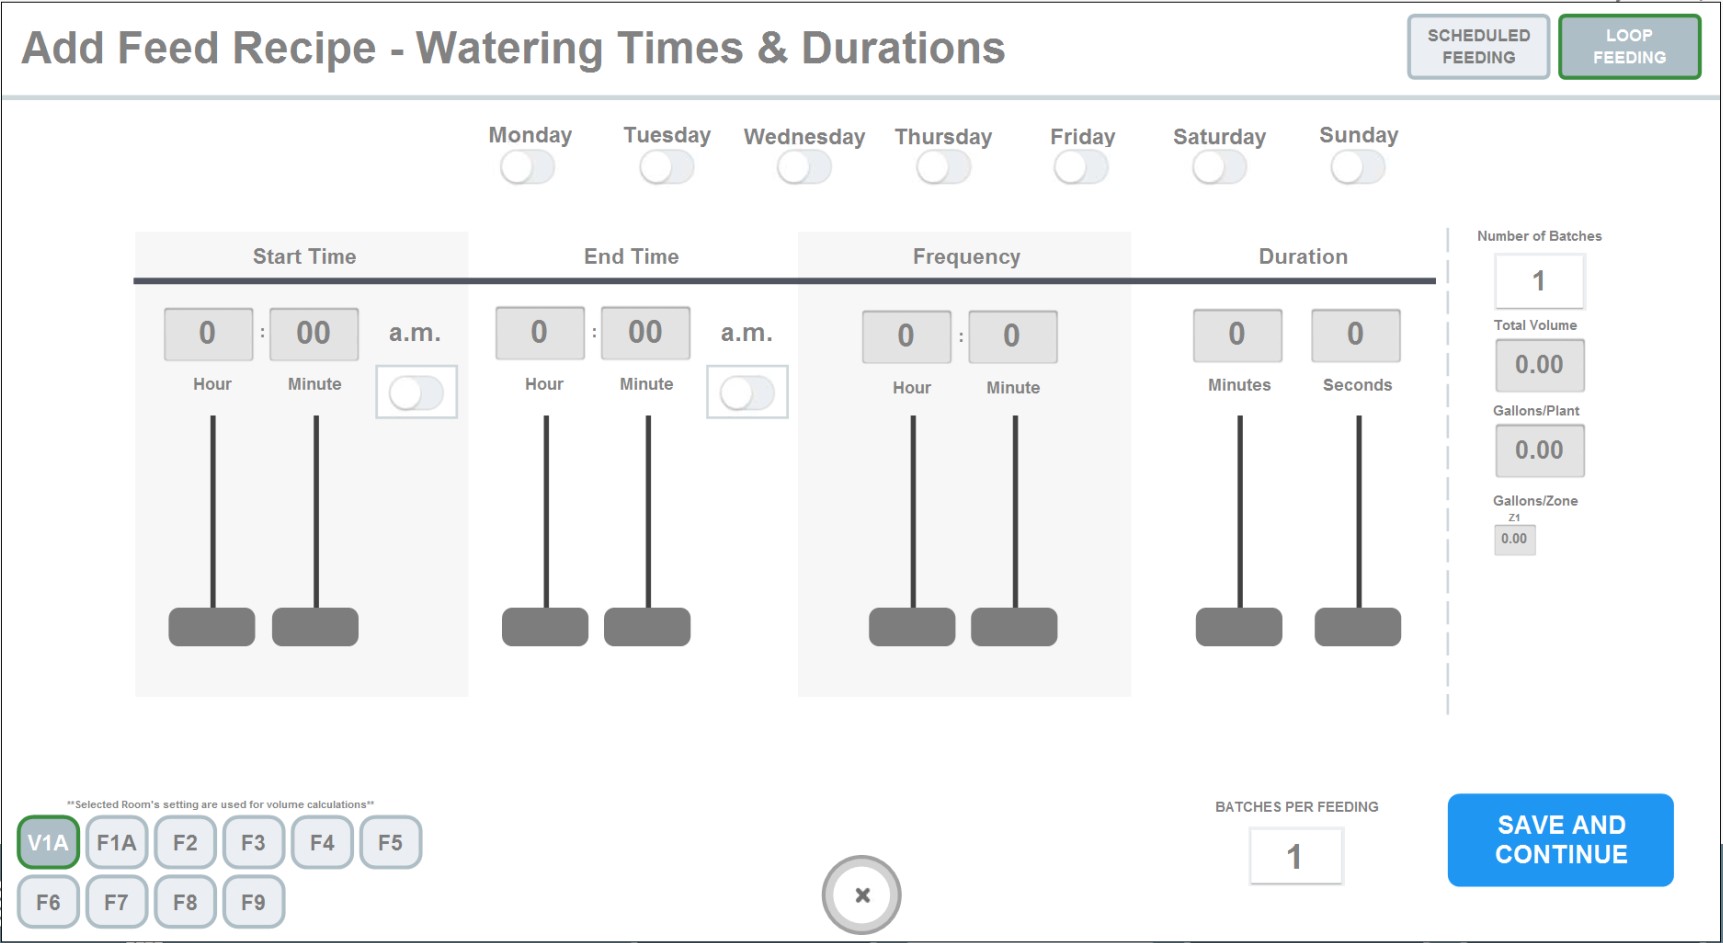
Loop Feeds. Some versions of the software allow for loop feeds. On the recipe page, loop feeds will display the days which the recipe will water, the start time and end time of the loop schedule, how often the recipe will run (frequency), and the duration of each feed.

This loop schedule example shows the recipe will feed every Monday, Wednesday and Friday starting at 9am every hour until 3pm. The batch will disperse equally to set zones for 20 minutes total.
Note: The "End Time" is the time the setting turns off. If you set the end time to 3pm, the recipe will not feed at 3pm. If you need the room to water the final feed at 3pm, set your "End Time" to something after 3pm, e.g. 3:02pm.

Nutrients Used. The nutrients you selected to dose into the recipe will appear here. You can add or remove them by editing the recipe and changing the nutrients and their dosage on PAGE 2.

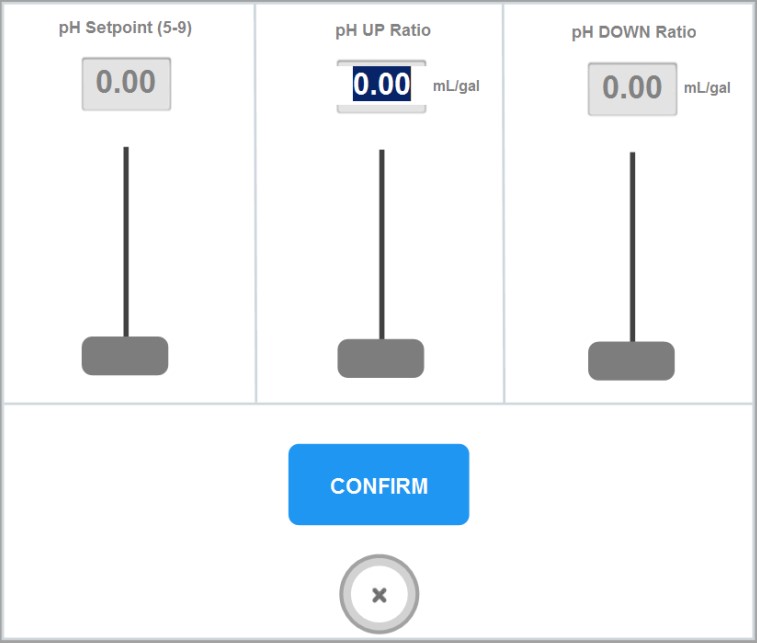
pH Setpoint. Your pH settings will display here. You can change the setpoint and its bandwidth, ratios (amount of pH up or down that will be dosed when attempting to stabilize), and whether or not you would like to disable this feature.

EC Setpoint. Your EC settings will display here. You can change the setpoint, the ppm 500 and ppm 700 scale conversion values, and whether or not you would like to enable/disable EC stabilzation.

Notes. Add notes to your recipe to remind yourself or your team members of important details. You can add notes by editing the recipe and entering them on PAGE 3.
3. Add Recipe

Add Recipe. Depending on the version of the software you are using, there may be an "Add Recipe" button in the upper right hand corner of the Recipe Builder, or you may need to navigate to an empty slot with the blue plus sign.
The two types of schedules you can run are "Scheduled Feeding" or "Loop Feeding." You can select them in the upper right hand corner. Depending on your software version, you may only have the "Scheduled Feeding" option.

Scheduled Feeding - Page 1
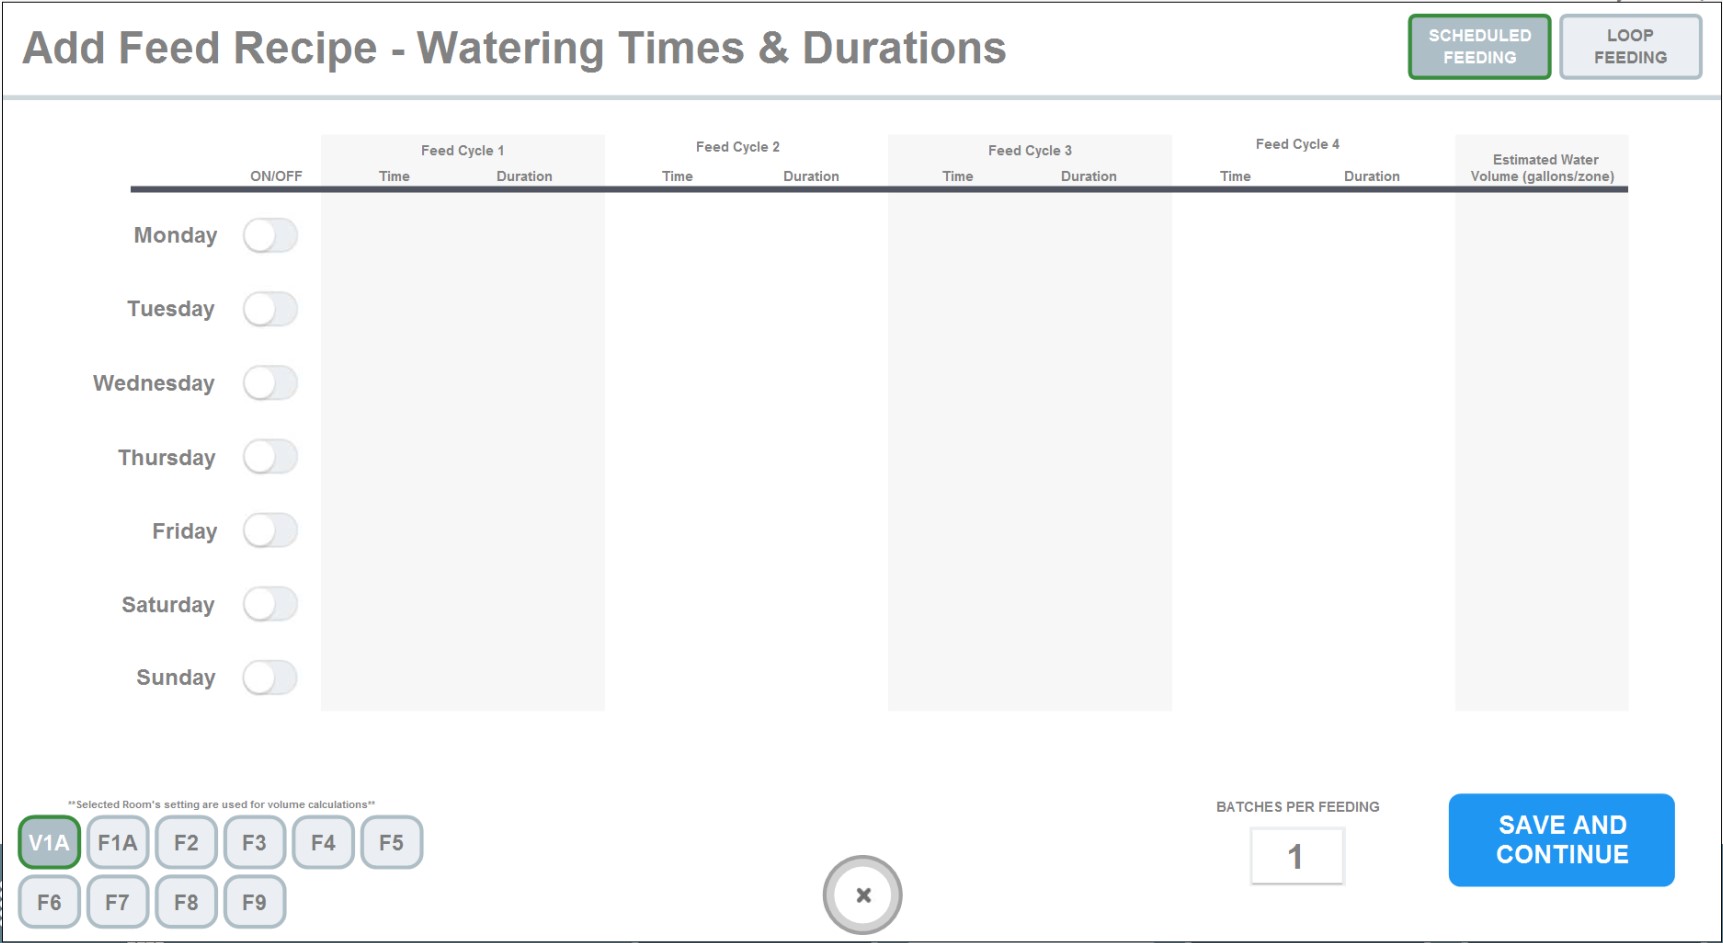
Scheduled Feeding. PAGE 1 of "Add Recipe" will allow you to start creating the schedule for your recipe. First you will need to select which days you would like to water by pressing the green toggle.
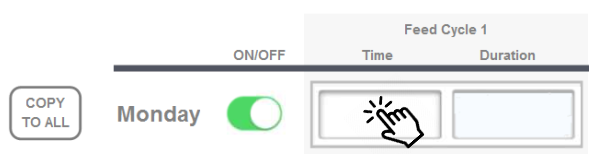
You can then click the empty box that appears under "Feed Cycle 1" to display a popup to enter times and duration:
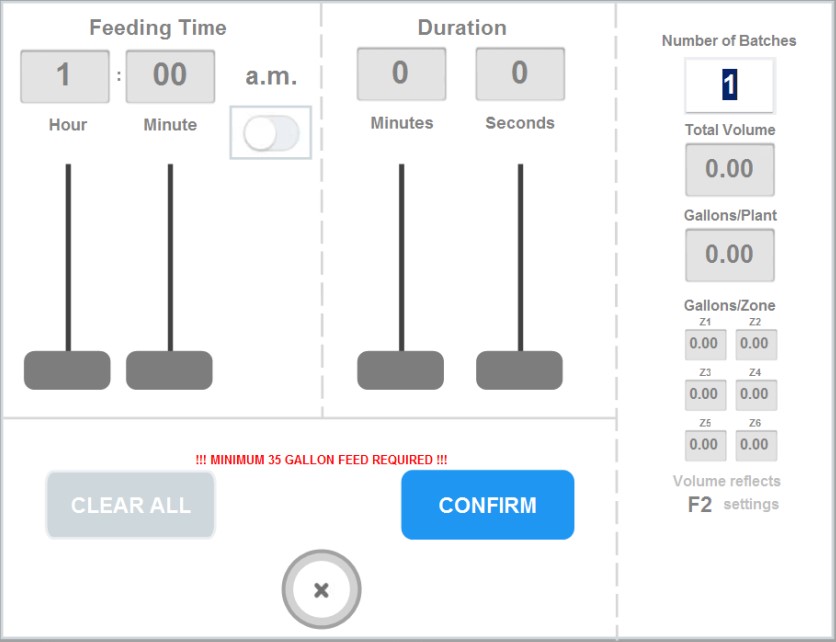
Feeding Time. Enter the time you'd like the recipe to start. You can press the box and enter a numeral or use the sliders. If you'd like p.m., use the toggle below "a.m."
Important!
The start time for recipes is the time the batch will start mixing. Depending on many factors, batches can take between 10 and 45 minutes so please calculate this into your schedules. If you schedule more than one recipe at the same start time (different rooms), the system will prioritize the recipes, usually from LEFT to RIGHT Room Order but this may vary per customer. Since it is an engineer programming setting, you can control this factor on your end by setting recipes with start times like 9:00am, 9:01am, 9:02am, etc. You can see which recipes are in the queue for the day by going to DASHBOARD.
The start time for recipes is the time the batch will start mixing. Depending on many factors, batches can take between 10 and 45 minutes so please calculate this into your schedules. If you schedule more than one recipe at the same start time (different rooms), the system will prioritize the recipes, usually from LEFT to RIGHT Room Order but this may vary per customer. Since it is an engineer programming setting, you can control this factor on your end by setting recipes with start times like 9:00am, 9:01am, 9:02am, etc. You can see which recipes are in the queue for the day by going to DASHBOARD.
Duration. Enter your duration by time using the numeric pad or sliders. Notice when you choose your duration by time, you can also see the volume (either total gallons sent to the room, or gallons per individual zone) updating on the right hand side.
As you change the durations, red text at the bottom denoting the minimum gallons that must be fed will disappear once you have selected the minimum.
As you change the durations, red text at the bottom denoting the minimum gallons that must be fed will disappear once you have selected the minimum.
After confirming the popup, back at the scheduling screen, you can continue to add Feed Cycles as necessary (up to 4), and toggle more days to feed. You can press "Copy To All" to copy the schedule to every day. Click "Save and Continue" to navigate to PAGE 2.


Number of Batches. If your recipe requires more gallons than your tank can hold, you will need to make additional consecutive batches of the same recipe. The number of batches will appear here and can be changed by editing the recipe and changing the number on PAGE 1 in the lower right hand corner.
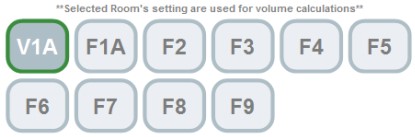
Room Setting. Make sure when setting up recipes to select which room it will be used in. This is because each room can be different sized, with different plant counts and emitters etc. so when the recipe is set up it can result in different volumes going to each room ( i.e. if you set the recipe up for 0.5 gallons per plant and Room 1 has 100 plants and Room 2 has 200 plants, the volumes would be different.)
Note: If you need the same recipe to run in more than one room, you will need to make a duplicate of that recipe and just change the Room Setting.
Note: If you need the same recipe to run in more than one room, you will need to make a duplicate of that recipe and just change the Room Setting.
Loop Feeding - Page 1
Loop Feeding. In the upper right hand corner of "Add Recipe" you can also select Loop Feeding (only available in certain software versions.) Loop feeding is a convenient way to water if you prefer to feed a room every hour regardless of schedules. Use the toggles to choose which days you'd like to loop feed, then add a start and end time using the numeric pad or sliders. For p.m. times, use the toggle below "a.m."
You can then select the frequency (feed every 30 minutes, 1 hour, 2 hours, etc.) and the duration by using numeric pads or sliders. Duration will be in time, but you can see the voume conversion to the right hand side update as you change this.
You can then select the frequency (feed every 30 minutes, 1 hour, 2 hours, etc.) and the duration by using numeric pads or sliders. Duration will be in time, but you can see the voume conversion to the right hand side update as you change this.
Important!
The start time for loop recipes is the time the batch will start mixing. Depending on many factors, batches can take between 10 and 45 minutes so please calculate this into your schedules. For example, if you want to feed hourly but your recipe takes 45 minutes, your room may not feed at 9am as intended, but instead at 9:45am and so on.
The start time for loop recipes is the time the batch will start mixing. Depending on many factors, batches can take between 10 and 45 minutes so please calculate this into your schedules. For example, if you want to feed hourly but your recipe takes 45 minutes, your room may not feed at 9am as intended, but instead at 9:45am and so on.
Room Setting. Make sure when setting up recipes to select which room it will be used in. This is because each room can be different sized, with different plant counts and emitters etc. so when the recipe is setup it can result in different volumes going to each room ( i.e. if you set the recipe up for 0.5 gallons per plant and Room 1 has 100 plants and Room 2 has 200 plants, the volumes would be different.)
Note: If you need the same recipe to run in more than one room, you will need to make a duplicate of that recipe and just change the Room Setting.
Note: If you need the same recipe to run in more than one room, you will need to make a duplicate of that recipe and just change the Room Setting.
Scheduled & Loop Feeding - Page 2
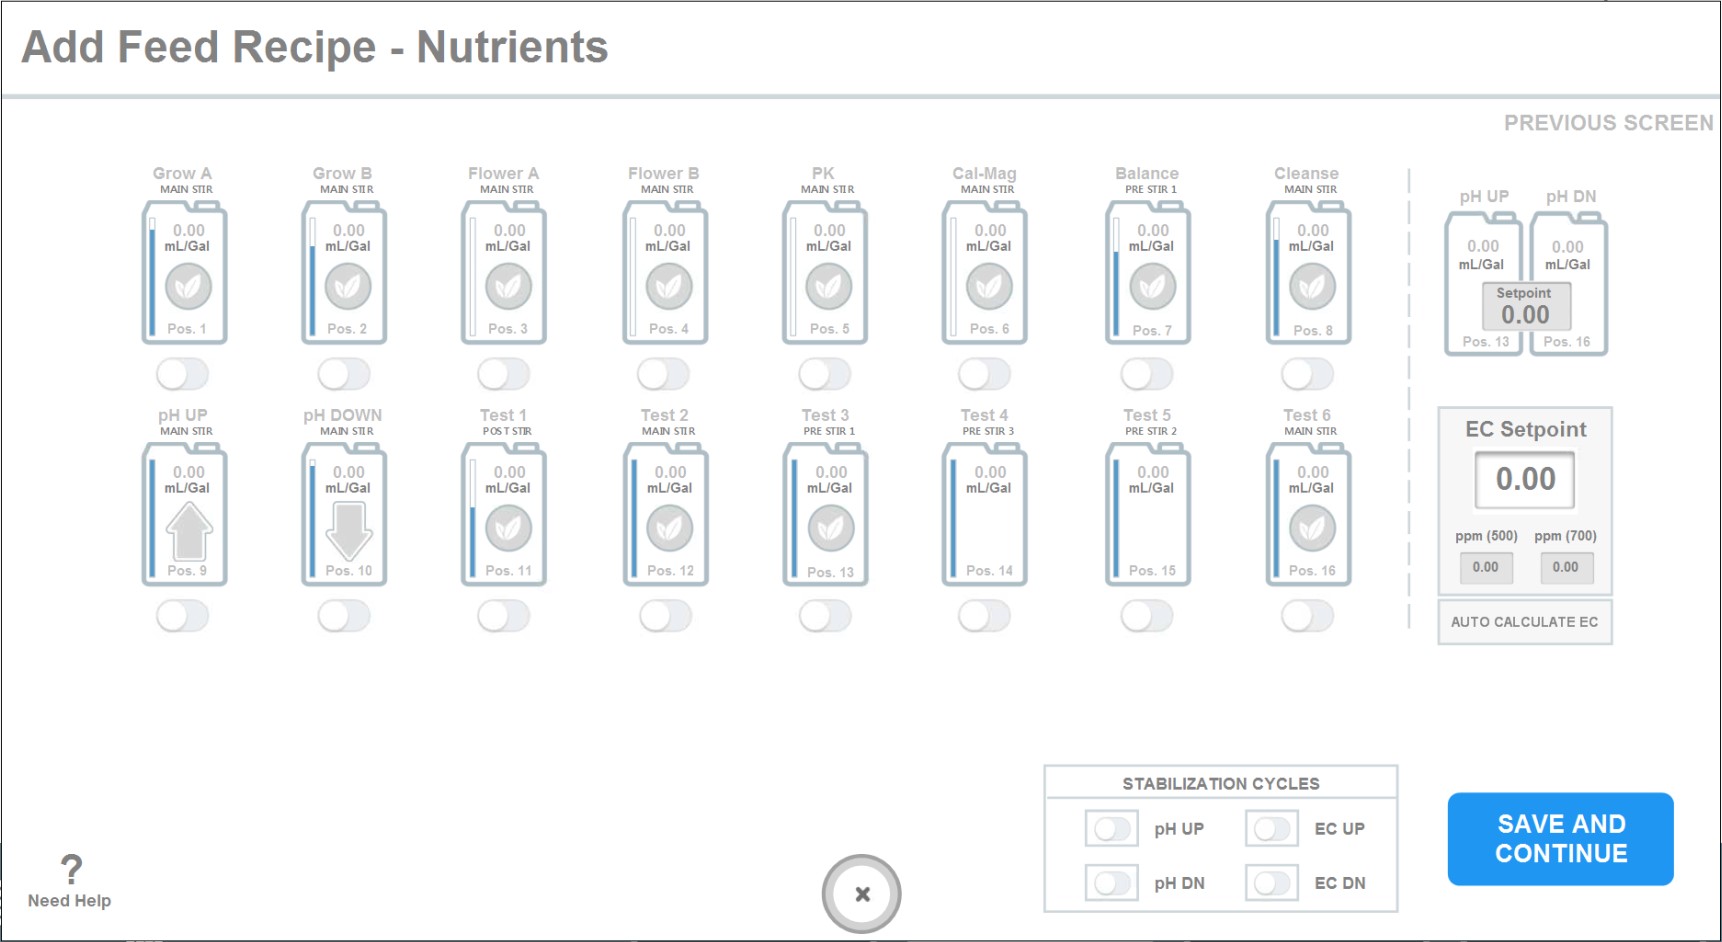
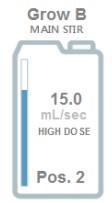
Add Nutrients. On the second page of "Add Recipe" you can select the nutrients you'd like to add to your recipe by selecting the toggle below each nutrient. Once the toggle is green, click on the nutrient bottle icon to change the dosage ratio in mL/gal.

You will notice each nutrient bottle icon displays text with the nutrient name, stir position, pump type and pump position. These details cannot be changed from the Recipe Builder. Please see CONFIGURATION on how to change nutrient details.

If you want to avoid the stabilization process, you can add pH up or down to the main stir nutrients on the recipe page. This requires testing and fine tuning on your end to find the perfect dosage combination.


pH Setpoint. You can change the pH setpoint and up/down ratios by clicking on the gray box. The ratio is the amount of pH up/down in mL/gal you'd like the machine to add every attempt during stabilization. Start with something low like .01-.04 when testing new formulations.

EC Setpoint. Change the EC setpoint by clicking on the white box. Ppm 500 and ppm 700 values will also be shown.
Auto Calculate. Use Rhythm's Auto Calculate EC feature if you'd like the system to calculate what the EC might be based on the nutrients you added. In order for this to work, you must do some legwork to figure out what each nutrient's EC/ppm would be per 1 mL/gallon. You then must set it up by going to Rhythm Logo > Configuration > Nutrients > EC Calculation. See NUTRIENT CONFIGURATION for full details on this process.
Auto Calculate. Use Rhythm's Auto Calculate EC feature if you'd like the system to calculate what the EC might be based on the nutrients you added. In order for this to work, you must do some legwork to figure out what each nutrient's EC/ppm would be per 1 mL/gallon. You then must set it up by going to Rhythm Logo > Configuration > Nutrients > EC Calculation. See NUTRIENT CONFIGURATION for full details on this process.
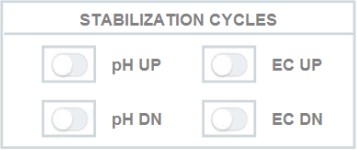
Stabilization Cycles. Enable or disable pH or EC stabilization during the mixing process by using the toggles here. This is helpful when some recipes require it and some don't. To read more about the stabilization process, please see the Main Overview section.

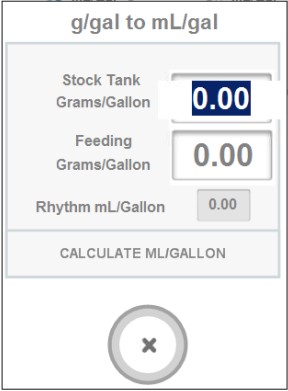
Feeding Conversions for Powdered Nutrient Mixtures. Most soluble fertilizers will use grams per gallon feed schedules but Rhythm requires a mL/gallon conversion. You can click "Need Help?" for an easy conversion calculator.
Scheduled & Loop Feeding - Page 3

On PAGE 3, you can denote whether your recipe is a Veg or Flower type. This is important only if you enabled EC Stabilization (a Veg recipe will dose from your designated Veg nutrient and a Flower recipe will dose from your designated Flower nutrient(s). You can edit these in Rhythm Logo > Configuration > Nutrients > NUTRIENT # > Flower/Veg Base.
Name your recipe and enter any notes you'd like you or your team to remember.
Name your recipe and enter any notes you'd like you or your team to remember.
Note: If you click the "x" on the bottom of the page during any of the Edit Recipe process, none of your changes will be saved. You must click "Save & Continue" or "Save Recipe" to save changes made.


.svg)