
SOFTWARE USER GUIDE
Configuration

Rooms

Nutrients

pH/EC

Process

Email

Admin
1. Rooms Configuration
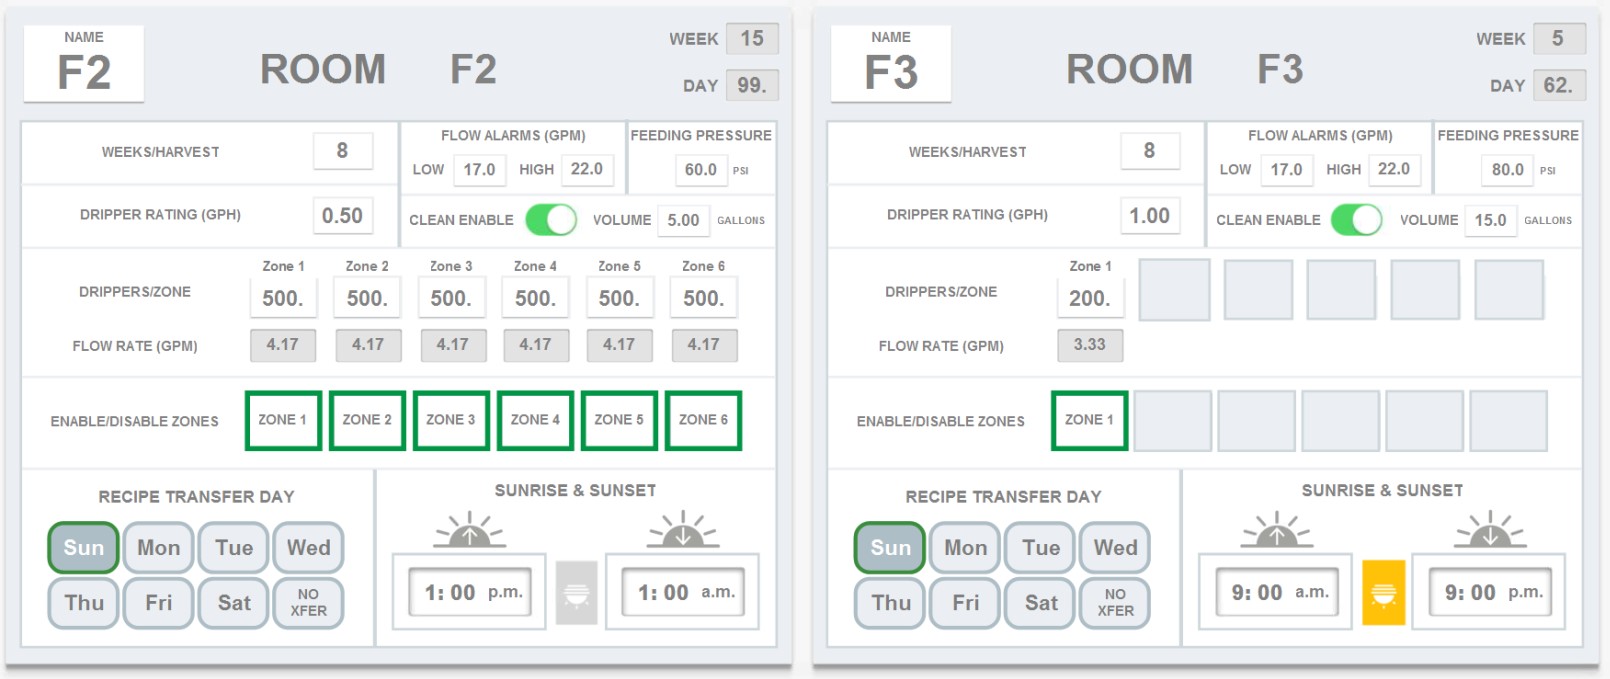
Please note: All of the following settings are room specific. If you'd like them to affect all rooms, please go into each room's settings and change them all.

Room Name. You can press/click directly on the Room Name to change it (max 3 characters).
Day/Week Progress. The week and day the room is in cannot be edited in CONFIGURATION. It must be done in the FEED SCHEDULER to avoid affecting schedules.
Day/Week Progress. The week and day the room is in cannot be edited in CONFIGURATION. It must be done in the FEED SCHEDULER to avoid affecting schedules.

Weeks/Harvest. Edit the number of weeks your room has until harvest. For Veg rooms, you can enter the amount of weeks the plants remain in veg until you turn over the room for the next group. Editing this number will only populate the room gauge on the ROOM OVERVIEW page and isn't required for complete functionality.

Dripper Rating. Enter your dripper rating in gallons per hour. This can be found by contacting your irrigation manufacturer.
Important!
Entering your dripper rating and emitters per plant is important because drippers (emitters) drive flow rates, and flow rates drive system functionality in calculating zone duration times to volume with accuracy.
Entering your dripper rating and emitters per plant is important because drippers (emitters) drive flow rates, and flow rates drive system functionality in calculating zone duration times to volume with accuracy.
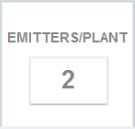
Emitters per Plant. On newer versions of software, emitters/plant will be displayed here on the room level. You will also need to enter this information.
Important!
Entering your dripper rating and emitters per plant is important because drippers (emitters) drive flow rates, and flow rates drive system functionality in calculating zone duration times to volume with accuracy.
Entering your dripper rating and emitters per plant is important because drippers (emitters) drive flow rates, and flow rates drive system functionality in calculating zone duration times to volume with accuracy.
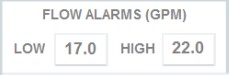
Flow Alarms. You will receive notification alarms for low or high flow rates. Enter the low/high values for notifications here in gallons per minute. Low flow rates can indicate clogged filters or emitters or some other plumbing restriction, while high flow rates can indicate a cracked/broken pipe or faulty filters.

Feeding Pressure. Rhythm allows you to dynamically change your feeding pressure per room. The goal is to optimize watering. This value will change based on the plumbing distance from your room to the Rhythm system. Generally, rooms that are further away need higher pressure. The accepted values are between 20 PSI and 100 PSI. Please contact your Rhythm representative to find out what your specific recommended values are.

Clean Enable/Disable. Clean Cycle is a feature that triggers after you make a batch and feed a room. The system will flush out the contents of the tank and inline pipes. Before the room level clean flush can be enabled, first go to the "Process" tab in CONFIGURATION and enable "Clean Cycle" on the global level. You can then go to the room level and enable the clean process here.
For the gallons used, generally, rooms that are closer to the Rhythm system need less gallons to completely flush out, but you can experiment with different amounts to see what works best for certain rooms.
For the gallons used, generally, rooms that are closer to the Rhythm system need less gallons to completely flush out, but you can experiment with different amounts to see what works best for certain rooms.

Zone Details. Setting up your drippers per zone is important when first configuring your system.
Important!
In order to obtain accurate system calculations, please make sure that you have filled out "Dripper Rating," "Emitters/Plant," and "Drippers/Zone." Rhythm uses these three numbers to calculate zone duration times to volume with accuracy. Flow rate (GPM) will be auto-calculated using the formula GPH (x) No. of emitters (/) 60.
In order to obtain accurate system calculations, please make sure that you have filled out "Dripper Rating," "Emitters/Plant," and "Drippers/Zone." Rhythm uses these three numbers to calculate zone duration times to volume with accuracy. Flow rate (GPM) will be auto-calculated using the formula GPH (x) No. of emitters (/) 60.

Zones Enable/Disable. You can select the specific zones you'd like to water. Zones outlined in green will water.
Note: If you activate/deactivate the zones from the CONFIGURATION screen, the changes will remain permanent for all room recipes unless you A) temporarily change them from the MAIN OVERVIEW SCREEN while a recipe is running or B) change them again in CONFIGURATION settings.
Note: If you activate/deactivate the zones from the CONFIGURATION screen, the changes will remain permanent for all room recipes unless you A) temporarily change them from the MAIN OVERVIEW SCREEN while a recipe is running or B) change them again in CONFIGURATION settings.
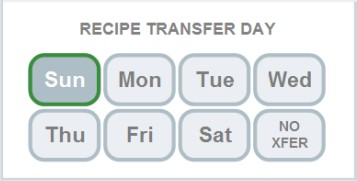
Recipe Transfer Day. When you create recipes in the FEED SCHEDULER, you can preload recipes for each week of your harvest. Based on the settings here, the recipe will automatically change to the next recipe (i.e. Week 1 Flower to Week 2 Flower) AFTER the day selected i.e. if you select a Tuesday transfer day, Tuesday is the LAST DAY the recipe will run and will transfer to the next recipe at Sunrise on the following day, Wednesday.
You can select "No Xfer" if you'd like to manually change recipes yourself.
You can select "No Xfer" if you'd like to manually change recipes yourself.

Sunrise & Sunset. Enter your room's sunrise time (when the lights turn on) and sunset time (when the lights turn off). Rhythm requires this information because it changes dates using this. Every sunrise will index a new day. If this is not configured, your room will show alert text on the ROOM OVERVIEW page.
Note: If you have your veg lights on for 24 hours a day, please set your Sunrise to 12am and your Sunset to 11:59pm.
Note: If you have your veg lights on for 24 hours a day, please set your Sunrise to 12am and your Sunset to 11:59pm.
2. Nutrients Configuration
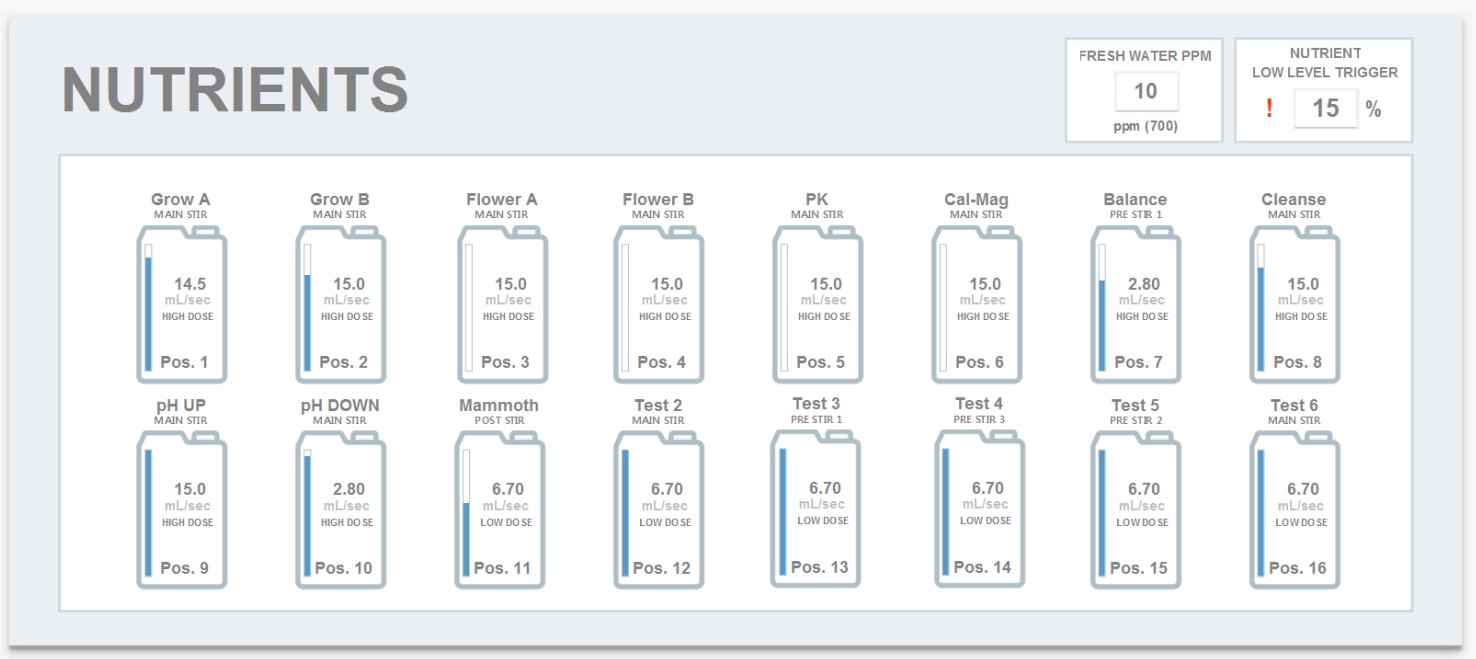
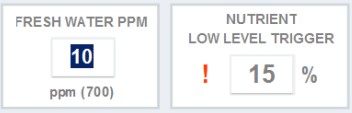
Fresh Water ppm Level. The type of fresh water you use (reverse osmosis, tap, well water, etc.) can have different ppm base values. Measure your water in ppm 700 scale and enter the value here. This will be used in batch calculations.
Nutrient Low Level Trigger. When your nutrient bottle is about to be empty, the system will alert you to refill. Set up the percentage trigger amount here.
Nutrient Low Level Trigger. When your nutrient bottle is about to be empty, the system will alert you to refill. Set up the percentage trigger amount here.
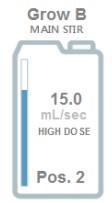
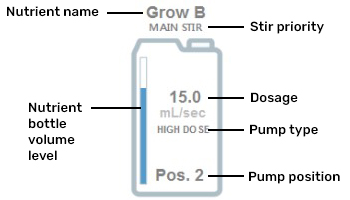
Nutrient Icon. The nutrient container icon will show the nutrient name, stir priority, container's nutrient volume, dosage rate in mL/second, dosing pump type, and pump position.
Click directly on the nutrient container icon to reveal the configuration settings popup:

Your individual nutrients can be added and edited here. Positions are based on which dosing pump position the nutrient pulls from. You can learn more about physical nutrient position placements on the NUTRIENTS & DOSING PUMP HARDWARE page.
Setup. 1) Enter the name of your nutrient.
2) Select the type of nutrient:
• Veg and Flower Base nutrients will be used in EC up stabilization (you may not have this enabled but it is still helpful to classify these.)
• pH up and down nutrients will be used during pH stabilization. You might use another nutrient in place of pH up or down (i.e silica or household recipes), but classify them as pH up/down so that Rhythm may correctly use them during stabilization.
• Pre-stir nutrients will add and get stirred before any main nutrients. Most customers use this for silica because of its mixing properties.
• Post-stir nutrients will add AFTER stabilization. This is commonly used for nutrients like Mammoth Microbes.
3) Fill out your nutrient bottle size (i.e. 5 gals, 55 gals) and the current estimated volume inside. This will be used during the mixing phase to let you know if you are running low.
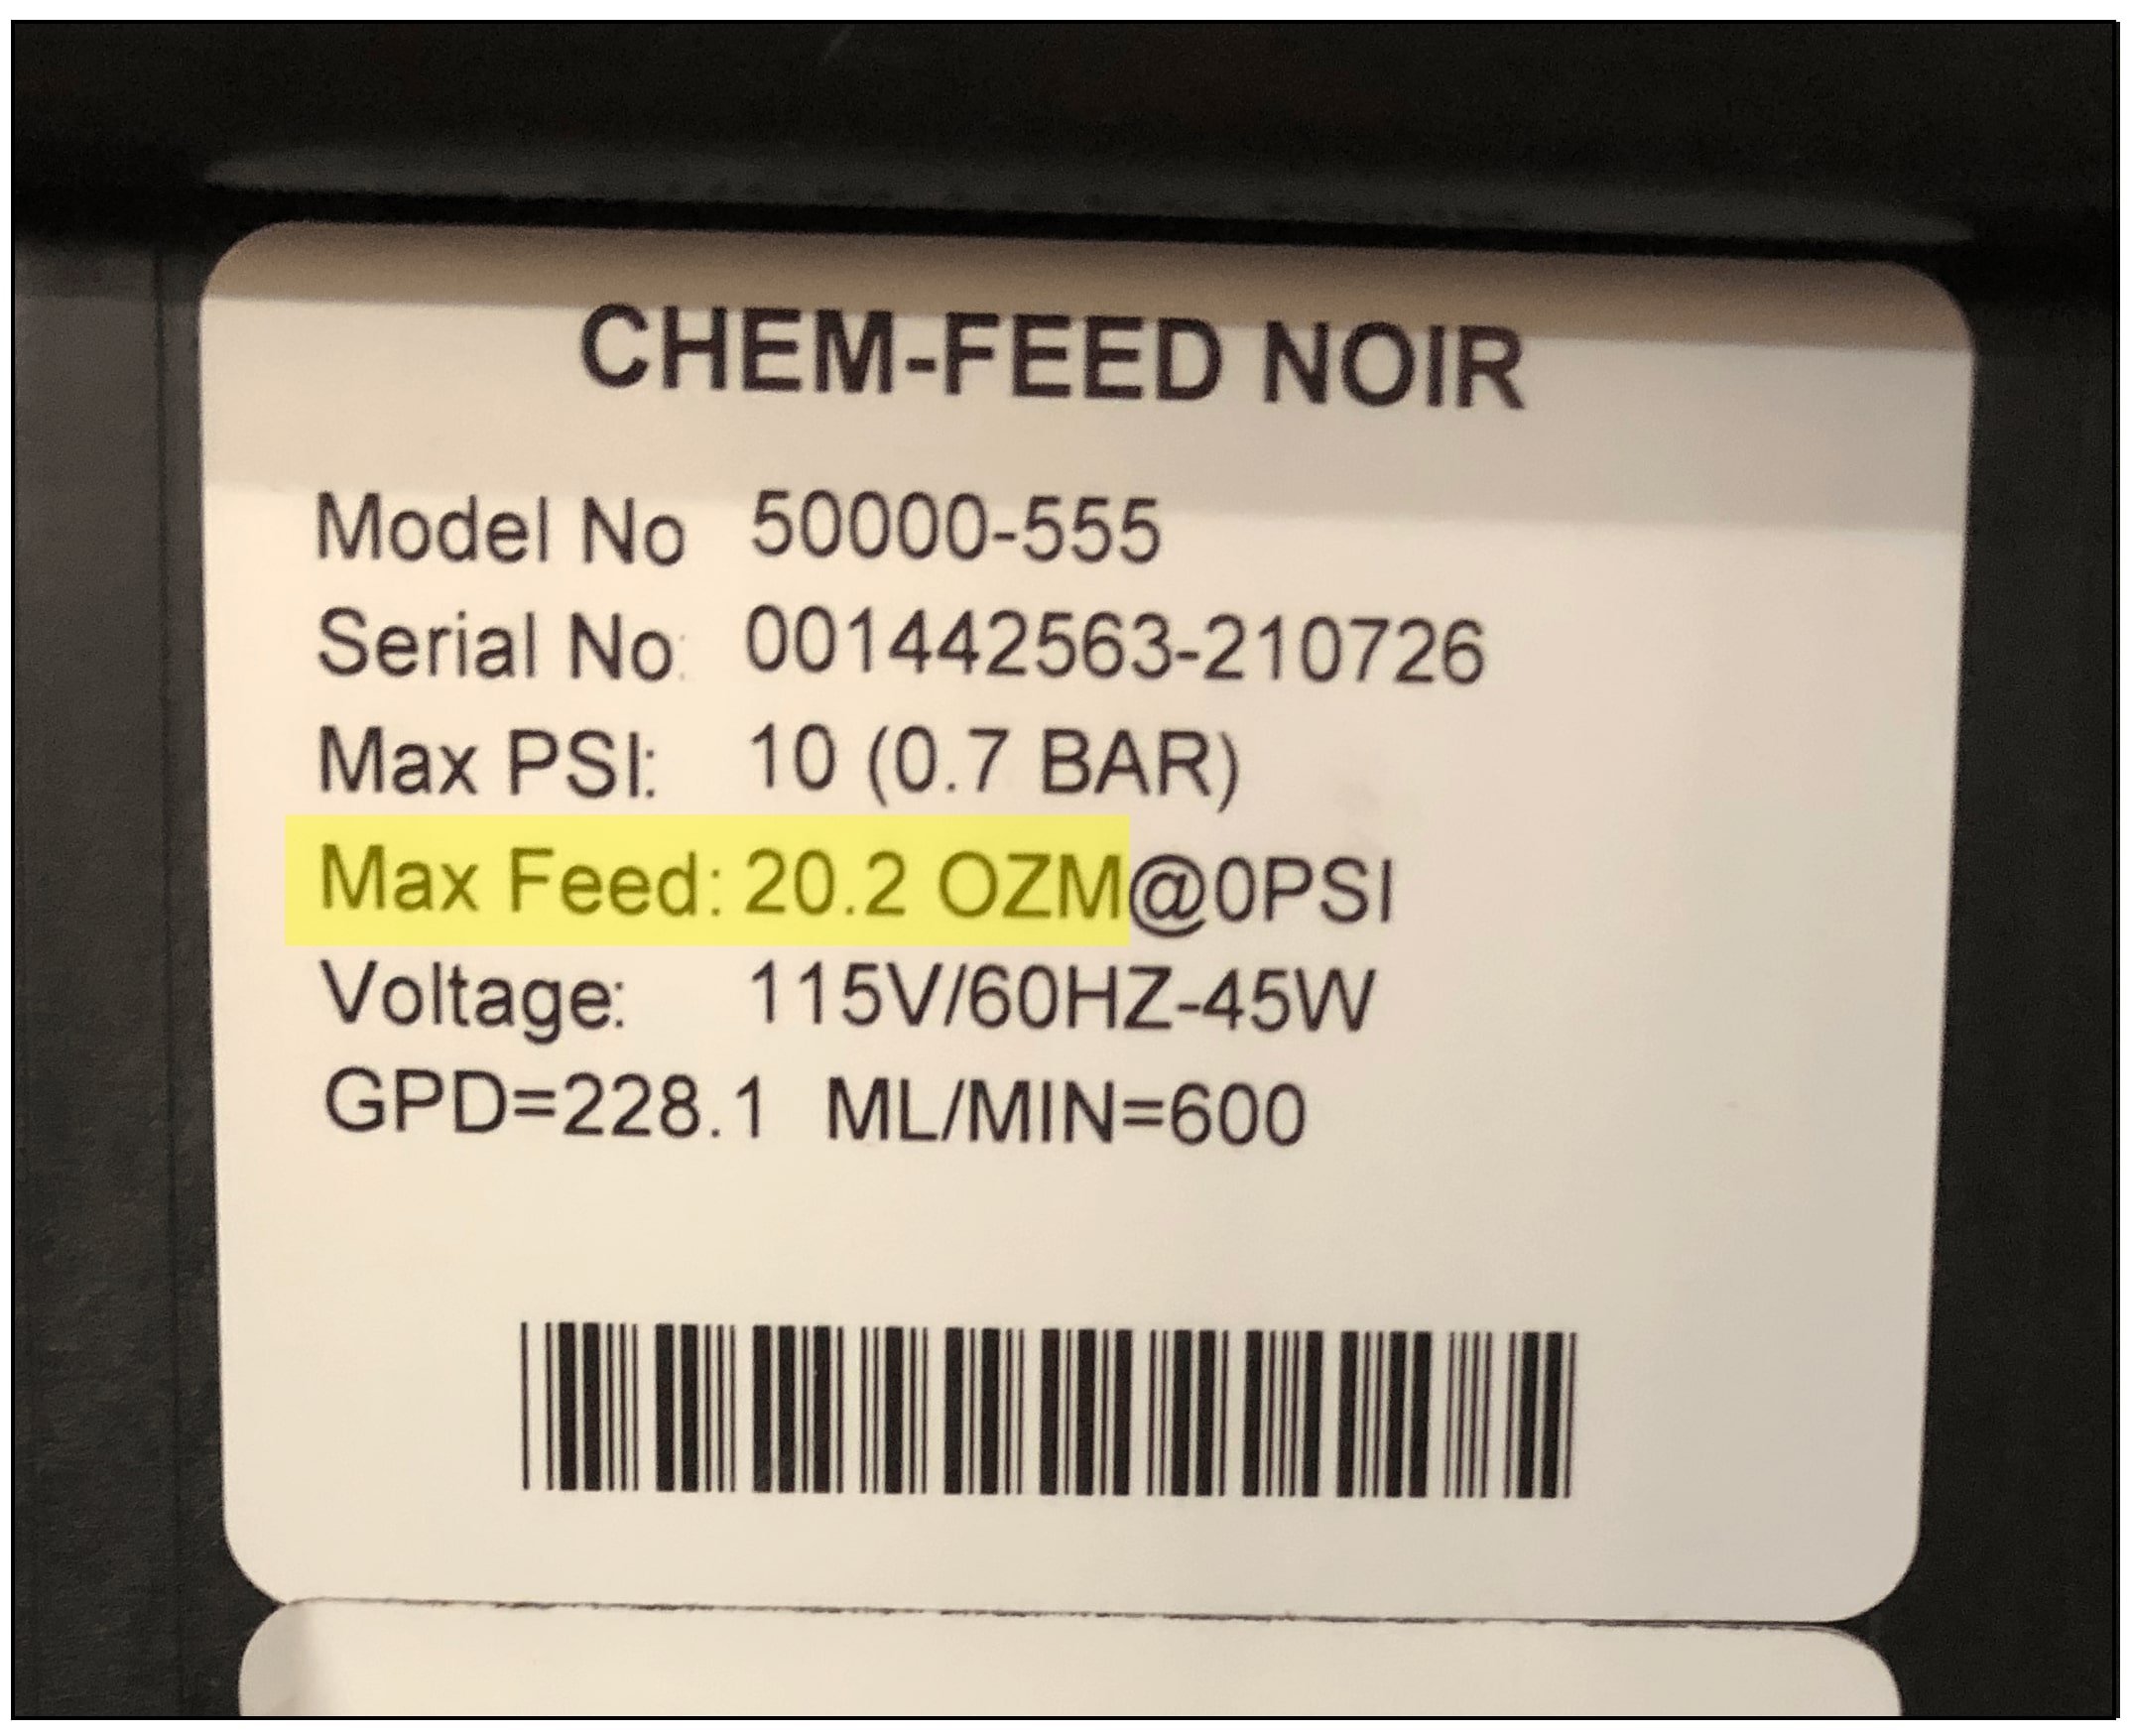
4) Enter the pump type for this Position. This can be found by looking directly on your pump. A Rhythm rep may have labeled the individual pump with "high," "mid," or "low" or you can look on the label. Look for the text "Max Feed." High dose pumps will be labeled as 20.2 oz/min. Mid dose pumps will be 13.98 oz/min. Low dose pumps will be 5.9 oz/min.
Setup. 1) Enter the name of your nutrient.
2) Select the type of nutrient:
• Veg and Flower Base nutrients will be used in EC up stabilization (you may not have this enabled but it is still helpful to classify these.)
• pH up and down nutrients will be used during pH stabilization. You might use another nutrient in place of pH up or down (i.e silica or household recipes), but classify them as pH up/down so that Rhythm may correctly use them during stabilization.
• Pre-stir nutrients will add and get stirred before any main nutrients. Most customers use this for silica because of its mixing properties.
• Post-stir nutrients will add AFTER stabilization. This is commonly used for nutrients like Mammoth Microbes.
3) Fill out your nutrient bottle size (i.e. 5 gals, 55 gals) and the current estimated volume inside. This will be used during the mixing phase to let you know if you are running low.
4) Enter the pump type for this Position. This can be found by looking directly on your pump. A Rhythm rep may have labeled the individual pump with "high," "mid," or "low" or you can look on the label. Look for the text "Max Feed." High dose pumps will be labeled as 20.2 oz/min. Mid dose pumps will be 13.98 oz/min. Low dose pumps will be 5.9 oz/min.
Recipe EC Calculations. Most growers enter their own EC setpoints, but in the case you'd like Rhythm to Auto Calculate EC, you can configure your settings here. Measure 1ml of your nutrient and put it inside 1 gallon of water. Stir vigorously and check the ppm value (scale 700) and enter the value under "Nutrient + Water =". The value under "Water=" will self-populate from your setting under the "NUTRIENTS" tab in CONFIGURATION in the upper right hand corner.
Note: You must do the 1ml/1gal nutrient test and fill out the "Recipe EC Calculations" for every nutrient you intend to use. Click on the nutrient bottle icon for separate configurations.
You will then be able to go to each RECIPE and press "Auto Calculate EC" on page 2 to calculate the total estimated EC for that recipe.

Calibration. Every dosing pump must be calibrated at the beginning and occasionally during use. Please view our full guide on calibrating dosing pumps in NUTRIENTS & DOSING PUMPS HARDWARE.
Calibration time is recommended to be at 100 seconds for better accuracy but please note for high dose nutrients, you will want to use a large catch container, like a 2000ml measuring cup. Once you press "Start" you will have 10 seconds before the nutrient starts dispensing (it may be helpful to have a second person already at the tank). Once the nutrient you are trying to calibrate has finished dispensing for 100 seconds, record the amount inside your measuring cup in the "Enter Volume Dispensed" box and press confirm. This will populate a calibration value Rhythm will use to dispense your nutrients more accurately.
Calibration time is recommended to be at 100 seconds for better accuracy but please note for high dose nutrients, you will want to use a large catch container, like a 2000ml measuring cup. Once you press "Start" you will have 10 seconds before the nutrient starts dispensing (it may be helpful to have a second person already at the tank). Once the nutrient you are trying to calibrate has finished dispensing for 100 seconds, record the amount inside your measuring cup in the "Enter Volume Dispensed" box and press confirm. This will populate a calibration value Rhythm will use to dispense your nutrients more accurately.
3. pH/EC Configuration
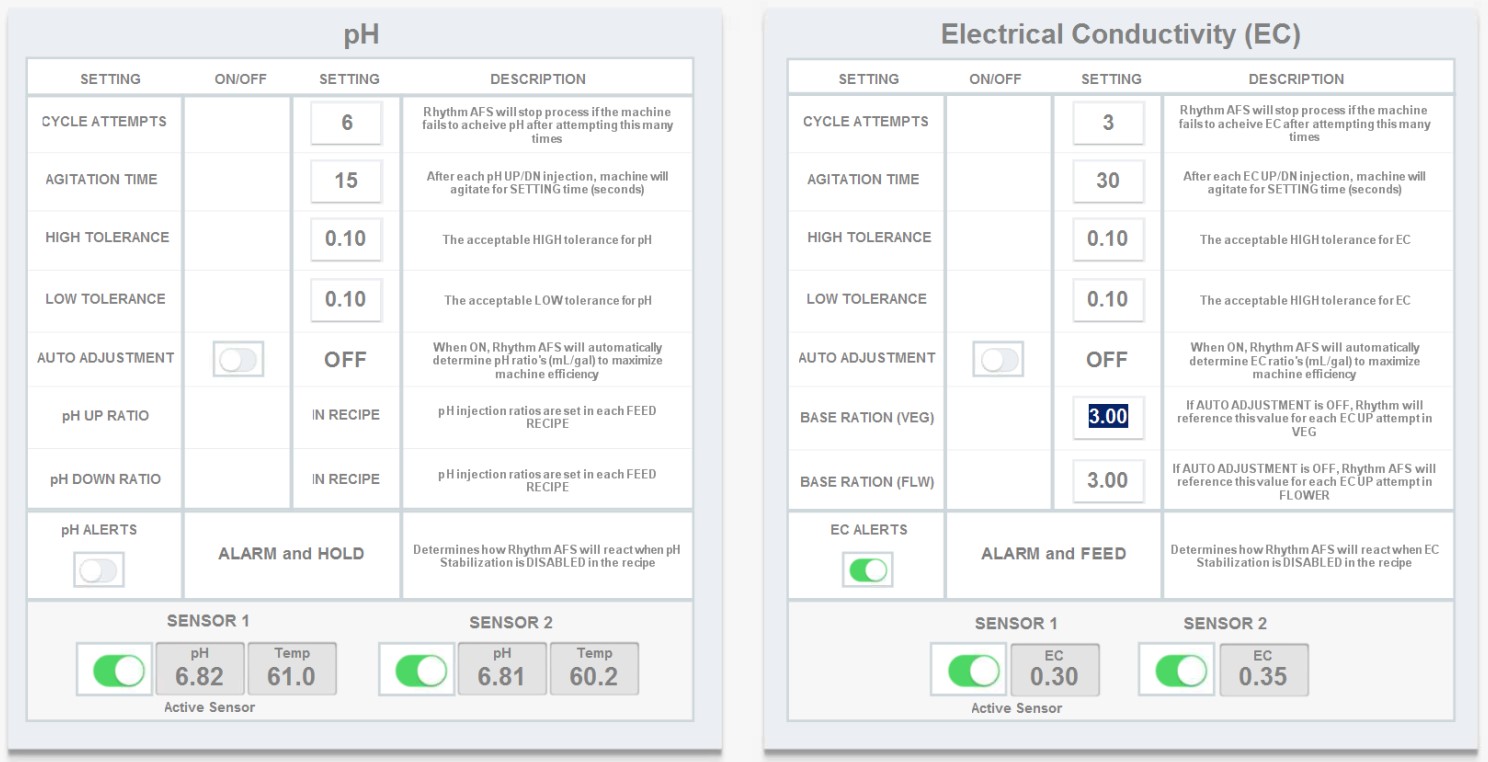
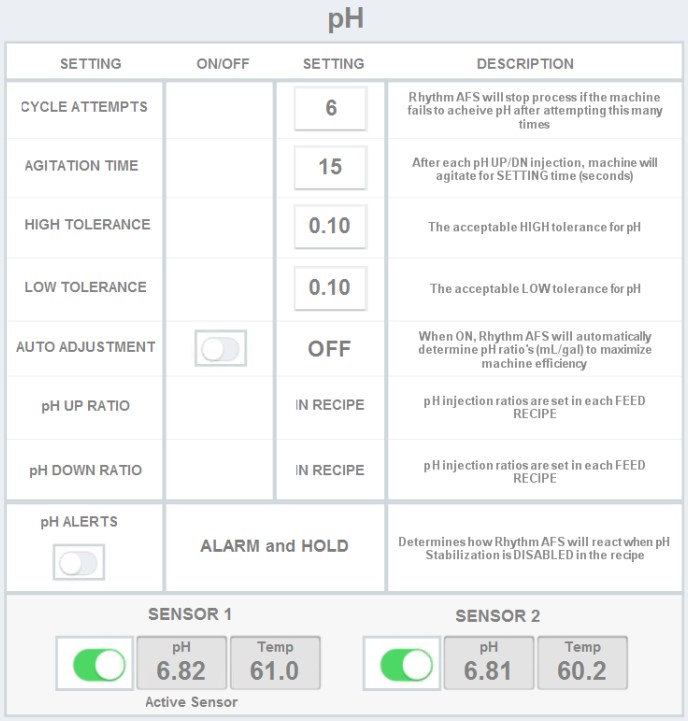
pH Settings. There are several pH settings you can edit to fine tune your stabilization process:
Cycle Attempts. Rhythm will stop all processes if the machine fails to achieve your desired pH after attempting this many times. We recommend a minimum of 6 cycles. If it does not achieve its goal, it will fault to a critical alert which requires user action to continue. You can tweak this setting to what works best for your recipes/time schedule.
Agitation Time. After each pH up/down injection, the machine will agitate for this long in SECONDS. The recommended setting is 60-120 seconds. If you are consistently making larger batches (i.e. 300 gallons), more time is better.
High Tolerance. Your high tolerance is how much OVER your desired pH you're willing to accept as a PASS i.e. if you'd like your recipe to feed at 6.0 pH, a .10 high tolerance will PASS your recipe if it achieves 6.1 pH.
Low Tolerance. Your low tolerance is how much UNDER your desired pH you're willing to accept as a PASS i.e. if you'd like your recipe to feed at 6.0 pH, a .20 low tolerance will PASS your recipe if it achieves 5.8 pH.
Auto Adjustment. Toggle this ON if you'd like Rhythm to automatically determine the pH ratios in mL/gal to maximize efficiency. Please note it is recommended that you don't use this setting at first. It is better that you experiment with pH ratios yourself so you can understand how the machine works.
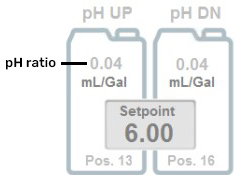
pH Up/Down Ratio. This setting is disabled on the global level. Please go to the recipe level to change this value. It is located on PAGE 2 of the RECIPE PAGE when you add or edit a recipe in the upper right hand corner:
Agitation Time. After each pH up/down injection, the machine will agitate for this long in SECONDS. The recommended setting is 60-120 seconds. If you are consistently making larger batches (i.e. 300 gallons), more time is better.
High Tolerance. Your high tolerance is how much OVER your desired pH you're willing to accept as a PASS i.e. if you'd like your recipe to feed at 6.0 pH, a .10 high tolerance will PASS your recipe if it achieves 6.1 pH.
Low Tolerance. Your low tolerance is how much UNDER your desired pH you're willing to accept as a PASS i.e. if you'd like your recipe to feed at 6.0 pH, a .20 low tolerance will PASS your recipe if it achieves 5.8 pH.
Auto Adjustment. Toggle this ON if you'd like Rhythm to automatically determine the pH ratios in mL/gal to maximize efficiency. Please note it is recommended that you don't use this setting at first. It is better that you experiment with pH ratios yourself so you can understand how the machine works.
pH Up/Down Ratio. This setting is disabled on the global level. Please go to the recipe level to change this value. It is located on PAGE 2 of the RECIPE PAGE when you add or edit a recipe in the upper right hand corner:
pH Alerts. Use this toggle to decide how you'd like the system to proceed in the case it doesn't achieve pH stabilization:

Disabling pH Alerts will apply "Alarm and Hold." This means if the machine does not achieve stabilization, it will display an alarm, notify you via email/text, and HOLD until action is taken.

Enabling pH Alerts will apply "Alarm and Feed." This means if the machine does not achieve stabilization, it will display an alarm, notify you via email/text, and continue feeding.
Your machine is equipped with redundant pH sensors. You can enable or disable one of them in case one of the sensors is faulty and you need the machine to read from a certain sensor only by using the toggle to the left.

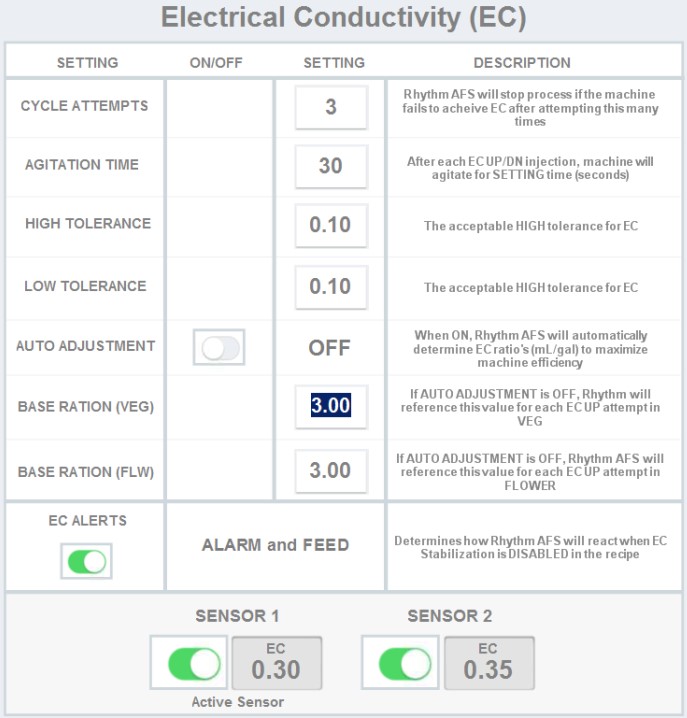
EC Settings. There are several EC settings you can edit to fine tune your stabilization process:
Cycle Attempts. Rhythm will stop all processes if the machine fails to achieve your desired EC after attempting this many times. We recommend a minimum of 6 cycles. If it does not achieve its goal, it will fault to a critical alert which requires user action to continue. You can tweak this setting to what works best for your recipes/time schedule.
Agitation Time. After each EC up/down injection, the machine will agitate for this long in SECONDS. The recommended setting is 60-120 seconds. If you are consistently making larger batches (i.e. 300 gallons), more time is better.
High Tolerance. Your high tolerance is how much OVER your desired EC you're willing to accept as a PASS i.e. if you'd like your recipe to feed at 2.1 EC, a .10 high tolerance will PASS your recipe if it achieves 2.2 EC.
Low Tolerance. Your low tolerance is how much UNDER your desired EC you're willing to accept as a PASS i.e. if you'd like your recipe to feed at 1.2 EC, a .20 low tolerance will PASS your recipe if it achieves 1.0 EC.
Auto Adjustment. Toggle this ON if you'd like Rhythm to automatically determine the EC ratios in mL/gal to maximize efficiency.
Base Ratio (Veg). If "Auto Adjustment" is OFF, Rhythm will reference this value for each EC up attempt in Veg Recipes i.e. if you set it to 3.0, and your recipe's EC is off, it will dose 3ml of your VEG BASE nutrient to try and achieve stabilization (3ml PER ATTEMPT). You can choose which nutrient doses as VEG BASE from the "Nutrients" tab in CONFIGURATION.
Base Ration (Flw). If "Auto Adjustment" is OFF, Rhythm will reference this value for each EC up attempt in Flower Recipes i.e. if you set it to 3.0, and your recipe's EC is off, it will dose 3ml of your FLOWER BASE nutrient to try and achieve stabilization (3ml PER ATTEMPT). You can choose which nutrient doses as FLOWER BASE from the "Nutrients" tab in CONFIGURATION.
EC Alerts. Use this toggle to decide how you'd like the system to proceed in the case it doesn't achieve EC stabilization:

Disabling EC Alerts will apply "Alarm and Hold." This means if the machine does not achieve stabilization, it will display an alarm, notify you via email/text, and HOLD until action is taken.

Enabling EC Alerts will apply "Alarm and Feed." This means if the machine does not achieve stabilization, it will display an alarm, notify you via email/text, and continue feeding.
Your machine is equipped with redundant EC sensors. You can enable or disable one of them in case one of the sensors is faulty and you need the machine to read from a certain sensor only by using the toggle to the left.

4. Process / Alert Configuration
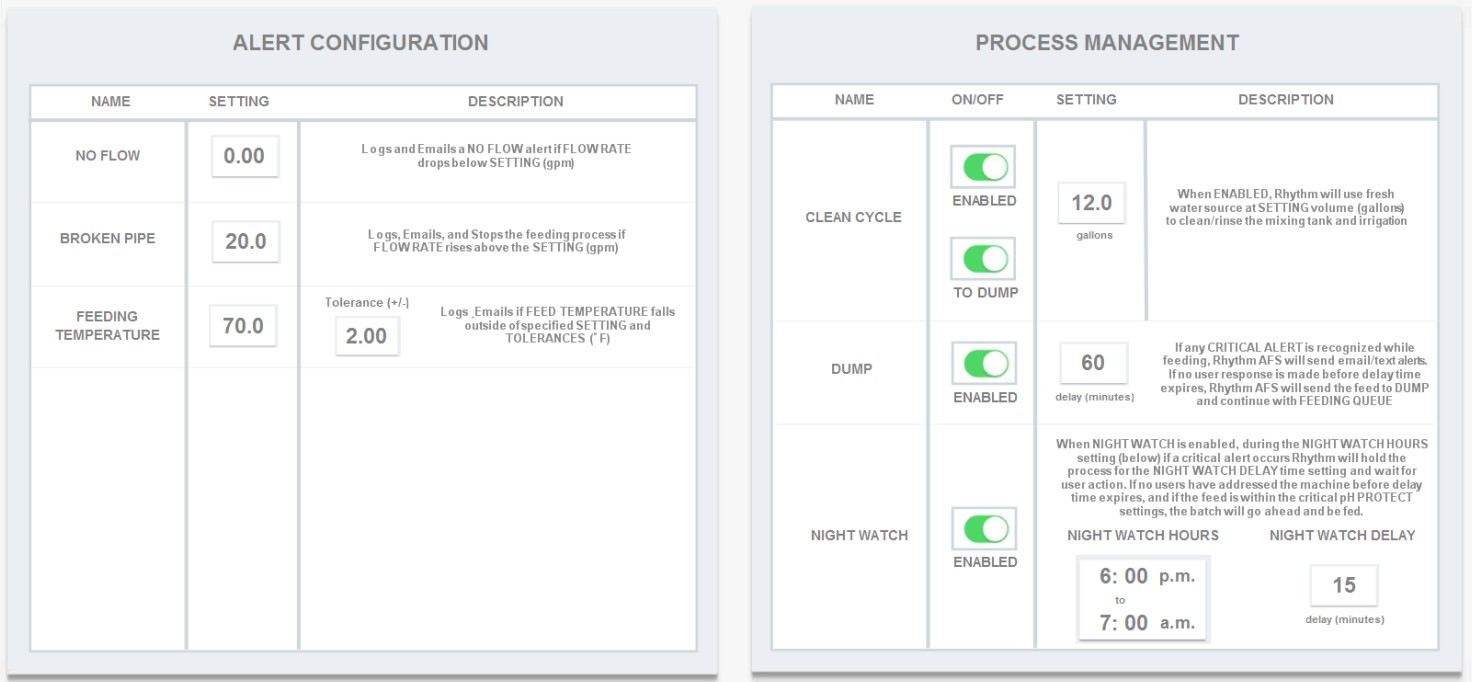
Alert Configuration. Configure your alert settings for instances of no flow, broken pipes, or feeding temperature imbalances. Everything logged here will display on your ALERTS page.
No Flow. Logs and emails no flow alert if the flow rate drops below or equal to the setting here. We suggest to set this at 0.
Broken Pipe. Logs, emails and stops the feeding process if flow rate rises above the setting here. Our customers usually set this between 35-40gpm.
Feeding Temperature. Logs and emails if feed temperature falls outside of this specified setting and tolerance. This is just an alert setting. If you'd like the system to take action against temperature imbalances, use the "Temp Protection" setting under the ADMIN CONFIGURATION tab.
Process Management. Configure your settings for Clean Cycles (when the system flushes water through the lines after each feed), Dump (when the system dumps a cancelled feed), and Night Watch (nightly protection feature).
Clean Cycle. When this is enabled, Rhythm will use fresh water to flush the lines after each feed. THE DEFAULT SETTING SHOULD HAVE THE SECOND TOGGLE DISPLAYING THE TEXT "TO DUMP." This means the dumped fluids will go to the dump output (i.e. the sink or drains). You can press the toggle again to send the dumped fluids to your room lines, which means the plants will receive it. Enter the amount of gallons of water you'd like to call for during this process.
Note: The gallons setting here is global. It will only be used if the system doesn't have an input on the ROOM LEVEL. Every room can have its own clean cycle gallons setting by going to Rhythm Logo > Configuration > ROOM # > Clean Cycle and entering the gallons amount there. The number setting in ROOMS CONFIG will precede the setting here in PROCESS CONFIG.
Note: The gallons setting here is global. It will only be used if the system doesn't have an input on the ROOM LEVEL. Every room can have its own clean cycle gallons setting by going to Rhythm Logo > Configuration > ROOM # > Clean Cycle and entering the gallons amount there. The number setting in ROOMS CONFIG will precede the setting here in PROCESS CONFIG.
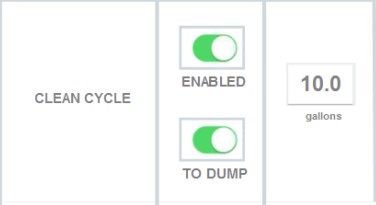
Clean cycle will dump to your dump output like the drains or sink.

Clean cycle will dump to the room irrigation lines.
Dump. When you cancel a feed, the system will give you the option of dumping the tank contents. If any critical alert is recognized while feeding, Rhythm will send email/text alerts. If no user response is made before the delay timer expires, Rhythm will send the feed to dump and continue with the feeding queue. Set your desired time for delay timer here in minutes.
Night Watch. When "Night Watch" is enabled, if critical alerts occur during the "Night Watch Hours" setting, Rhythm will hold the process for the "Night Water Delay" time setting and wait for user action. If no users have addressed the alarm before the "Night Watch Delay" time expires (also must be within the critical "pH Protect" settings under the ADMIN tab), the batch will continue feeding. This offers protection for when rooms feed but no staff is present.
Night Watch. When "Night Watch" is enabled, if critical alerts occur during the "Night Watch Hours" setting, Rhythm will hold the process for the "Night Water Delay" time setting and wait for user action. If no users have addressed the alarm before the "Night Watch Delay" time expires (also must be within the critical "pH Protect" settings under the ADMIN tab), the batch will continue feeding. This offers protection for when rooms feed but no staff is present.

5. Email Configuration

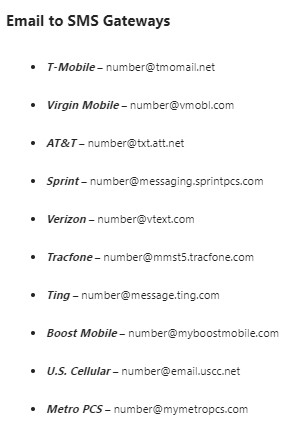
Email Alerts. If you'd like to be notified every time there is an alert on your system, you can set up email or text alerts here. For text, please refer to the following chart to configure your phone number's text address:
You can then customize which types of alerts you would like to receive by enabling/disabling them on the column to the right side of the page:
Critcal Alerts. When ON, Rhythm will send email/texts for all CRITICAL alerts. An example of a critical alert is a time when the machine needs your action to resume function.
Nurtients Alerts. When ON, Rhythm will send email/texts for all nutrient low level alerts. This is important to know if your machine has a full schedule, it may run out of a certain nutrient when dosing which will most likely affect your EC results and/or throw off pH stabilization.
Feeding Alerts. When ON, Rhythm will send email/texts for all non-critical feeding alerts. This can be something like low/high EC/pH alerts.
Rooms Not Fed. When ON, Rhythm will send email/texts for all rooms/zones that did not feed during the previous daylight hours. This could be helpful when there is an issue that needs resolving on your end or if you are off site and a team member has forgotten to schedule, for example.

This allows the software to establish a connection to the email server if service is interrupted. Your Rhythm engineer will most likely be the only one using this button.

Use this button to send a test email out to all the listed recipients to check functionality.
Sometimes the connection can get stuck and this allows the memory processes to reset to zero. Your Rhythm engineer will most likely be the only one using this button.
6. Admin Configuration
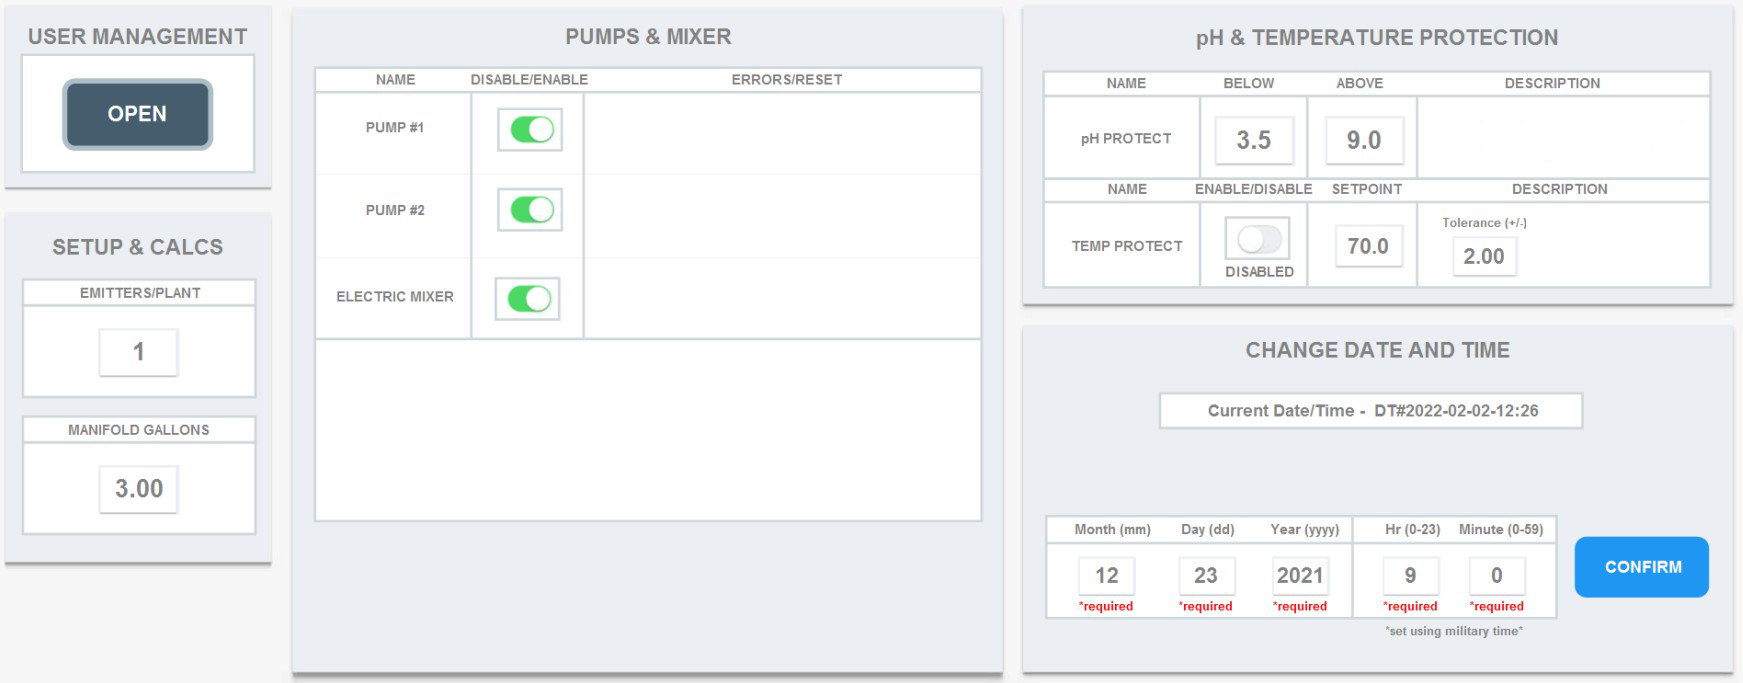
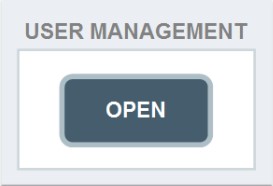
User Management. Click/press on "User Management - Open" to bring up a popup which will allow you to add or edit users, change your password, or recover data:
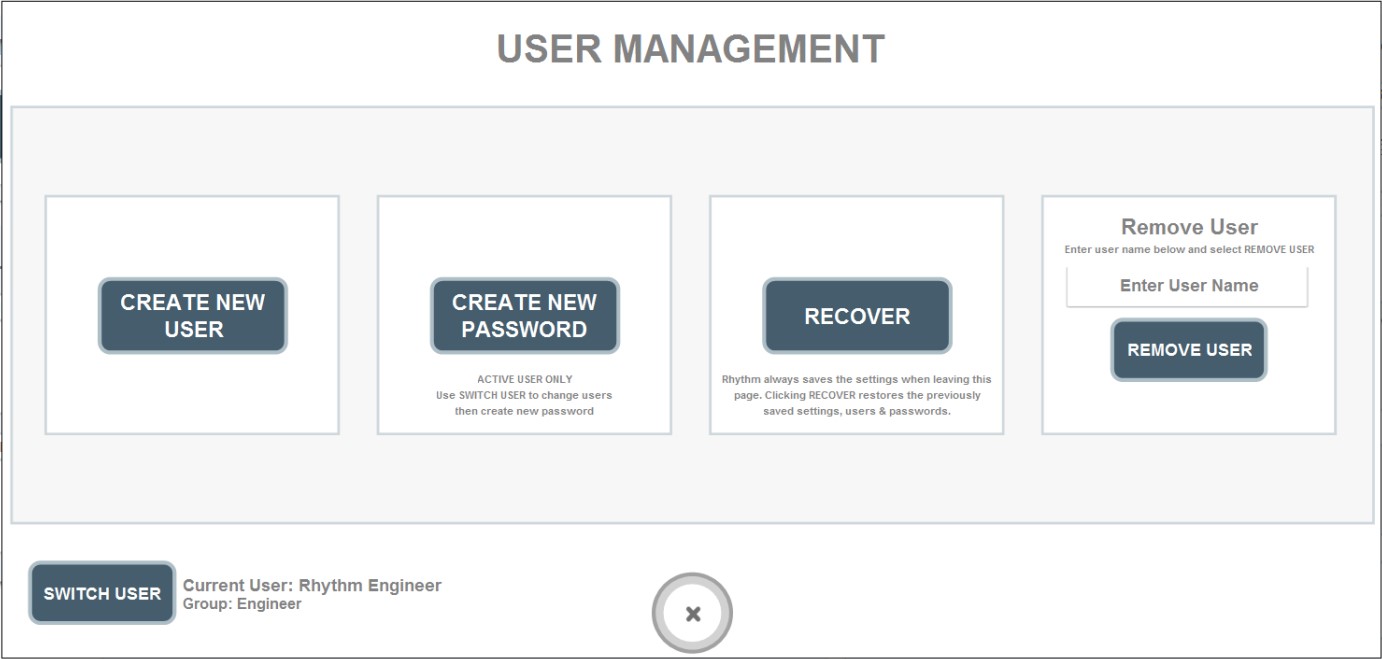
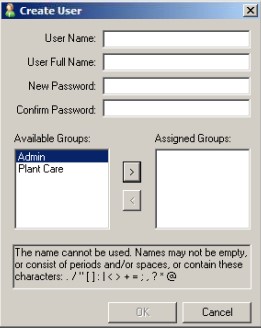
When you create a new user, a pop up will allow you create the user name, password and assign the user a group. Admin users will be able to edit recipes, change schedules, and edit configuration settings while Plant Care users will only be able to view the software and access the "Feeding on Demand" feature:
Note: The local user name and password will be different from the remote access VNC Viewer username and password. The local user/password will only work for accessing the Rhythm Software. The VNC Viewer user/password will allow you to access the remote desktop viewer of the software on your phone or computer remotely. You will still have to log into the machine when accessing from VNC Viewer with the LOCAL user/password. See more about adding remote access users in the SOFTWARE START-UP GUIDE.
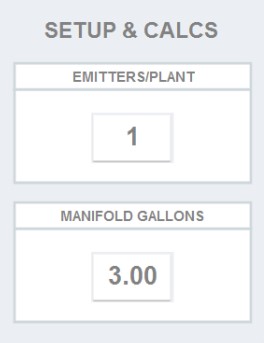
Emitters/Plant. If your software does not have the emitters/plant setting in the ROOMS CONFIGUARTION tab, it will appear here in the Admin tab. See ROOMS CONFIGURATION above to learn more about settings for emitters/plant.
Manifold Gallons. Based on how the system irrigates, there will also be remnant fluid inside the manifold lines at any given time. If you use the "Clean Cycle" feature, it will mostly be low ppm RO water. Rhythm can account for this extra volume when making batches. For example, if you enter 3 gallons in this setting as the estimated volume inside your manifold, and your recipe calls for 50 gallons, Rhythm will supply 47 gallons of water, but dose nutrients for 50 gallons worth.
Manifold Gallons. Based on how the system irrigates, there will also be remnant fluid inside the manifold lines at any given time. If you use the "Clean Cycle" feature, it will mostly be low ppm RO water. Rhythm can account for this extra volume when making batches. For example, if you enter 3 gallons in this setting as the estimated volume inside your manifold, and your recipe calls for 50 gallons, Rhythm will supply 47 gallons of water, but dose nutrients for 50 gallons worth.
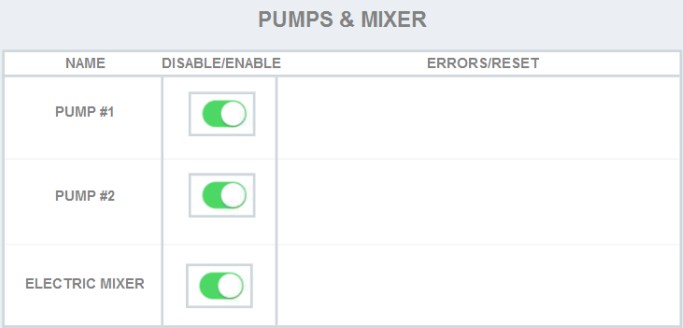
Pumps & Mixer. You can disable one of your main irrigation pumps. Pump #1 is on the left and Pump #2 is on the right. This is useful when doing pump maintenance, in the case that one pump is malfunctioned, if one side of the system has a cracked pipe or check valve, etc.
You can also disable the tank mixer in case it requires maintenance or is getting replaced, etc.
You can also disable the tank mixer in case it requires maintenance or is getting replaced, etc.

pH & Temperature Protection. You can configure settings which protect your rooms from getting automatically fed with pH or temps too far outside your preferences. For "pH Protect", enter a value that is the lowest acceptable pH to feed at. For example, if you enter 3.5 pH under "below," the system will NEVER feed a recipe that reads lower than 3.5 pH. Apply the same tactic when entering your "Above" value.
For "Temp Protect," use the toggle to enable, enter your desired setpoint and tolerance for feeding.
For "Temp Protect," use the toggle to enable, enter your desired setpoint and tolerance for feeding.
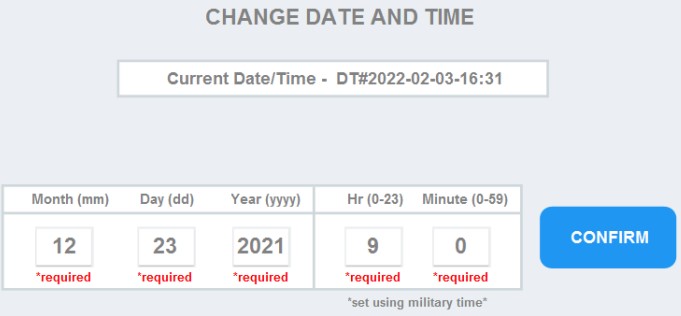
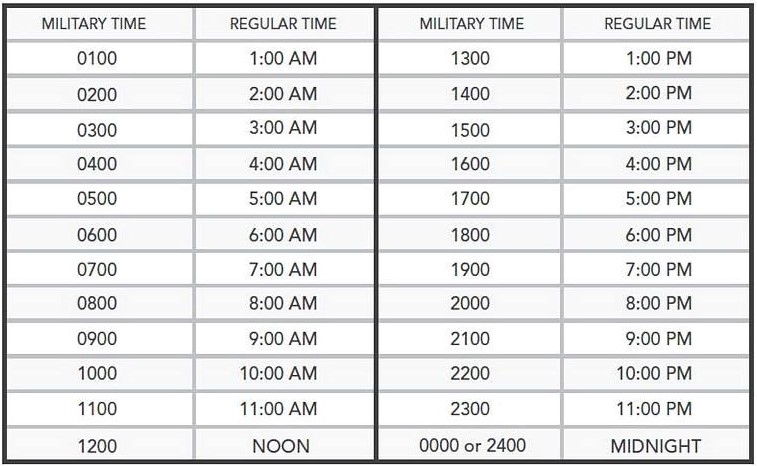
Change Date and Time. This is required to operate your machinery. Please note times must be in military time for full functionality. Please use the chart below for military time conversions:


.svg)