
INLINE SOFTWARE USER GUIDE
Main Overview Screen
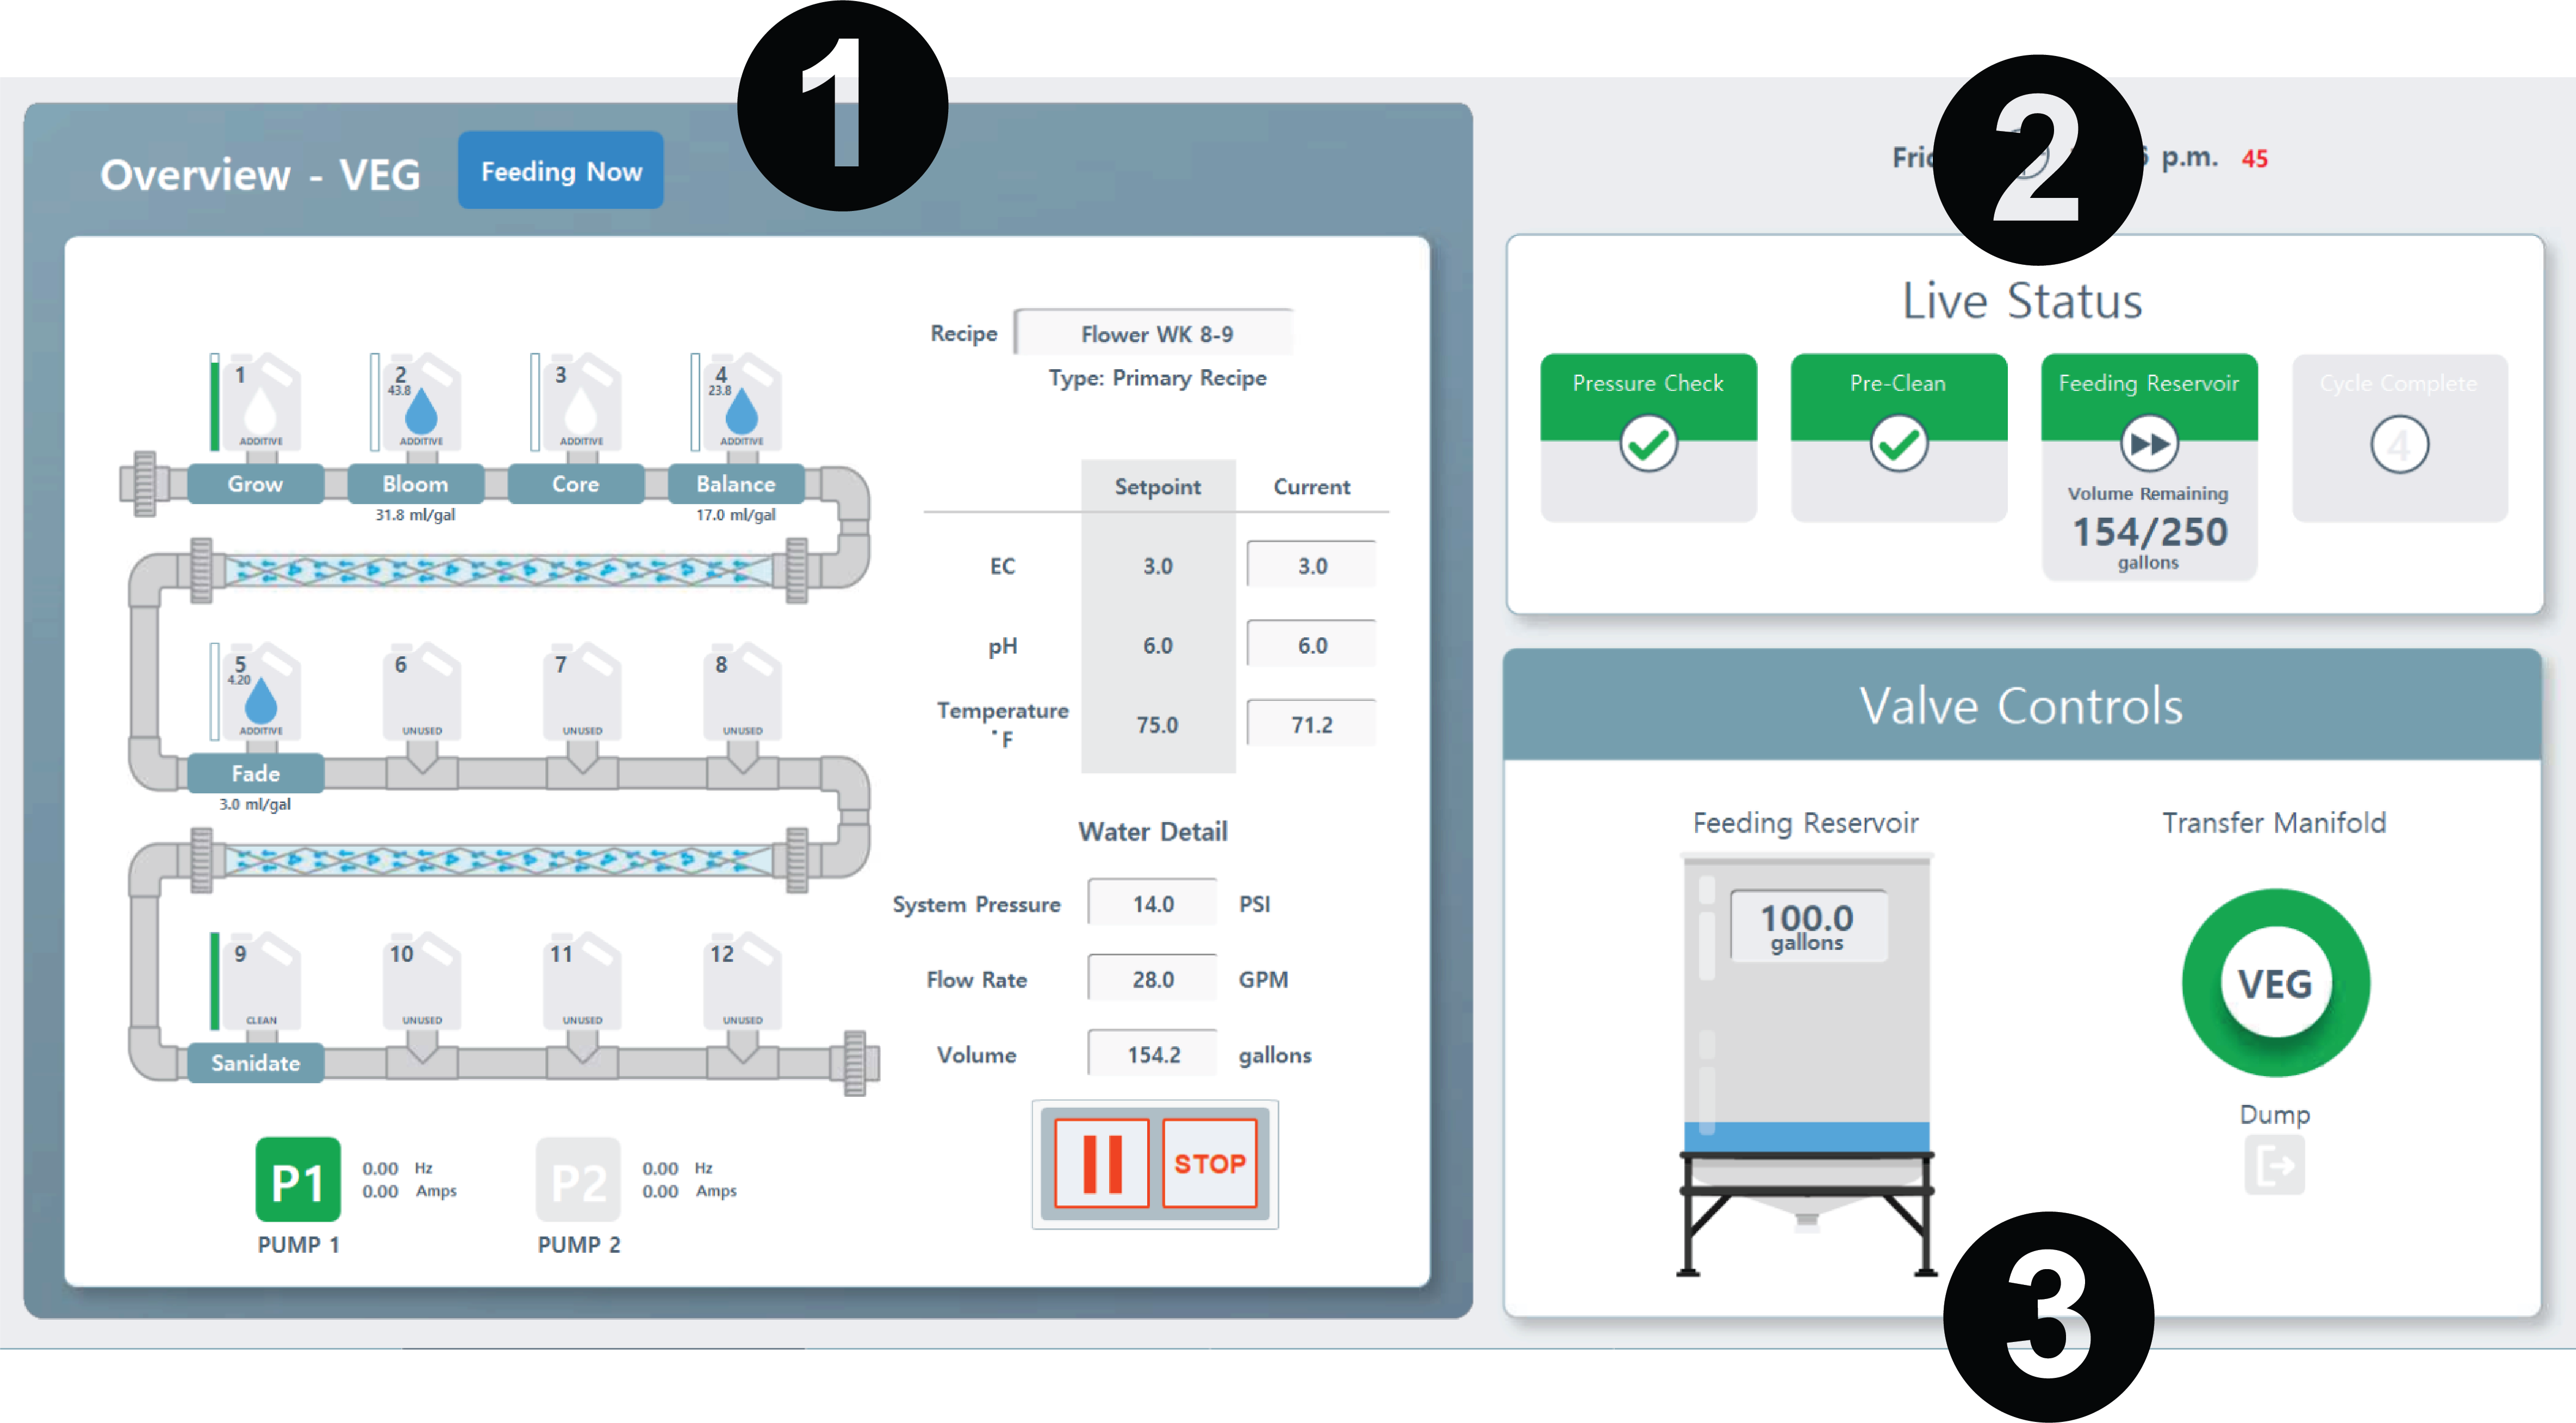
Click the corresponding number icon to jump to its section.

Inline/Nutrient Status

Live Status

Valve Controls
1. Inline/Nutrient Status
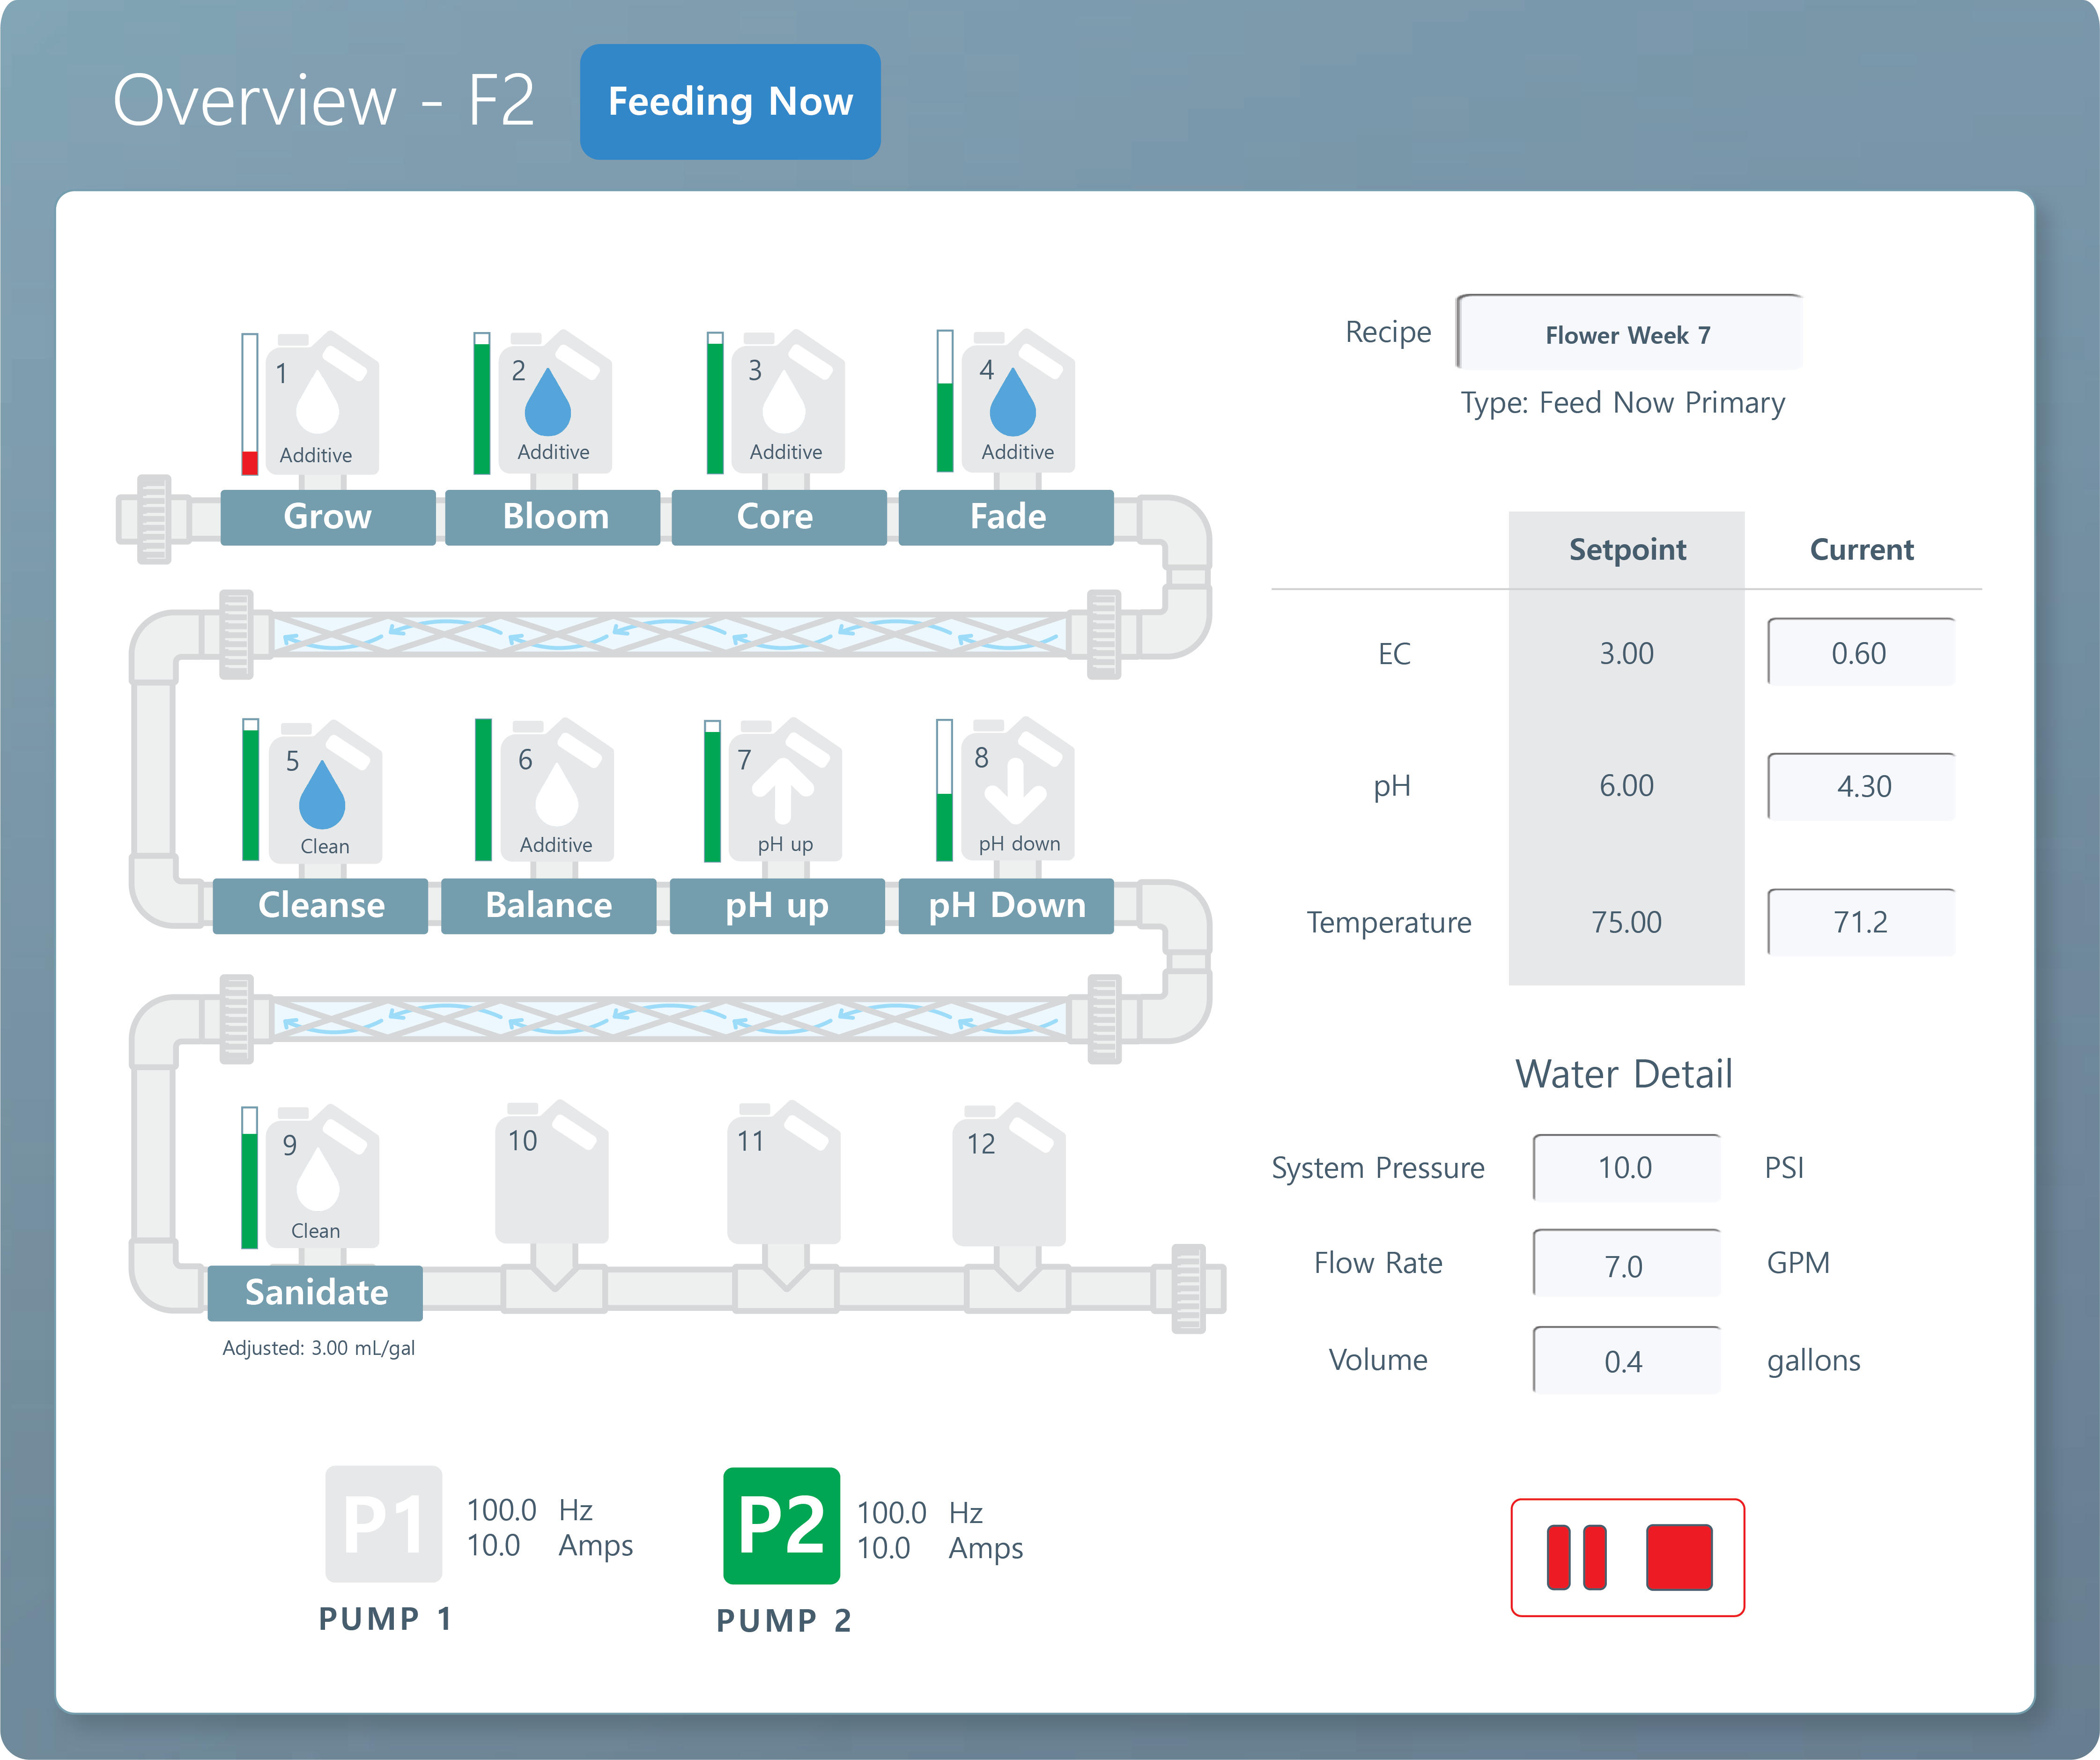

Room Name & Active Status. When the machine is preparing a feed, the name of which room it is will appear here. The blue icon "Feeding Now" will denote that a room is actively getting watered.

Active Recipe. Your active feeding recipe will appear here. Feed Type will also be displayed (i.e. Scheduled, Feed Now, Primary, Secondary).
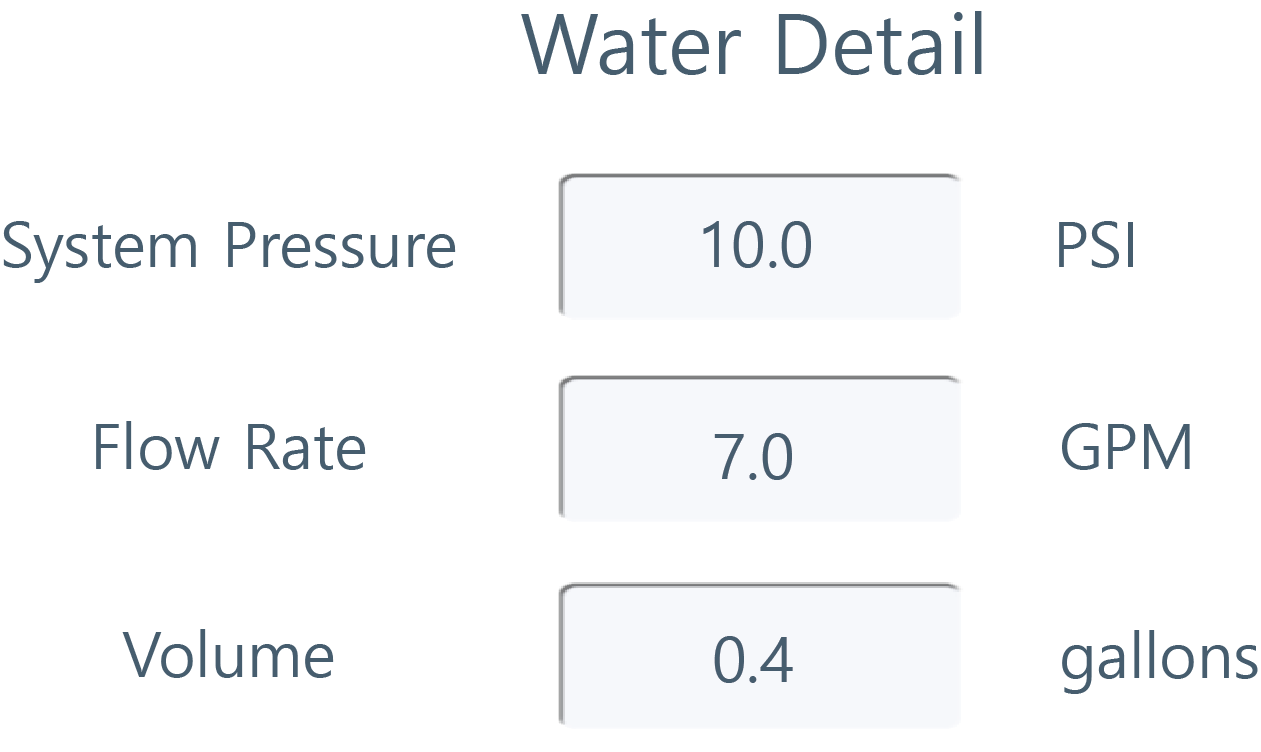
Water Details. The PSI displays the system pressure (pounds per square inch) at the machine. The pump will dynamically manage pressure based on configured room settings. Pressure is also important to monitor during troubleshooting.
The GPM displays the system flow rate in gallons per minute. The system will maintain specific flow rates for recirculation and dump cycles. When feeding a room, the flow rate is not controlled by Rhythm, but rather by the quantity and type (GPH) of emitters in the feeding zone. During feeding cycles, the flow rate should be monitored to ensure the emitters are flowing correctly. Flow is also important to monitor during troubleshooting.
Volume will show the volume already dispensed to the watering zones.
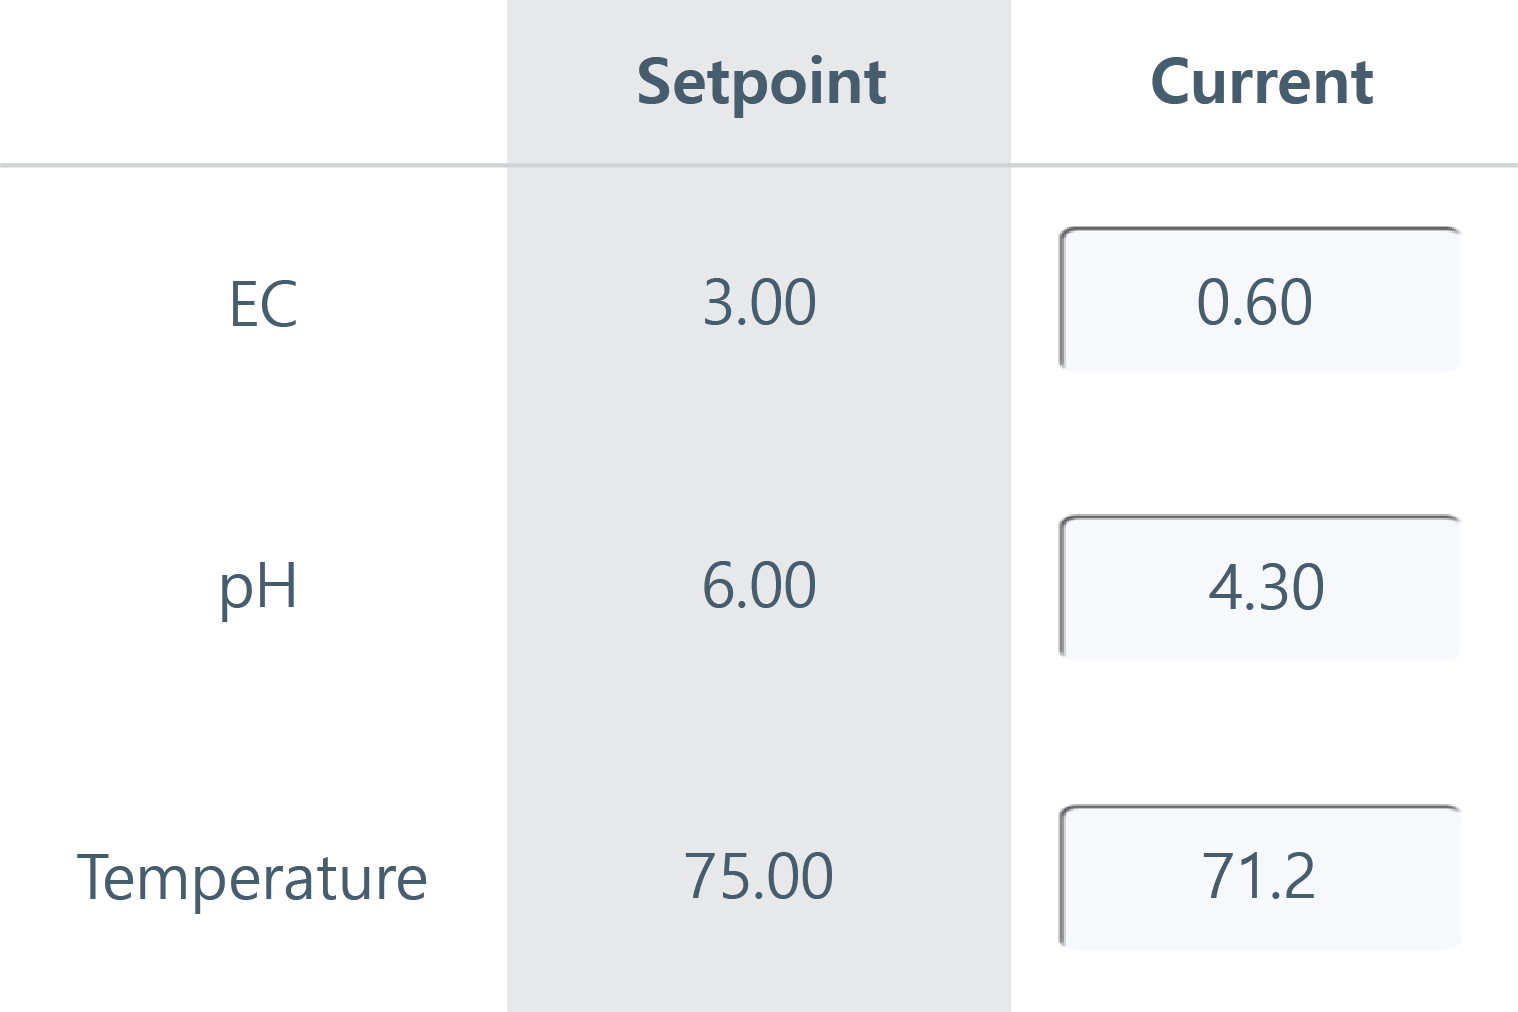
EC & pH Setpoint. When preparing a feed, the machine will reference your recipe to determine the EC and pH it should try to reach. These numbers will fall under the "Setpoint" column. The Current column will display the sensor readings for fluid passing through.
Temperature. The temperature inside your mainline is measured by the pH sensor. The current temperature will display under the "Current" column and your setpoint under the "Setpoint" column. You can change your temperature setpoint (only for alerting) by going to Rhythm Logo > Configuration > pH/EC > pH settings > Temperature Alerts.
Note: The setpoint is just a guide for email notifications. Rhythm cannot change the temperature, it will just email you when the temperature goes outside of the bandwidth you set. (i.e. it will email you if the temperature goes below 60F degrees or above 80F for example.)
Irrigation Pumps. Your irrigation pumps will display here. One is for a backup in case of primary pump failure. While feeding, the active pump will be highlighted in green. You can manually force the use of a certain pump by going to Rhythm Logo> Configuration > Advanced > Irrigation Pumps.
Pumps will display Frequency (Hz) and Amperage. While these metrics are primarily utilized by Rhythm engineers for advanced diagnostics, they serve as critical indicators of your hardware’s operational health.
It depends on your specific horsepower pump, but abnormal amperage draw can reflect certain issues.
High Amperage
Variable Amperage
Low Amperage
Potential electrical overdraw or motor strain
Obstructions, such as dirty or clogged filters, increasing the workload on the motor
Potential "dry run" conditions or loss of prime
Please reference your specific pump's amperage specifications. If you notice these numbers outside of normal operating range, please contact your Rhythm rep.
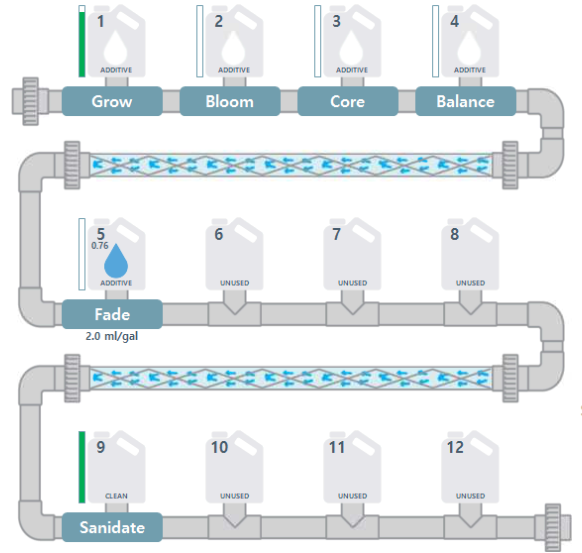
Mainline Status. The inline graphic shows a live view of your mainline and nutrient status.
Once the machine starts watering, the inline graphic will change to display the blue arrows inside the static mixer to show a visual representation of water flowing through your lines. The numerical gallons, psi and gpm will also display under "Water Detail."
Once the machine starts watering, the inline graphic will change to display the blue arrows inside the static mixer to show a visual representation of water flowing through your lines. The numerical gallons, psi and gpm will also display under "Water Detail."
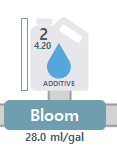
Nutrient Container Icons. Your nutrient containers will appear here as icons. The first icon correlates with the nutrient you have placed in dosing pump #1's position, and so on.
Note: For inline systems, the nutrient icon in first place will correlate to dosing pump #1. If you are looking at the back of the machine, dosing pump #1 will be the top right pump. #2 will be the pump directly to the left of #1 and so on. Please refer to Inline Dosing Pump section to see a graphic.
While actively dosing, the water droplet icon will turn blue, signifying that the nutrient is currently being dosed inline. The volume indicator to the left side lets you know how much volume is left inside the container. In order for Rhythm to know this, you must manually enter the volume every time you change or alter the containers.
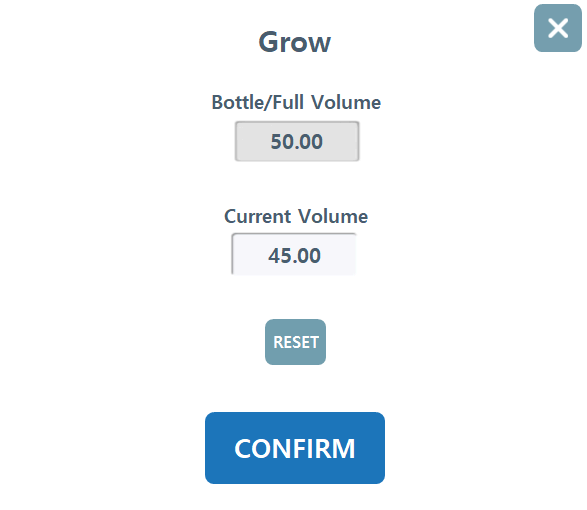
You can change the name, nutrient type, and volume by going to Rhythm Logo > Configuration > Nutrients > Nutrient Bottle. You can also adjust the volume of the bottle straight from the Overview screen by pressing the nutrient bottle itself and a popup will display. Enter the container's true size under "Bottle/Full Volume" and enter the current estimated volume under "Current Volume" and press confirm.
You can change the name, nutrient type, and volume by going to Rhythm Logo > Configuration > Nutrients > Nutrient Bottle. You can also adjust the volume of the bottle straight from the Overview screen by pressing the nutrient bottle itself and a popup will display. Enter the container's true size under "Bottle/Full Volume" and enter the current estimated volume under "Current Volume" and press confirm.
In the top left corner of the nutrient icon, the pump position # is displayed. In this graphic, it is pump position #2.
Below the nutrient name, the ml/gal will be displayed per your recipe. To change this for the current feeding, you can click directly on the nutrient being dispensed (blue drop icons only) and change the mL/gal under column "Recipe."
**Please note, changes made in real time will only apply to the current feeding and will not change the recipe.
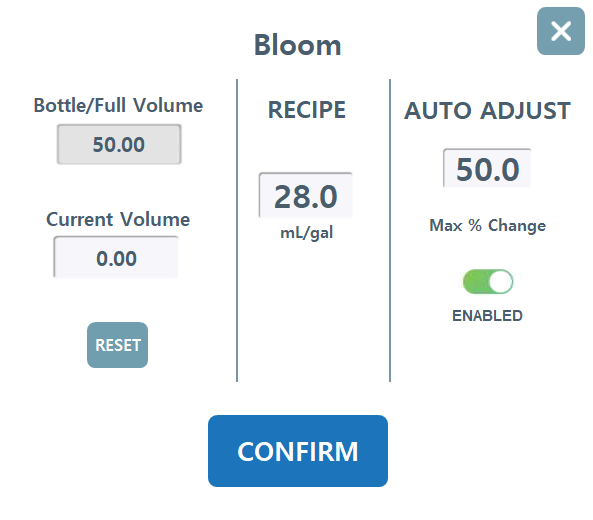
Auto Adjust. Auto adjust is a specialized Rhythm feature designed to dynamically modify nutrient dosages in real time to maintain precise EC setpoints. During the initial system calibration, it is essential to utilize this feature to refine your recipes and establish baseline dosage accuracy. Auto Adjust operates by defining a maximum percentage bandwidth, allowing the system to automatically scale nutrient delivery up or down to reach the target EC.
Configuration
• Click on any actively dosing nutrients (denoted by blue water drop icon).
• To preserve the balance of your formula, it is best practice to apply Auto Adjust to all active nutrients.
• If necessary, you can manually adjust the base concentration (ml/gal) within this menu first. **Pease note, changes made here will only change the active feeding and not directly edit the original recipe.
• Under the Auto Adjust column, input the maximum allowable percentage change the system may use to reach the EC setpoint.
Recommended Starting Parameters
Dosage Concentration
High Dosage (25-50 ml/gal)
Low Dosage (1-10 ml/gal)
Micro Dosage (< 1 ml/gal)
High Dosage (25-50 ml/gal)
Low Dosage (1-10 ml/gal)
Micro Dosage (< 1 ml/gal)
Suggested Max Change %
Start with 50%, monitor and adjust
Start with 100%
May require >100%
Start with 50%, monitor and adjust
Start with 100%
May require >100%
These numbers can be modified during live operation. Monitor the system's response to determine the optimal bandwidth for your recipe.

Stop and Pause. You can stop or pause your system during the mixing process by pressing the red buttons next to the tank icon.
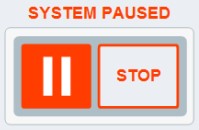
• When the pause button is pressed, functionality will not resume until the pause button is pressed again.
• When the "STOP" button is pressed:
• When the "STOP" button is pressed:
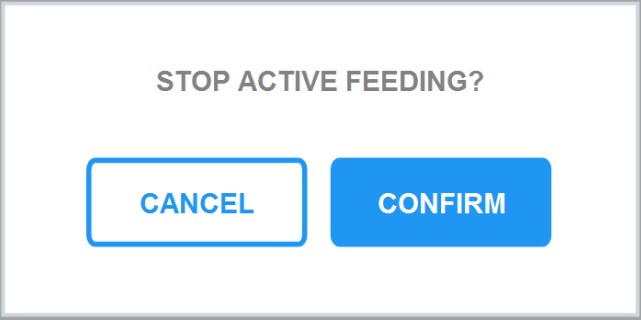
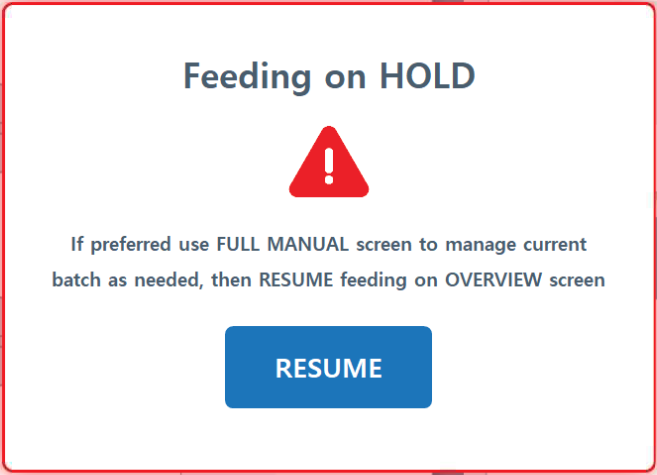
• You will first see a popup called "Stop Active Feeding?" Once you confirm, a popup called "Feeding on Hold" will appear. If you press "RESUME," the contents inside the lines will not move. You will need to go to Manual Mode by clicking Rhythm Logo> Full Manual> DUMP. You can then click the bottom menu "OVERVIEW" button and click "RESUME" to continue process. If another feed is scheduled after this, it will automatically begin once the dump is complete.
2. Live Status
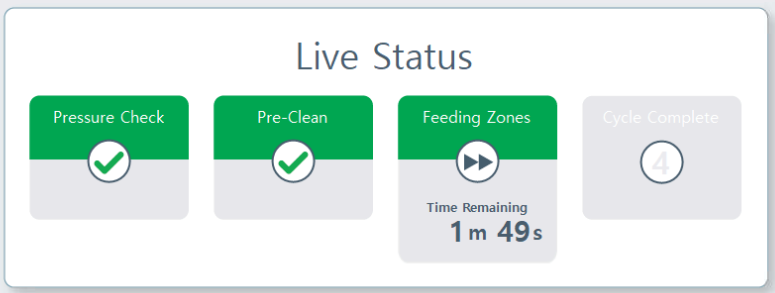
Live Status. You will see 3 steps in the process of your inline feeding. They are:

• Pressure Check. The system is engineered to run a preliminary pressure check to make sure there are no leaks within the lines. It will produce an alarm if it notices any failures.
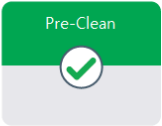
• Pre-Clean. After each feed, there will always be some residual feed left in the plumbing lines. Pre-clean will do a preliminary dump to remove these residuals to the designated dump location, which can be selected in the RECIPE. Recipes > Feed Time Recipes > Selected Recipe > Edit Recipe > Edit Cell > Pre Clean Volume. From here, you can select the amount of gallons to dump (depends on length of plumbing, for instance if your mainline is 300ft, you might dump 20 gallons to make sure the lines fully empty) and where to dump it (the local AFS machine location or the room level dump location.)
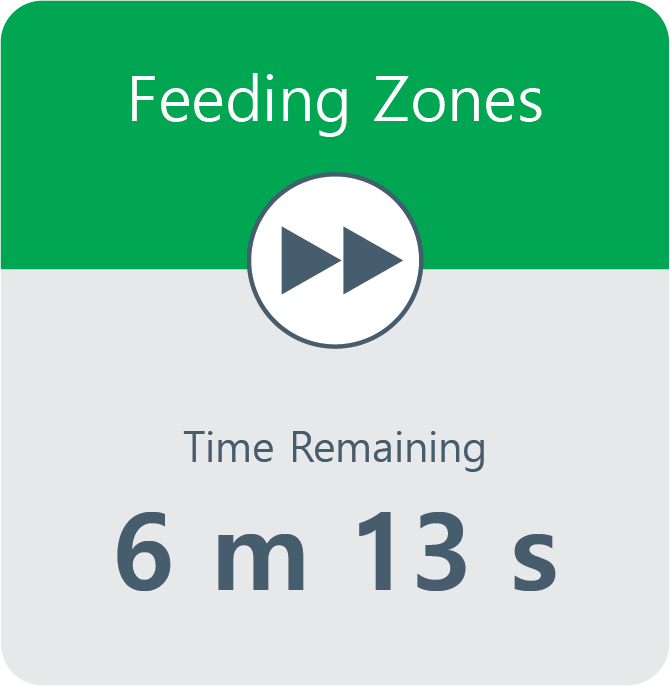
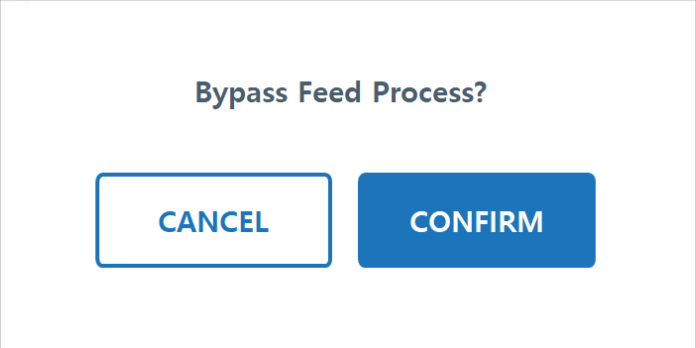
• Feeding Zones. Once your stabilization has completed, the system will start feeding the rooms/zones or filling the designated reservoir. You can bypass the Feeding by pressing the fast forward arrows (or sometimes the previous process icon.)
3. Valve Controls
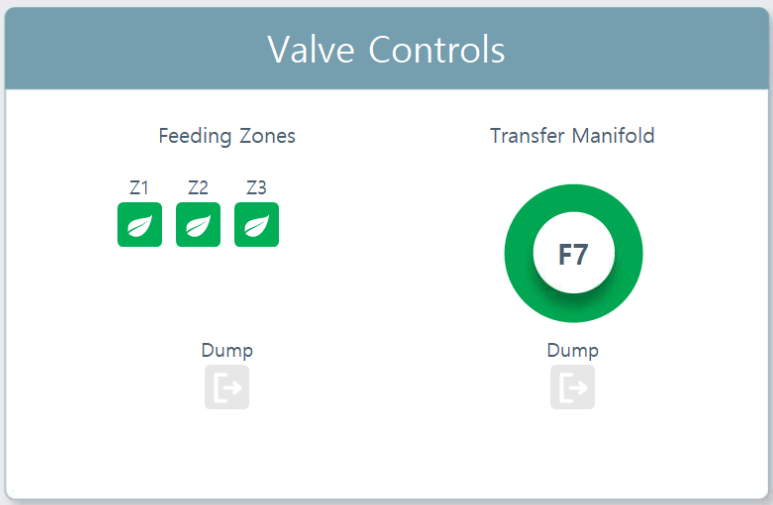
Feeding Zones. An overview to see which zones are active. Zones in green will water. You cannot select or deselect zones to feed from the Overview Screen. Instead, go to Rhythm Logo > Configuration > Room # > Edit Flow and Pressure Details > Enable/Disable Zones. Changes you make will reflect on the next feeding only.
Another method for zone manipulation is while making recipes, you can also enter "0" in specific zones you don't want to feed.
Another method for zone manipulation is while making recipes, you can also enter "0" in specific zones you don't want to feed.
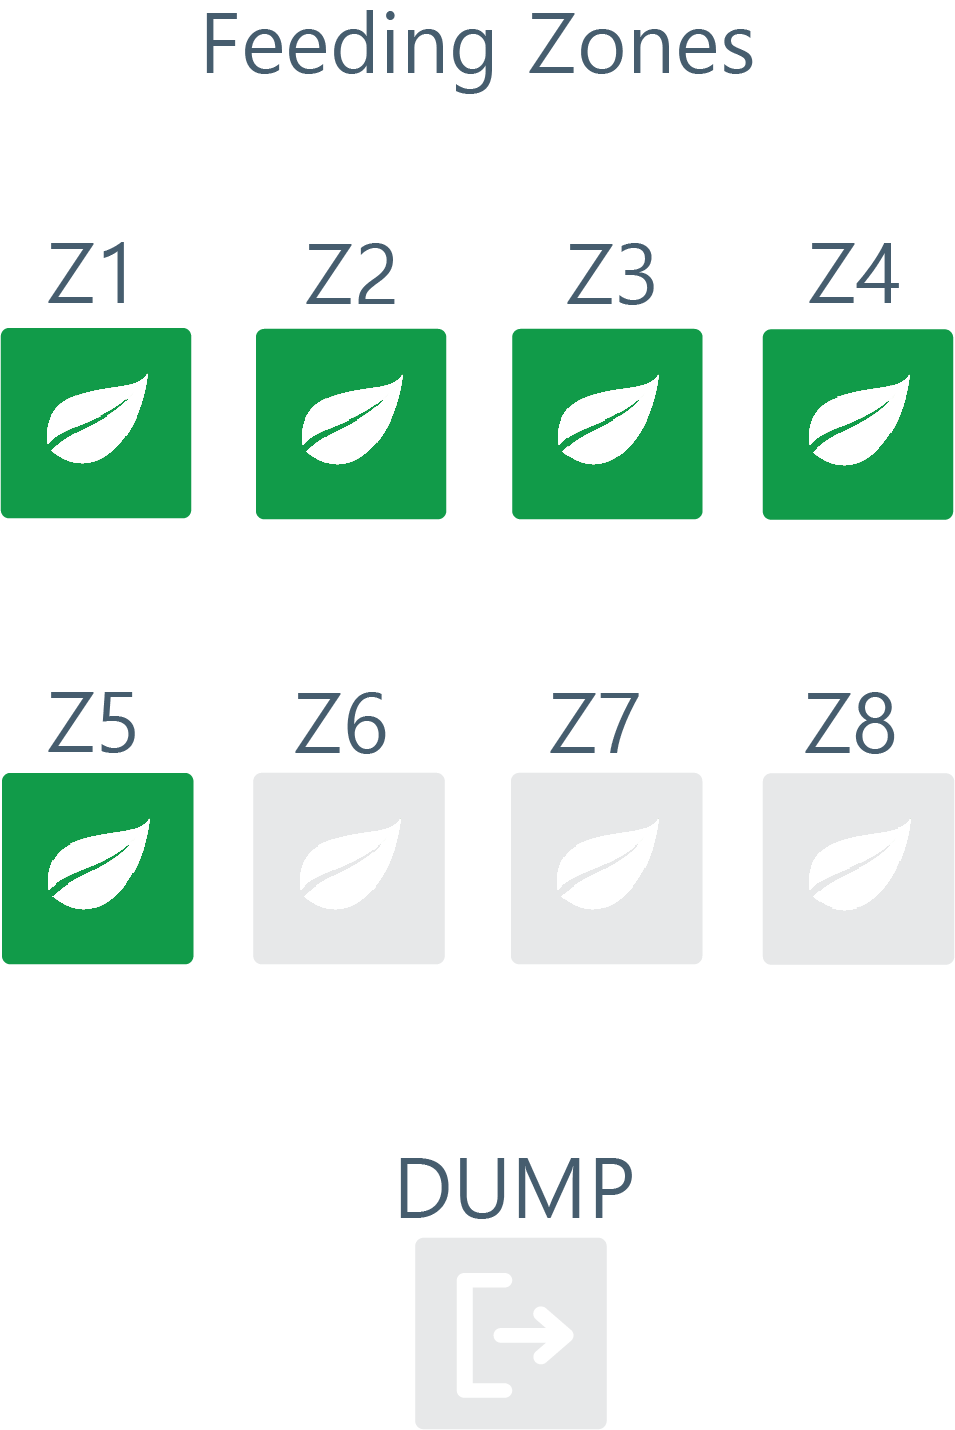
Note: DUMP icon is not an action button, but only an indication to show when the system is in dump mode. It will turn red while this is happening. This is the room level dump location only.
Transfer Manifold. The circle will turn green when the transfer manifold valve is OPEN. This is only a visual representation for the local machine level dump location.
Note: DUMP icon is not an action button, but only an indication to show when the system is in dump mode. It will turn red while this is happening.


.svg)