
INLINE SOFTWARE USER GUIDE
Configuration


Rooms


Email/Text

Nutrients


Users

pH/EC


Date/Time

Advanced
1. Rooms Configuration

Please note: All of the following settings are room specific. If you'd like them to affect all rooms, please go into each room's settings and change them all.
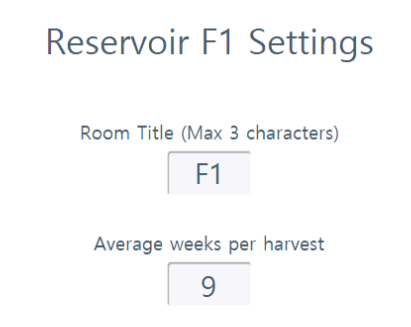
Room Name. You can press/click directly on the Room Name to change it (max 3 characters).
Average weeks per harvest. Edit the number of weeks your room has until harvest. For Veg rooms, you can enter the amount of weeks the plants remain in veg until you turn over the room for the next group. Editing this number will only populate the room gauge on the ROOM OVERVIEW page and isn't required for complete functionality.
Average weeks per harvest. Edit the number of weeks your room has until harvest. For Veg rooms, you can enter the amount of weeks the plants remain in veg until you turn over the room for the next group. Editing this number will only populate the room gauge on the ROOM OVERVIEW page and isn't required for complete functionality.

Day Progress. The week and day the room is in cannot be edited in CONFIGURATION. It must be done in the FEED SCHEDULER to avoid affecting schedules.
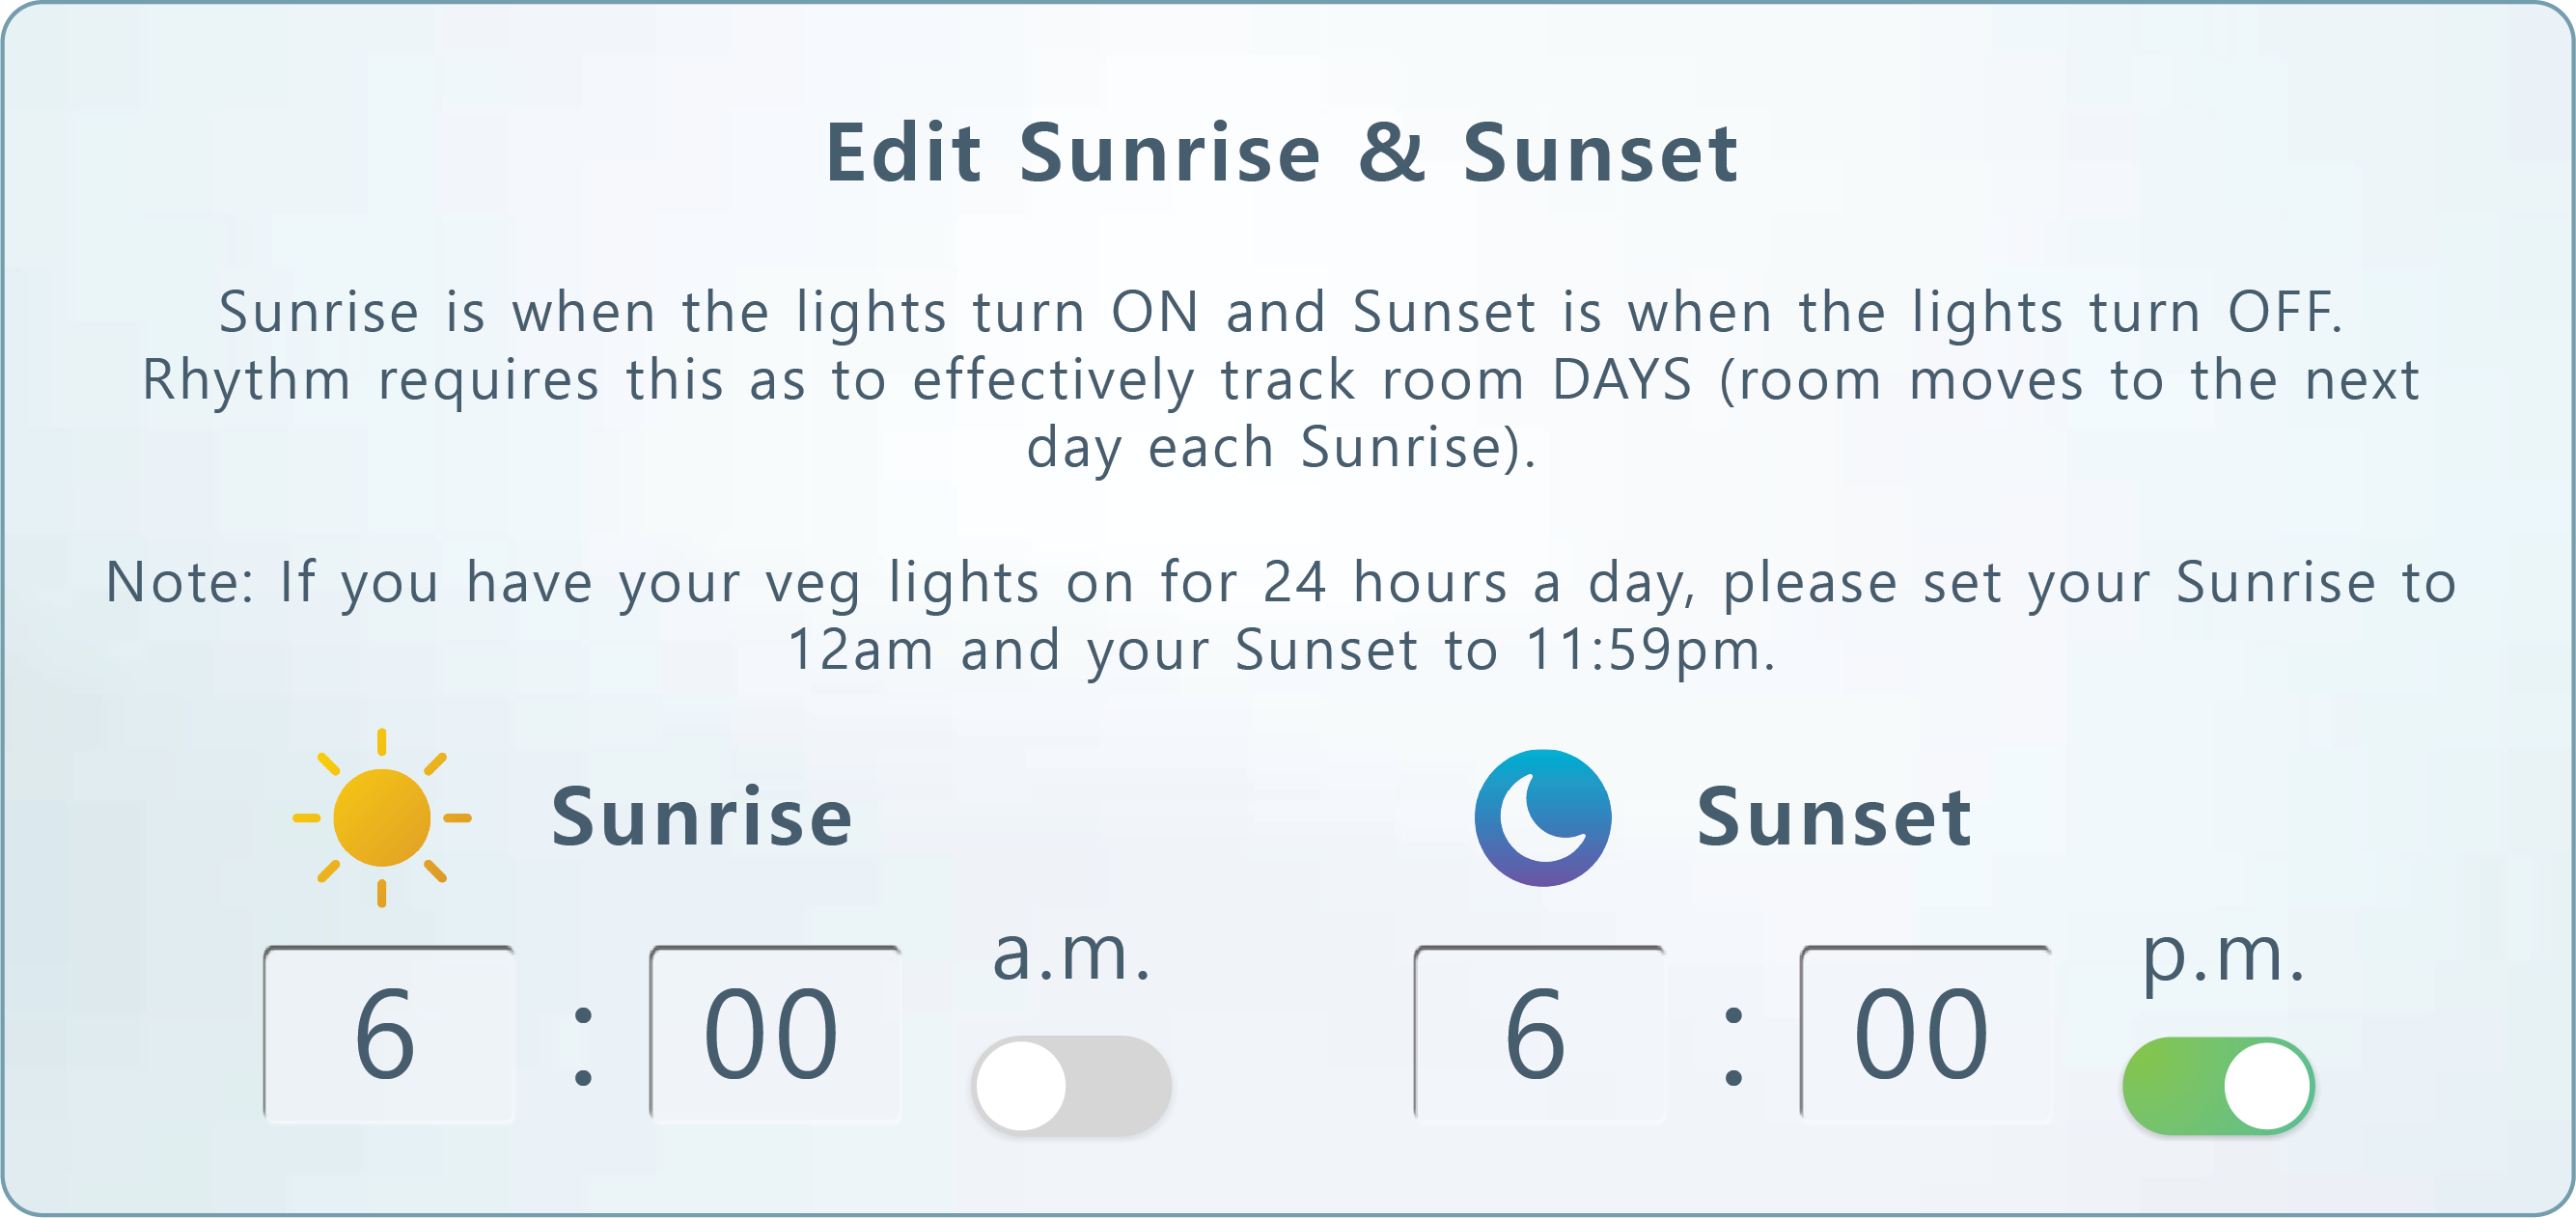
Sunrise & Sunset. Enter your room's sunrise time (when the lights turn on) and sunset time (when the lights turn off). Rhythm requires this information because it changes dates using this. Every sunrise will index a new day. If this is not configured, your room will show alert text on the ROOM OVERVIEW page.
Note: If you have your veg lights on for 24 hours a day, please set your Sunrise to 12am and your Sunset to 11:59pm.
Note: If you have your veg lights on for 24 hours a day, please set your Sunrise to 12am and your Sunset to 11:59pm.

Emitters per plant. Enter the amount of emitters you use on one single plant.
Important!
Entering your dripper rating and emitters per plant is important because drippers (emitters) drive flow rates, and flow rates drive system functionality in calculating zone duration times to volume with accuracy.
Entering your dripper rating and emitters per plant is important because drippers (emitters) drive flow rates, and flow rates drive system functionality in calculating zone duration times to volume with accuracy.

Emitter rating. Enter your dripper rating in gallons per hour. This can be found by contacting your irrigation manufacturer.
Important!
Entering your dripper rating and emitters per plant is important because drippers (emitters) drive flow rates, and flow rates drive system functionality in calculating zone duration times to volume with accuracy.
Entering your dripper rating and emitters per plant is important because drippers (emitters) drive flow rates, and flow rates drive system functionality in calculating zone duration times to volume with accuracy.

Zone Details. Setting up your drippers per zone is important when first configuring your system.
Important!
In order to obtain accurate system calculations, please make sure that you have filled out "Emitter Rating," "Emitters/Plant," and "Emitters/Zone." Rhythm uses these three numbers to calculate zone duration times to volume with accuracy. Flow rate (GPM) will be auto-calculated using the formula GPH (x) No. of emitters (/) 60.
In order to obtain accurate system calculations, please make sure that you have filled out "Emitter Rating," "Emitters/Plant," and "Emitters/Zone." Rhythm uses these three numbers to calculate zone duration times to volume with accuracy. Flow rate (GPM) will be auto-calculated using the formula GPH (x) No. of emitters (/) 60.
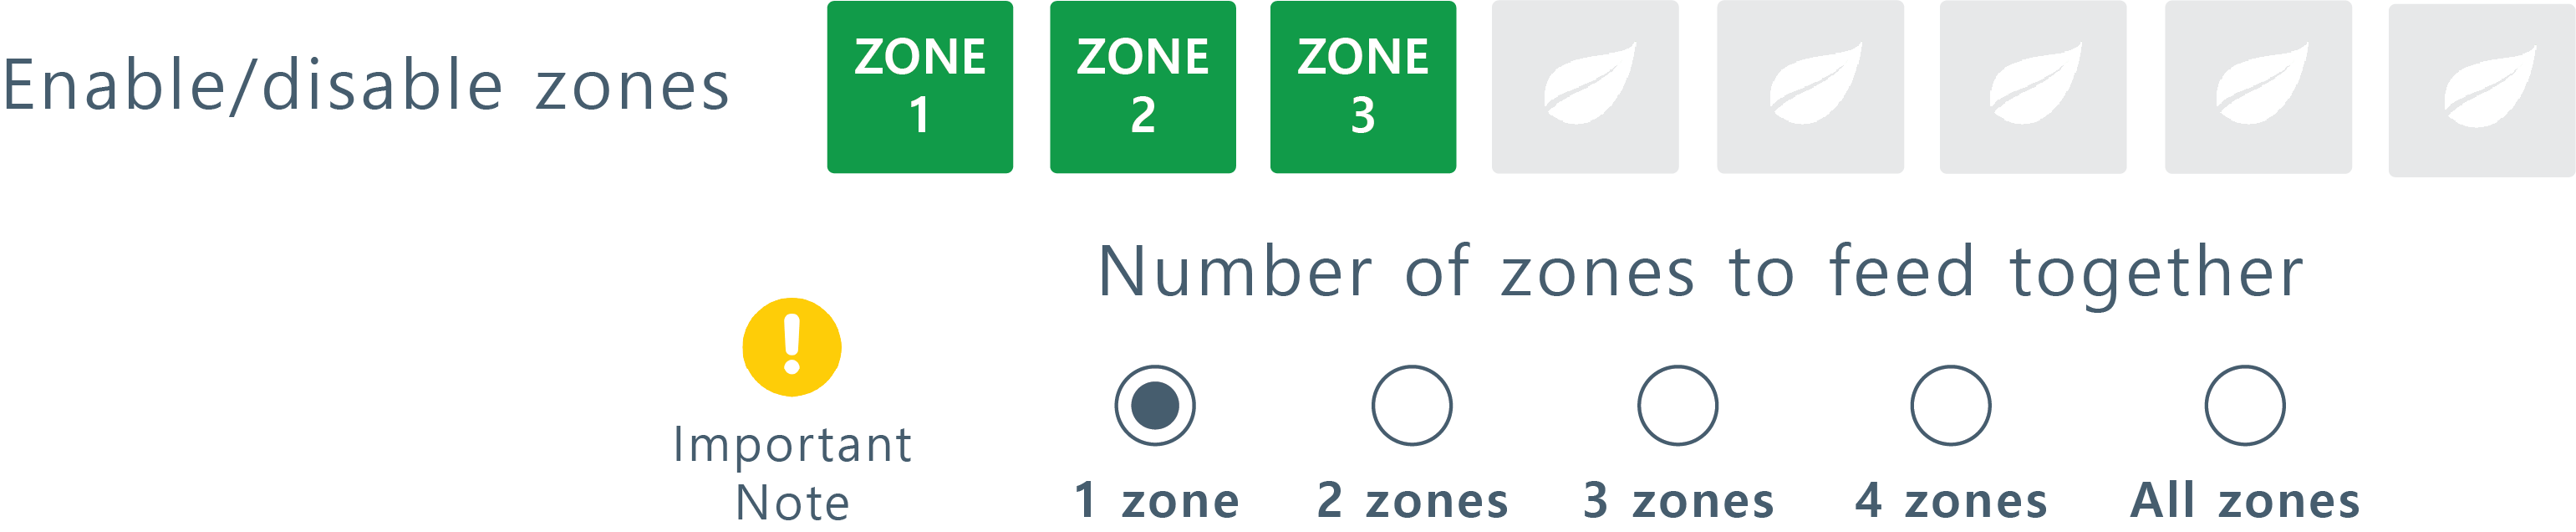
Zones Enable/Disable. You can select the specific zones you'd like to water. Zones highlighted in green will water.
Note: If you activate/deactivate the zones from the CONFIGURATION screen, the changes will remain permanent for all room recipes unless you A) temporarily change them from the MAIN OVERVIEW SCREEN while a recipe is running or B) change them again in CONFIGURATION settings.
Number of zones to feed together. This feature can be used if you want multiple zones to water at the same time.
Important!
Feeding more zones at once can save time, however depending on calculated flow rate above, feeding multiple zones at a time may not work. Please visually confirm flow rates in the room upon changing this value.
Feeding more zones at once can save time, however depending on calculated flow rate above, feeding multiple zones at a time may not work. Please visually confirm flow rates in the room upon changing this value.

Feeding Pressure. Rhythm allows you to dynamically change your feeding pressure per room. The goal is to optimize watering. This value will change based on the plumbing distance from your room to the Rhythm system. Generally, rooms that are further away need higher pressure. The accepted values are between 20 PSI and 100 PSI. Please contact your Rhythm representative to find out what your specific recommended values are.

Flow Alarms. You will receive notification alarms for low or high flow rates. Enter the low/high values for notifications here in gallons per minute. Low flow rates can indicate clogged filters or emitters or some other plumbing restriction, while high flow rates can indicate a cracked/broken pipe or faulty filters.

Pump Shutoff. Instead of flow alarms, you can set your pump to shut down at certain flow rates to avoid running dry. "No Flow" rating is usually 0 or 1. The setting here is for the room level only. If you'd like to create a global setting for pump shut off, please go to ADVANCED SETTINGS.
2. Email/Text Configuration
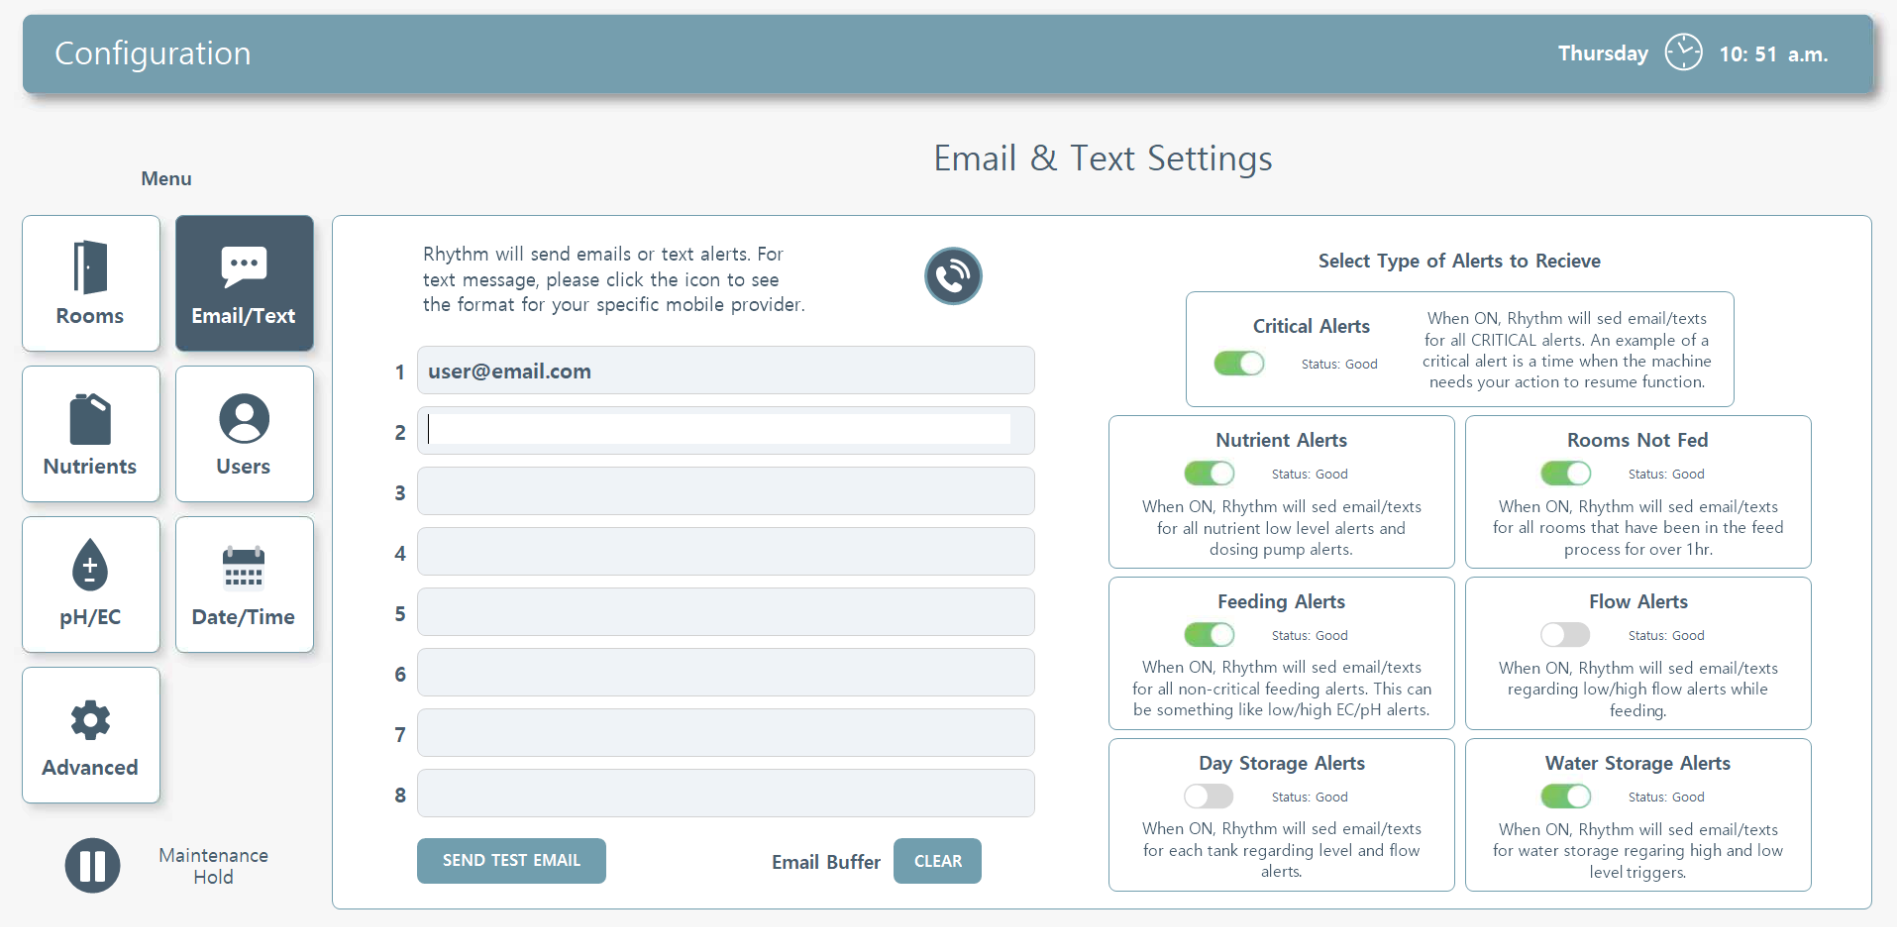
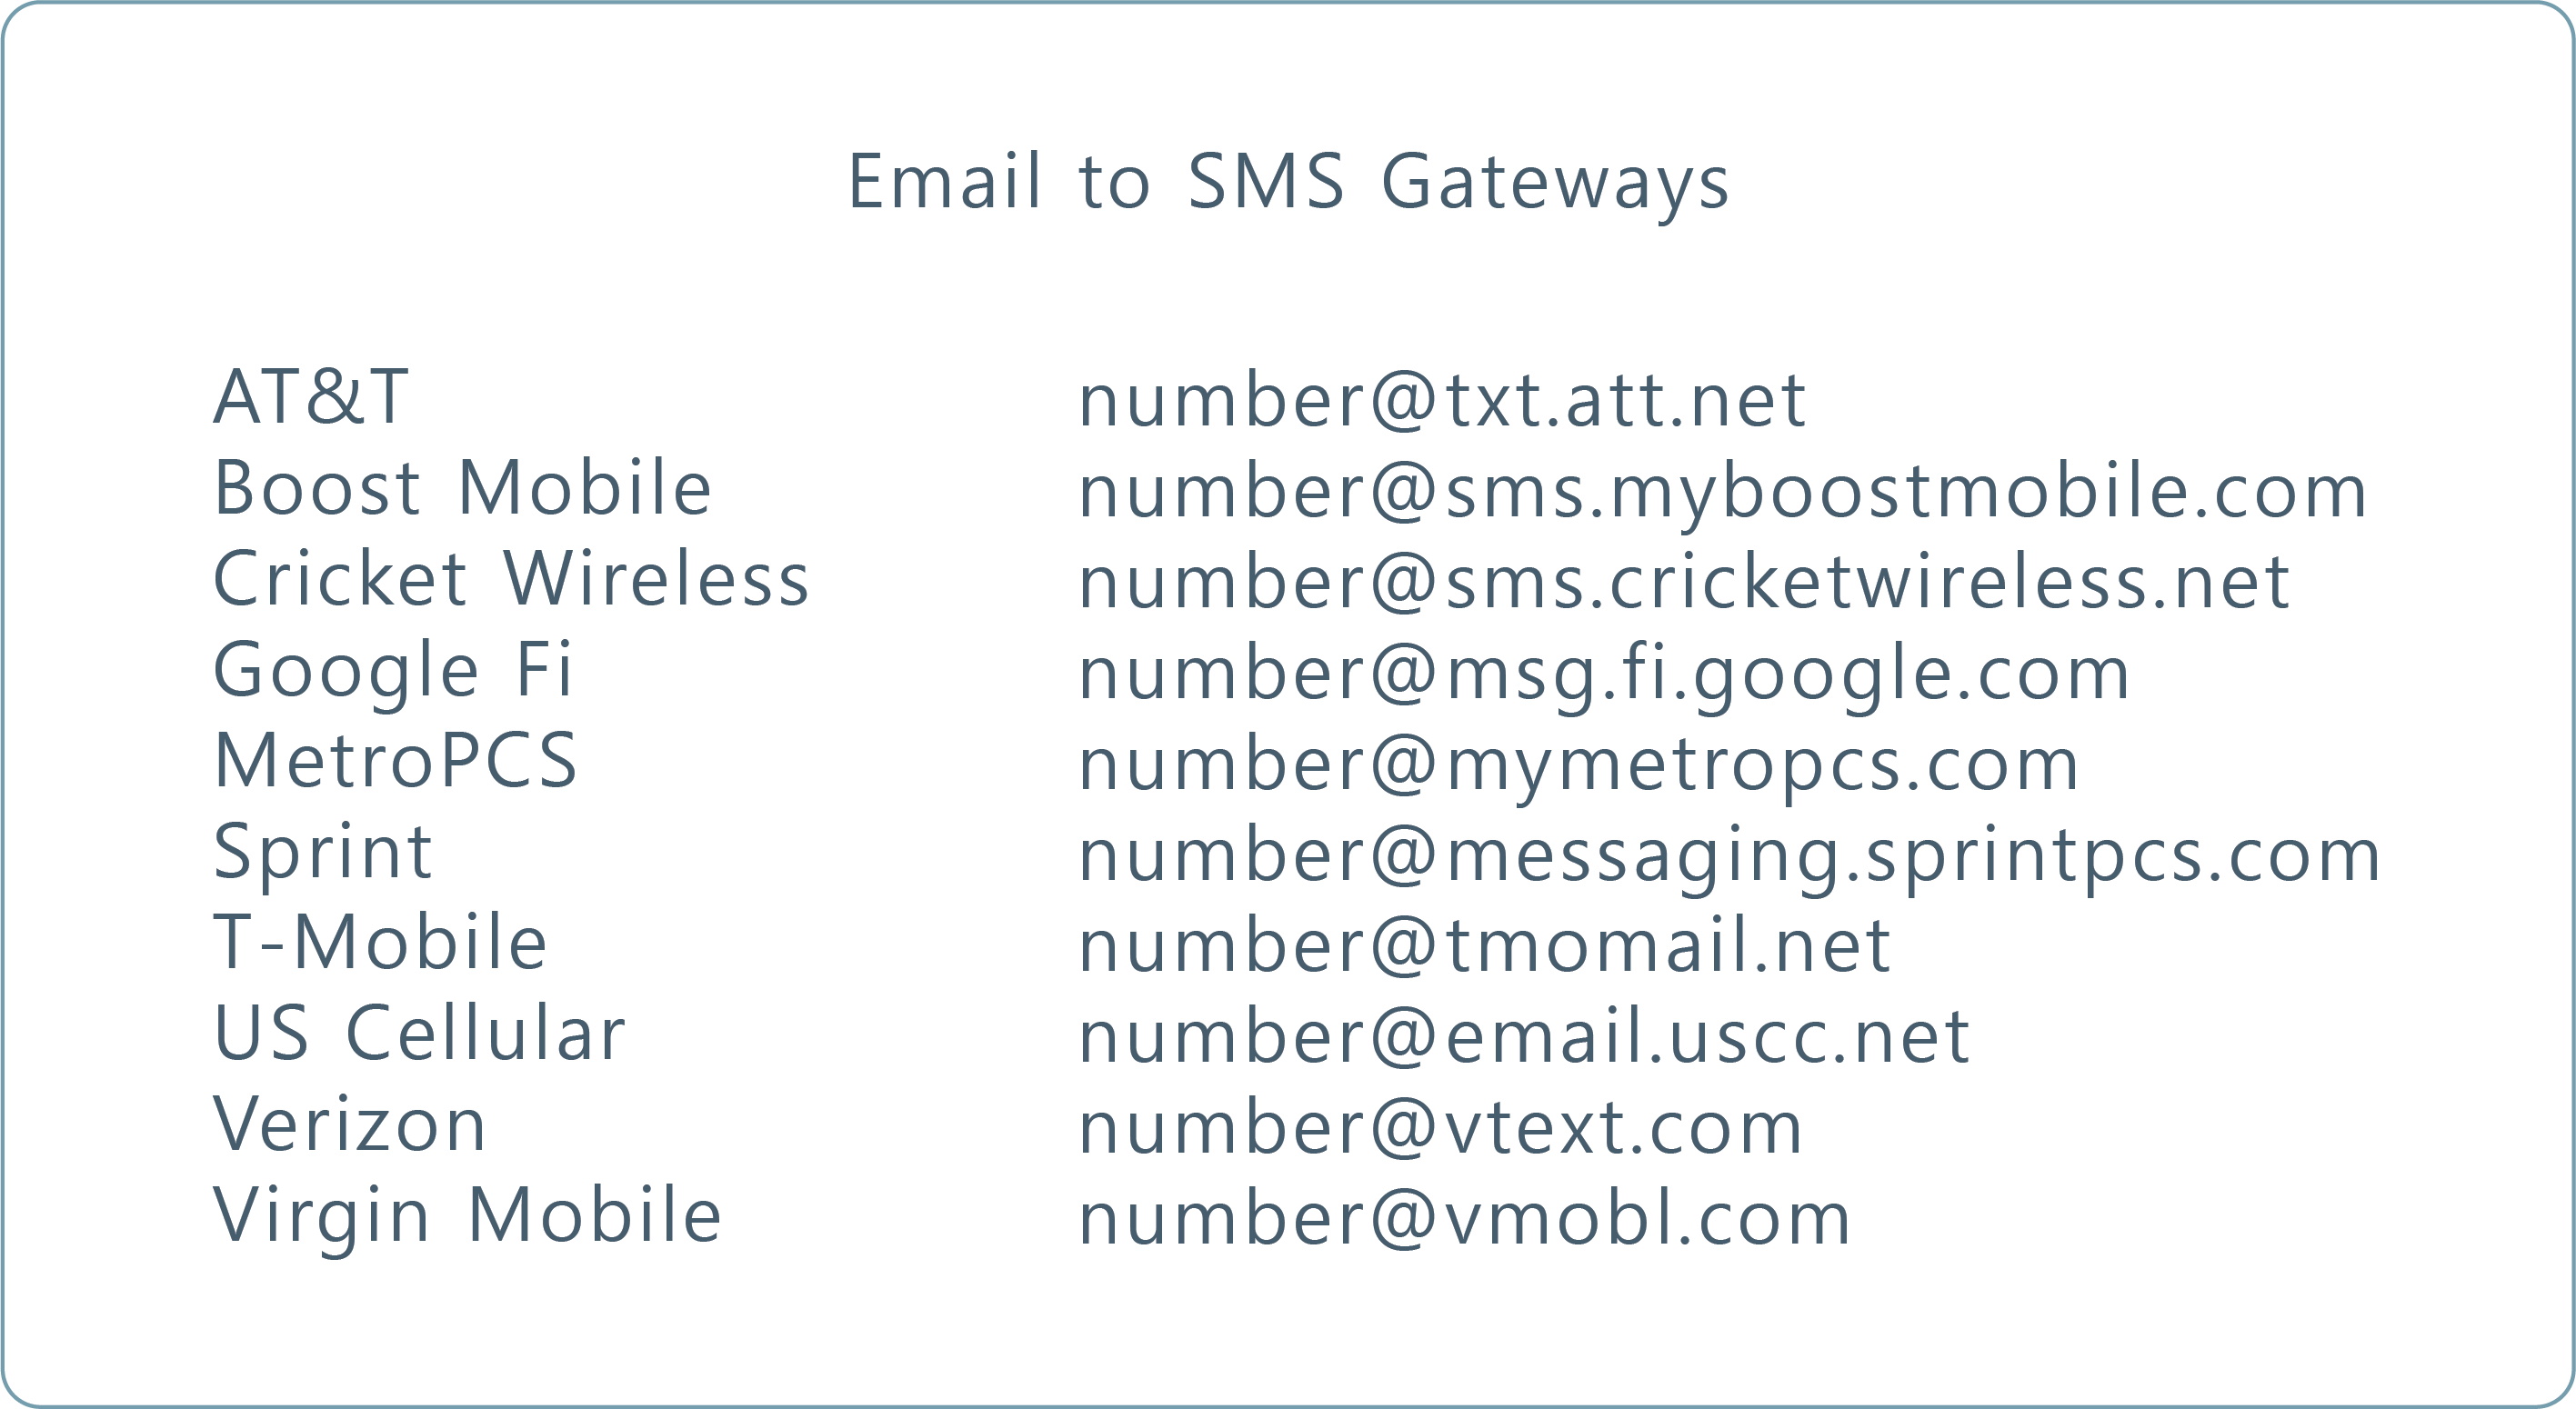
Email Alerts. If you'd like to be notified every time there is an alert on your system, you can set up email or text alerts here. For text, please refer to the following chart to configure your phone number's text address:
You can then customize which types of alerts you would like to receive by enabling/disabling them on the column to the right side of the page:
Critical Alerts. When ON, Rhythm will send email/texts for all CRITICAL alerts. An example of a critical alert is a time when the machine needs your action to resume function.
Nutrient Alerts. When ON, Rhythm will send email/texts for all nutrient low level alerts. This is important to know if your machine has a full schedule, it may run out of a certain nutrient when dosing which will most likely affect your EC results and/or throw off pH stabilization.
Rooms Not Fed. When ON, Rhythm will send email/texts for all rooms/zones that did not feed during the previous daylight hours. This could be helpful when there is an issue that needs resolving on your end or if you are off site and a team member has forgotten to schedule, for example.
Feeding Alerts. When ON, Rhythm will send email/texts for all non-critical feeding alerts. This can be something like low/high EC/pH alerts.
Flow Alerts. When ON, Rhythm will send email/texts regarding low/high flow alerts while feeding. This can be helpful for instances like busted or clogged pipes.
Day Storage Alerts. When ON, Rhythm will send email/texts for each day storage tank regarding levels and flow rate alerts.
Water Storage Alerts. When ON, Rhythm will send email/texts for water storage regarding low/high level triggers.

Use this button to send a test email out to all the listed recipients to check functionality.
Sometimes the connection can get stuck and this allows the memory processes to reset to zero. Your Rhythm engineer will most likely be the only one using this button.
3. Nutrients Configuration
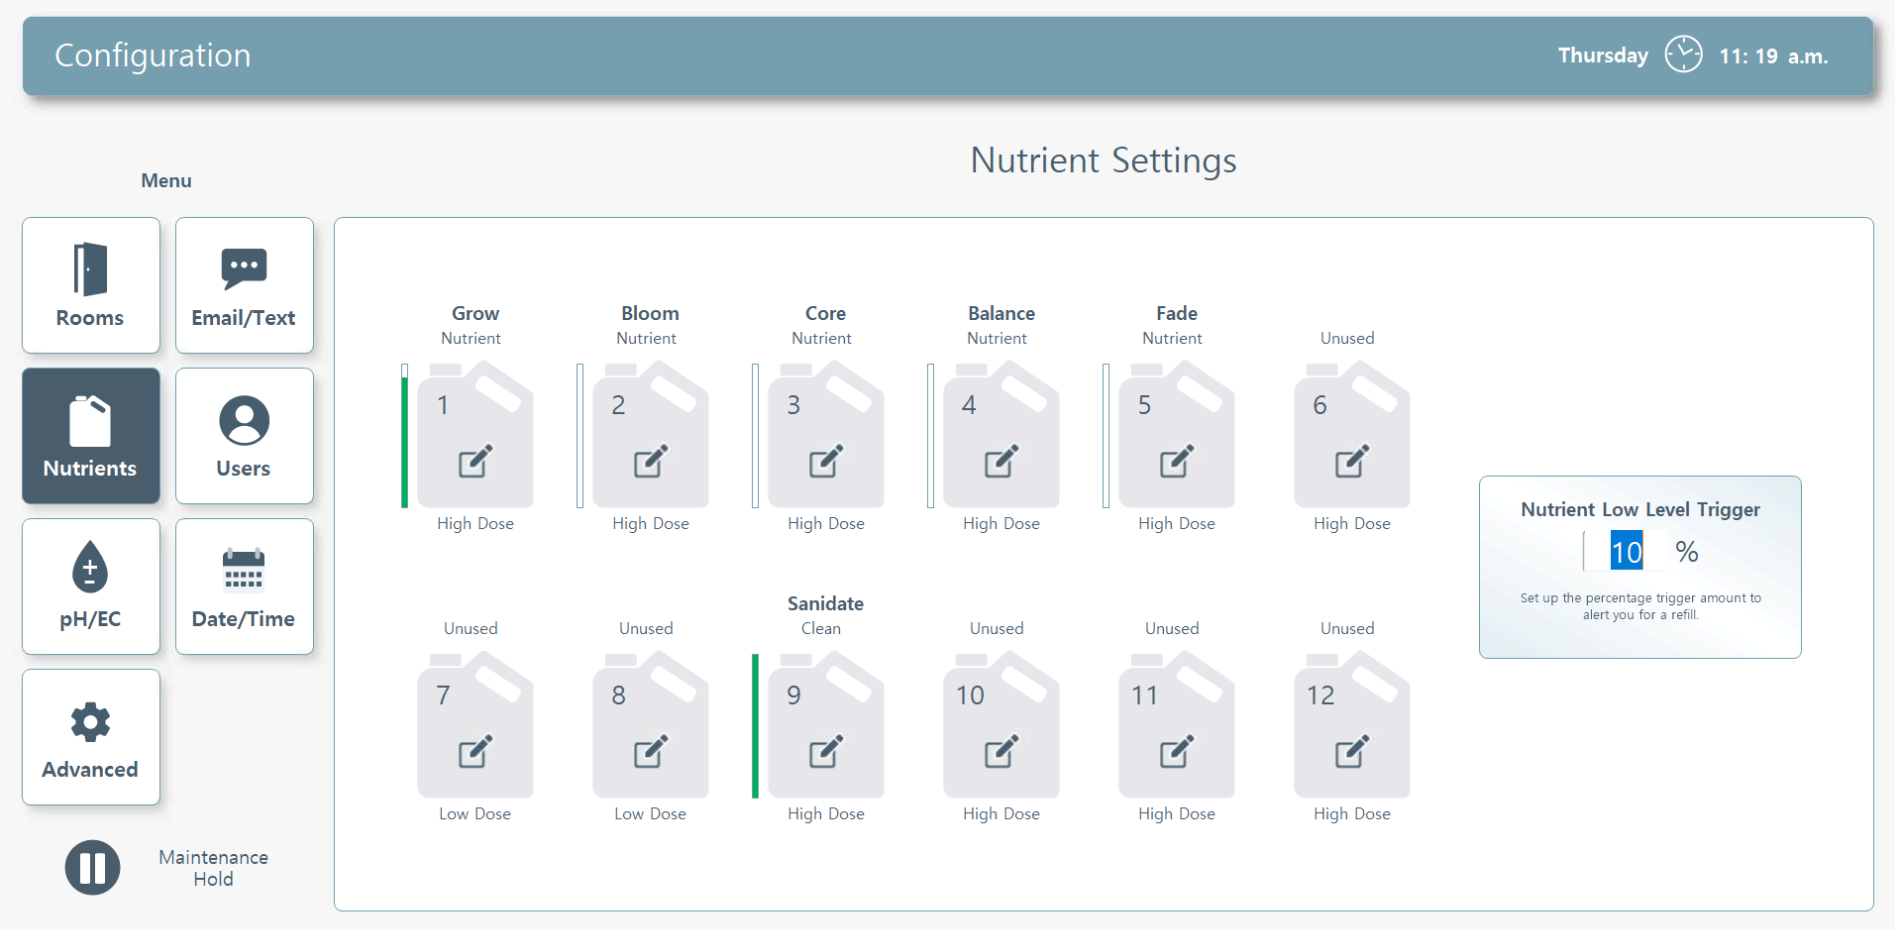
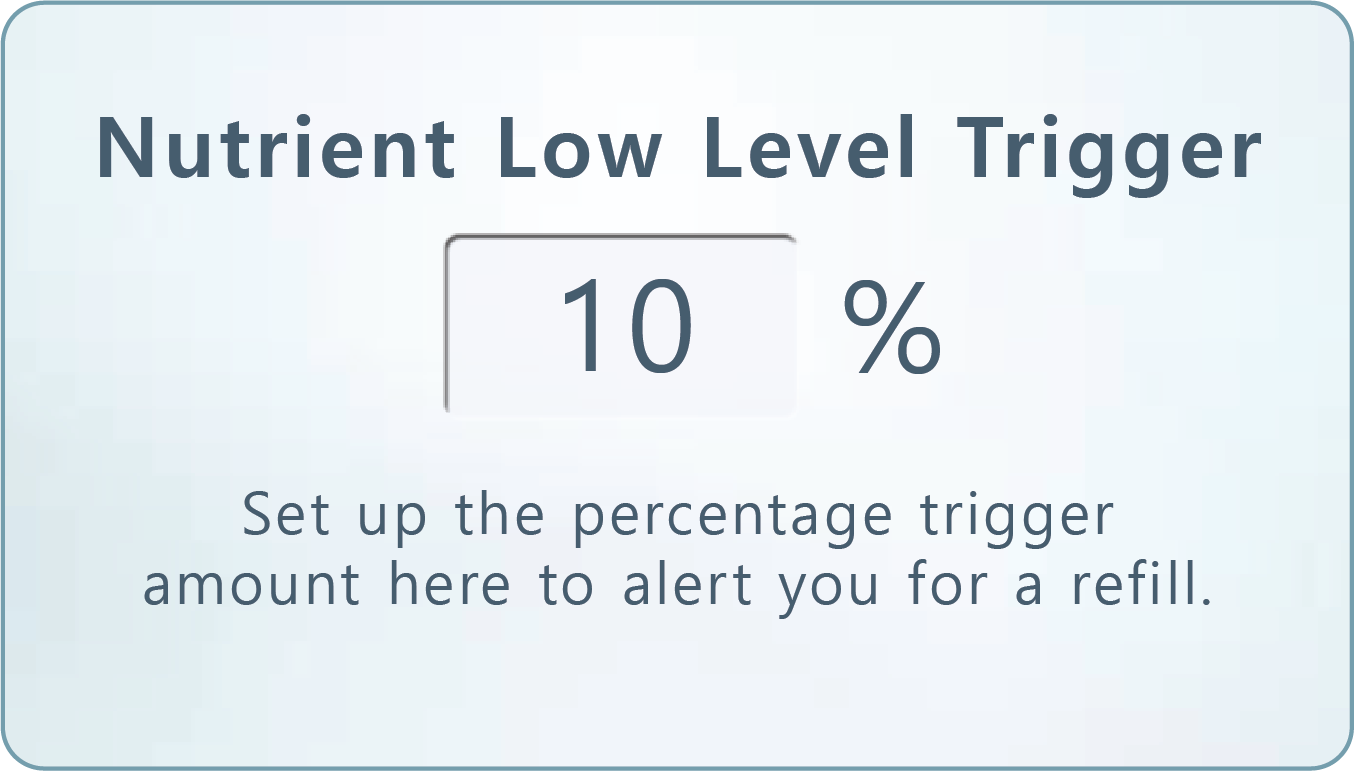
Nutrient Low Level Trigger. When your nutrient bottle is about to be empty, the system will alert you to refill. Set up the percentage trigger amount here.
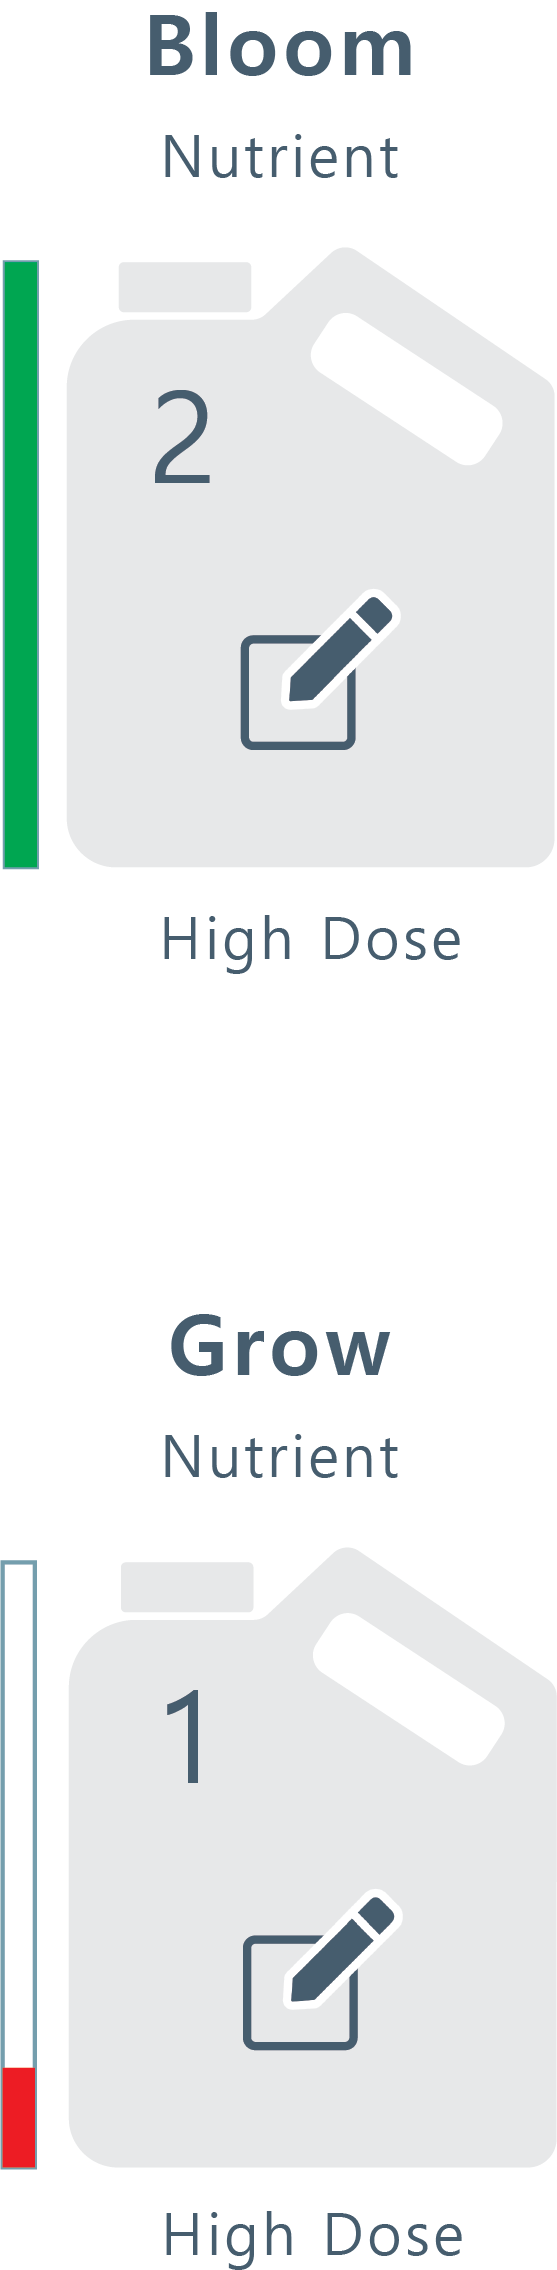
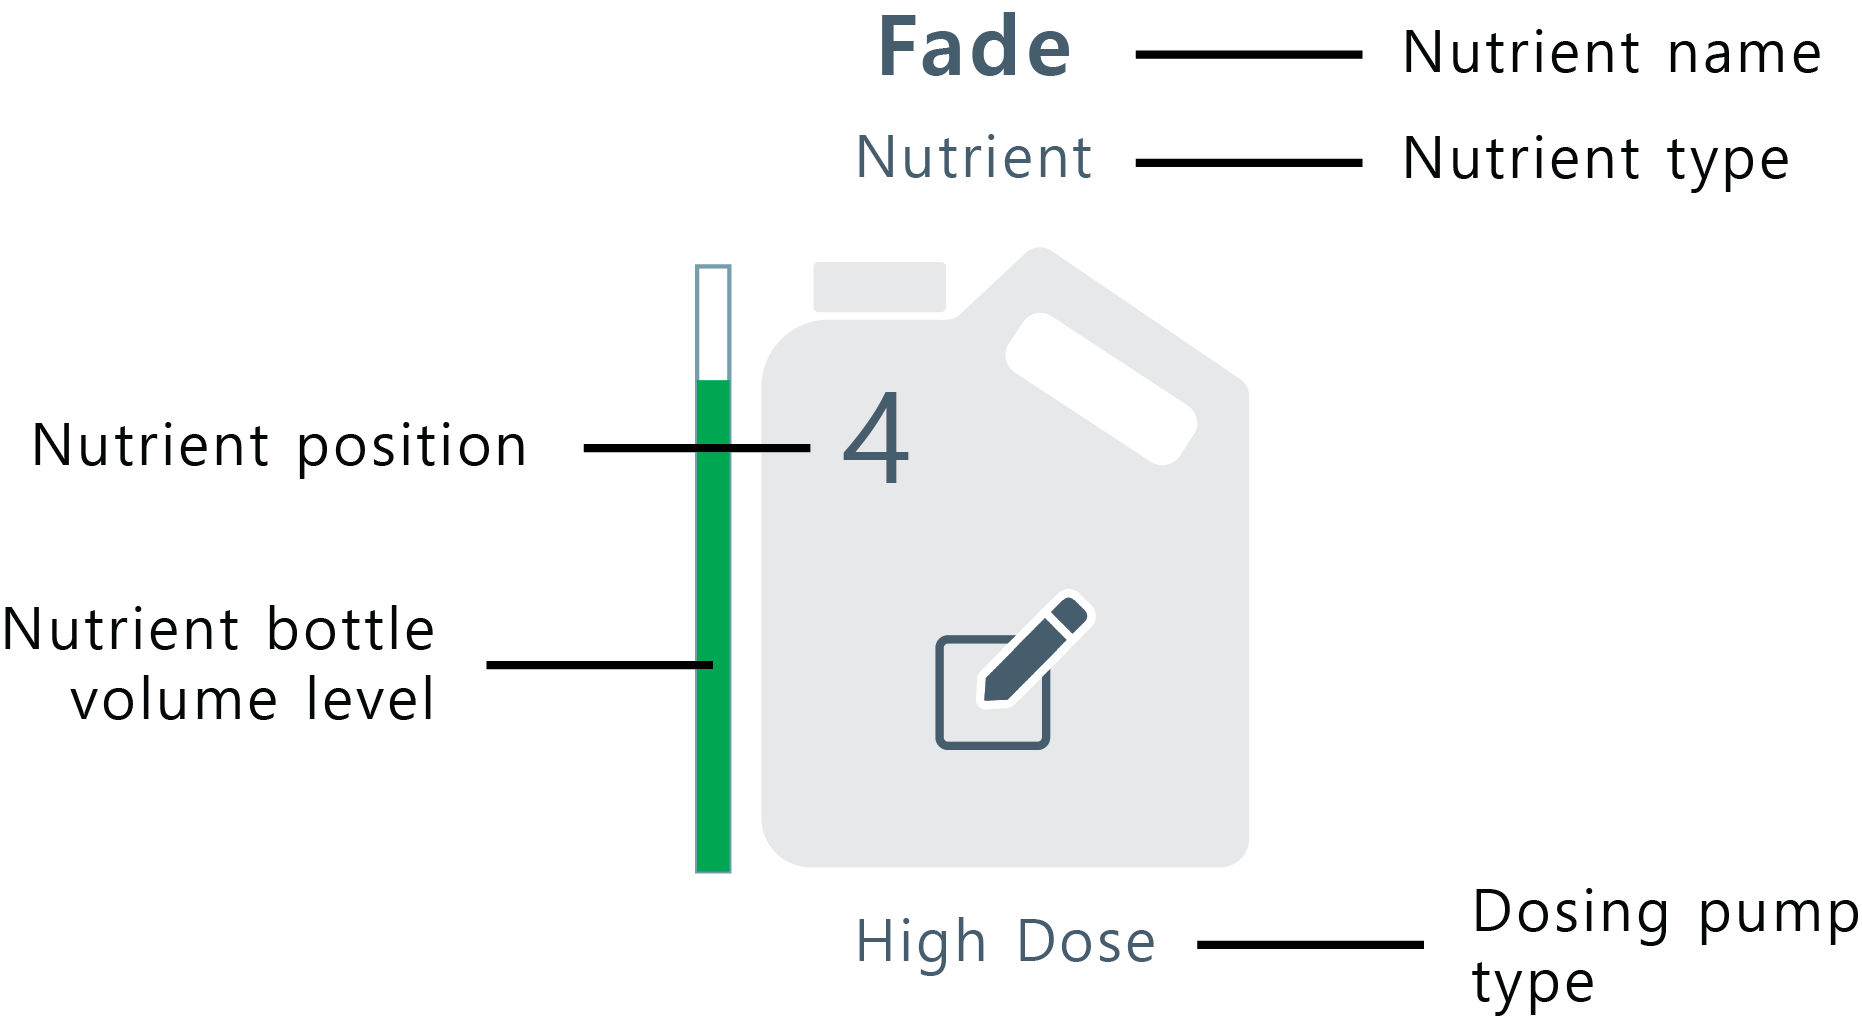
Nutrient Icon. The nutrient container icon will show the nutrient name, nutrient type, container's nutrient volume, dosing pump type, and pump position.
Click directly on the nutrient container icon to reveal the configuration settings popup:
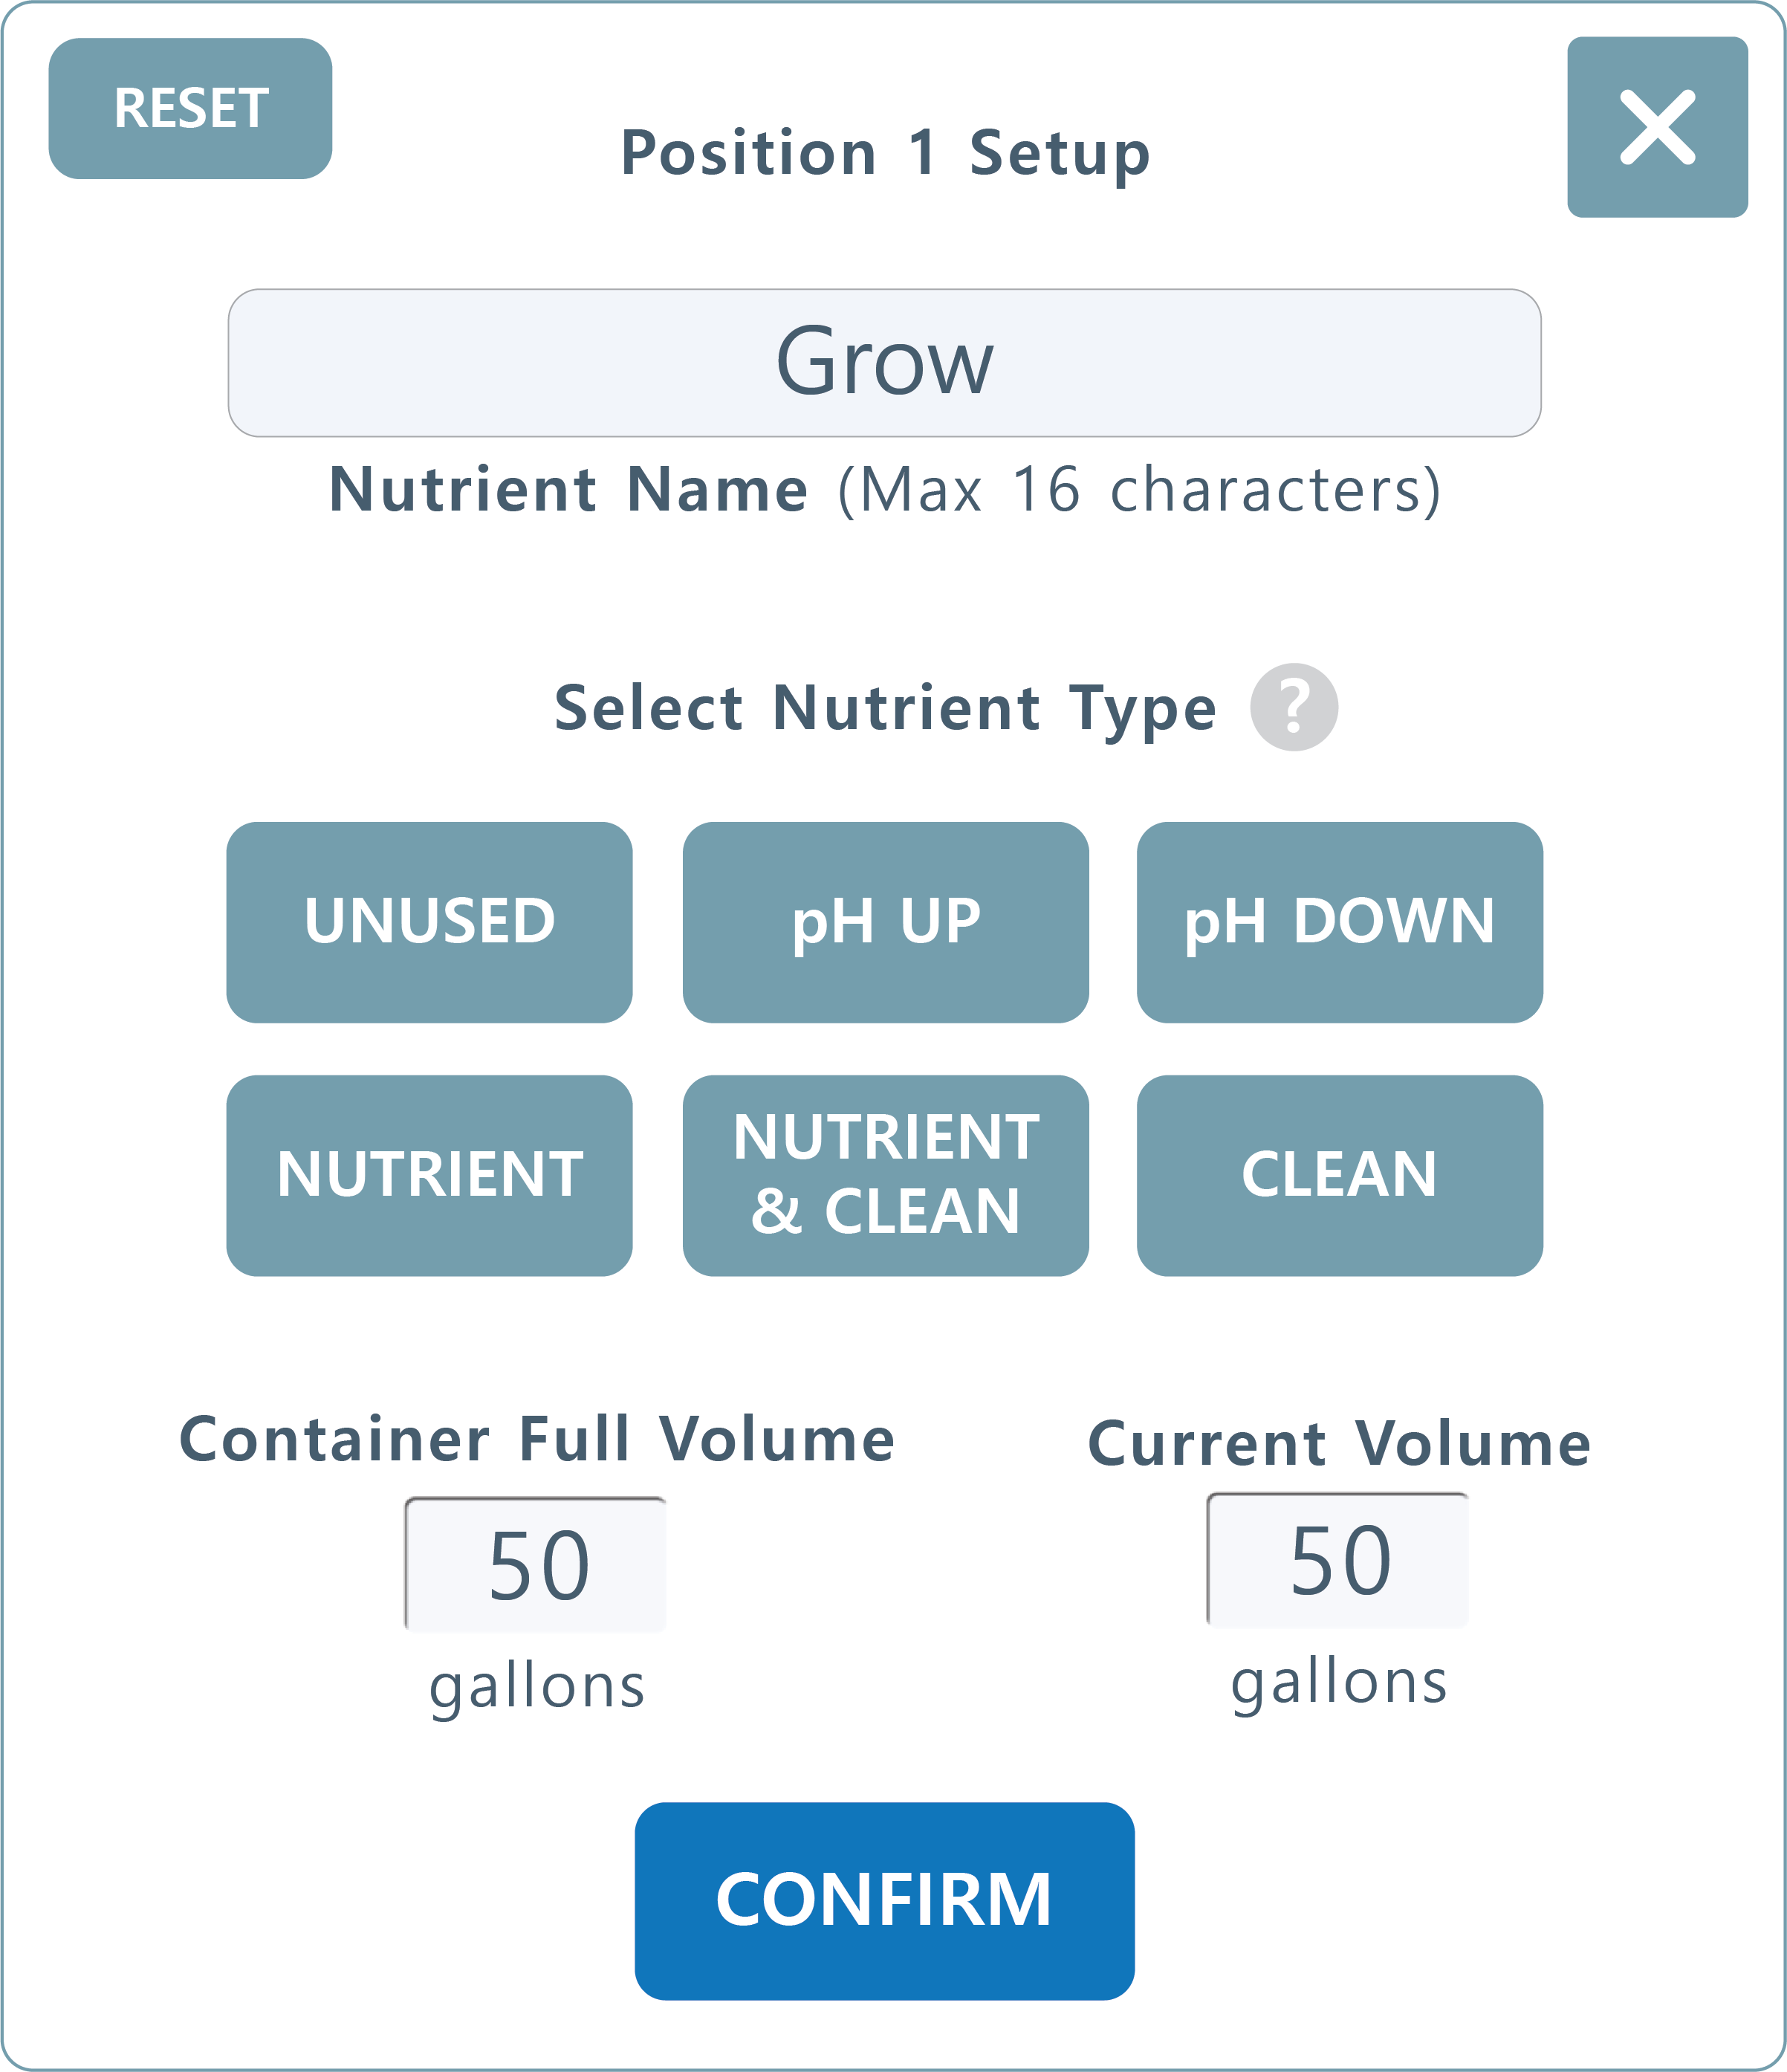
Your individual nutrients can be added and edited here. Positions are based on which dosing pump position the nutrient pulls from. You can learn more about physical nutrient position placements on the NUTRIENTS & DOSING PUMP HARDWARE page.
Setup.
1) Enter the name of your nutrient.
2) *Important* Select the type of nutrient:
• Unused - No current nutrient being used
• pH up and Down - These solutions will be used during pH stabilization. You might use another nutrient in place of pH up or down (i.e silica or household recipes), but classify them as pH up/down so that Rhythm may correctly use them during stabilization.
• Nutrient - Use this for any standard nutrient to be used.
• Nutrient & Clean - If you've enabled this in the recipe, this type of nutrient will inject while feeding but will also be used during the clean cycle.
• Clean - This type of nutrient will only be used during the clean cycle.
3) Fill out your nutrient bottle size in gallons (i.e. 5 gals, 55 gals) and the current estimated volume inside. This will be used during the mixing phase to let you know if you are running low.
Please note - Reset "Current Volume" by clicking on the nutrient in the overview screen each time the container is replaced or refilled.
Calibration. Every dosing pump must be calibrated at the beginning and occasionally during use. Please view our full guide on calibrating dosing pumps in NUTRIENTS & DOSING PUMPS HARDWARE.
4. Users Configuration
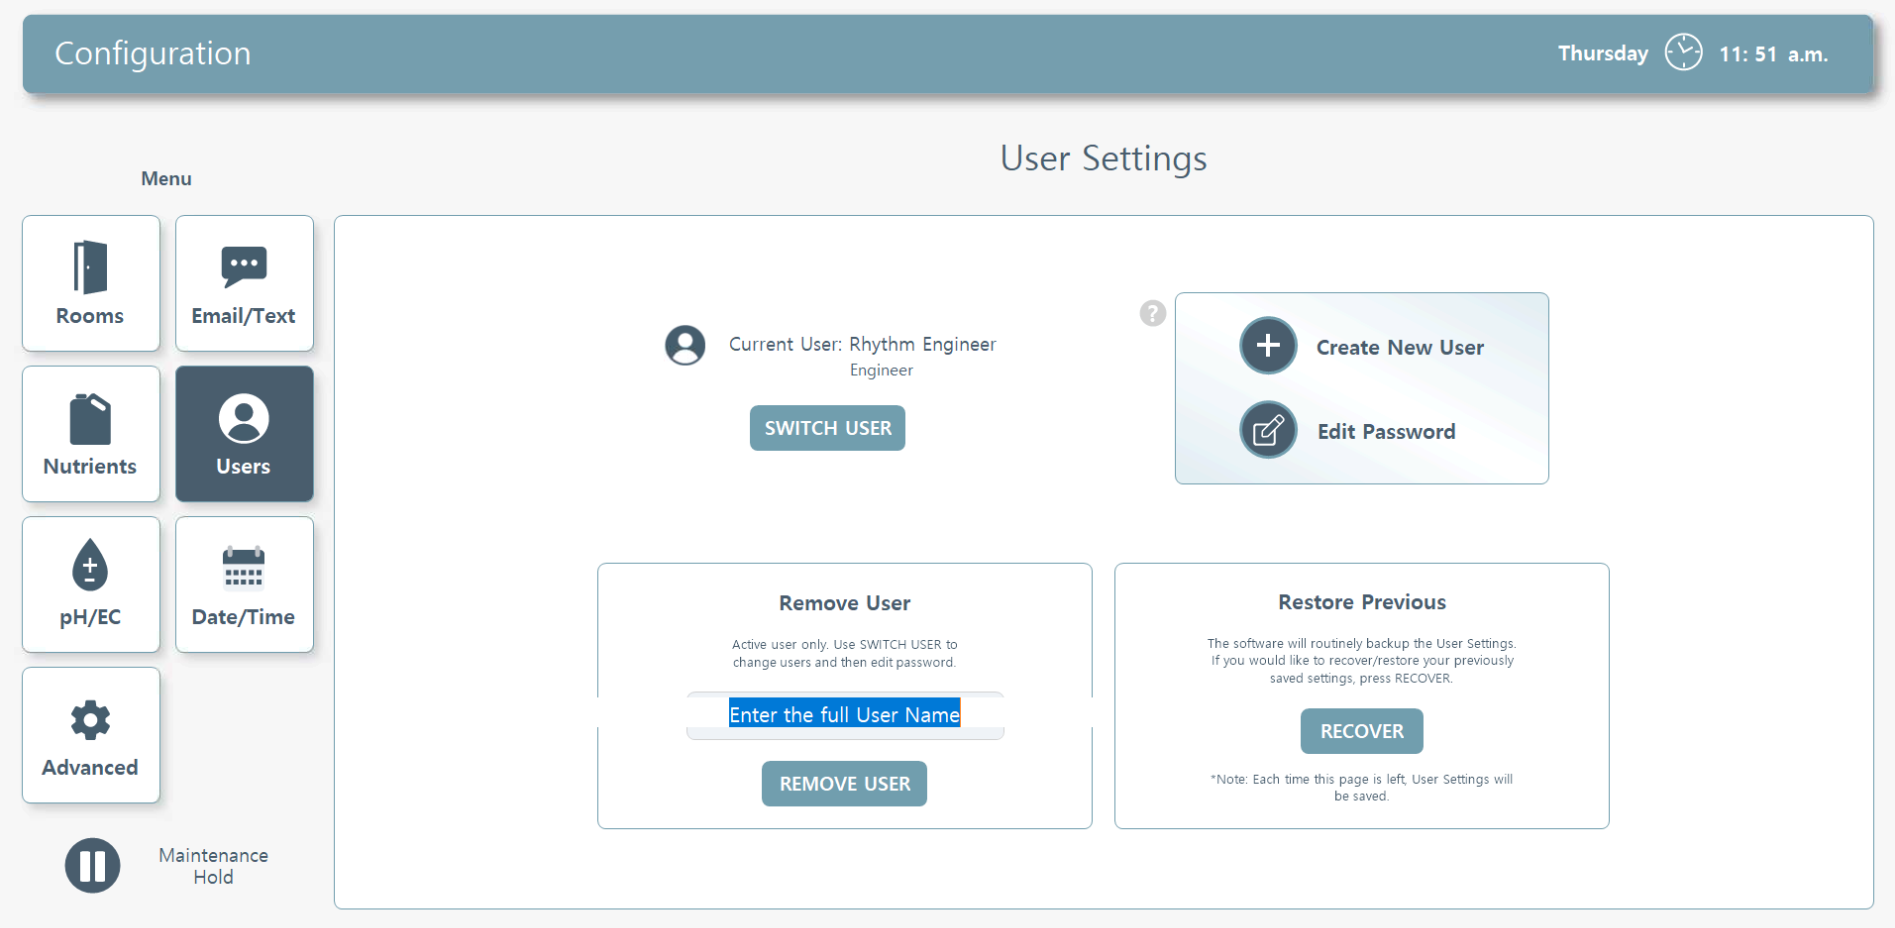
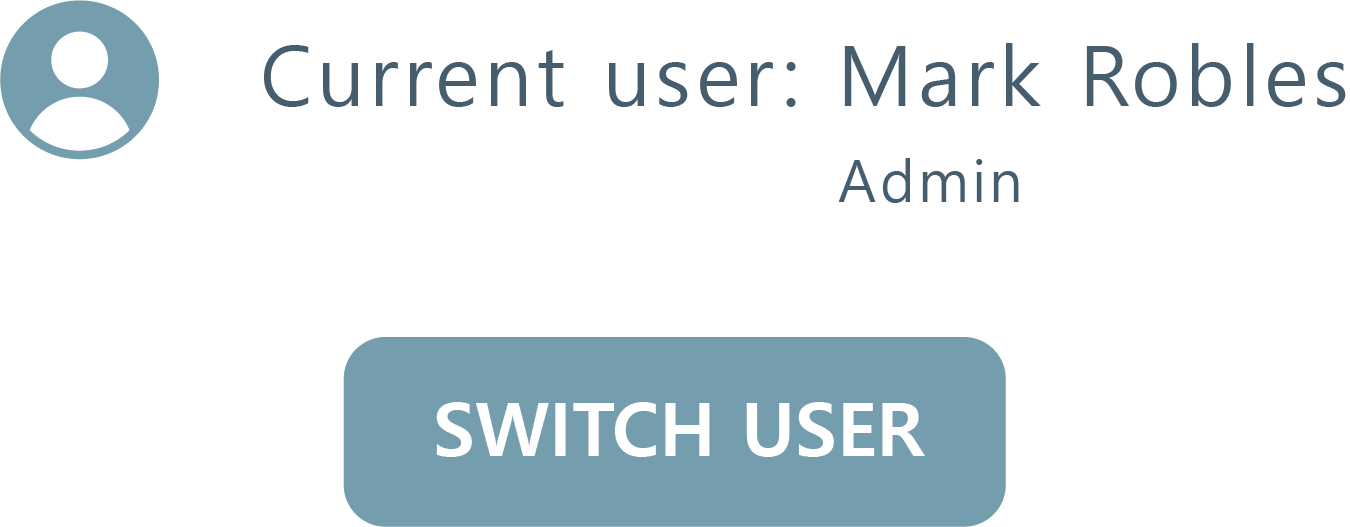
Current User. Current user logged in will be displayed here. You can change the user here, or login by clicking the bottom left Rhythm Logo to reveal the sub menu.
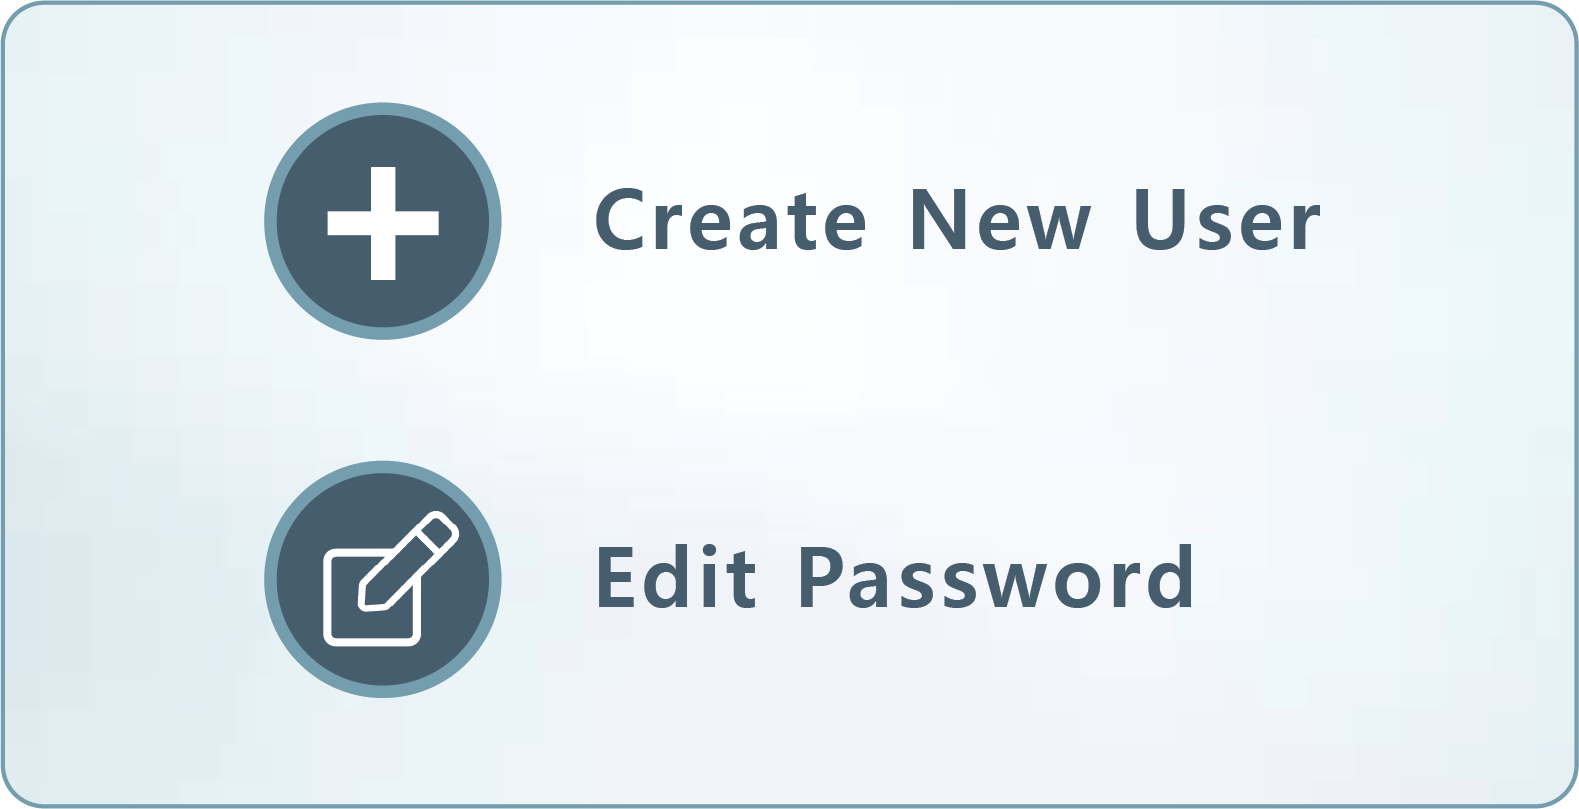
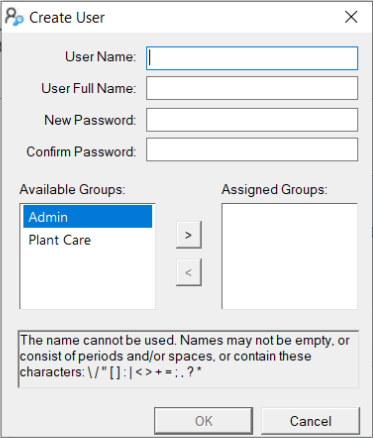
Edit User. You can create a new user here or change the password of users. When adding a new user, you can assign them permissions, i.e. "admin" or "plant care." Note: A plant care assigned user cannot edit recipes or change schedules.
Note: The local user name and password will be different from the remote access VNC Viewer username and password. The local user/password will only work for accessing the Rhythm Software. The VNC Viewer user/password will allow you to access the remote desktop viewer of the software on your phone or computer remotely. You will still have to log into the machine when accessing from VNC Viewer with the LOCAL user/password. See more about adding remote access users in the SOFTWARE START-UP GUIDE.
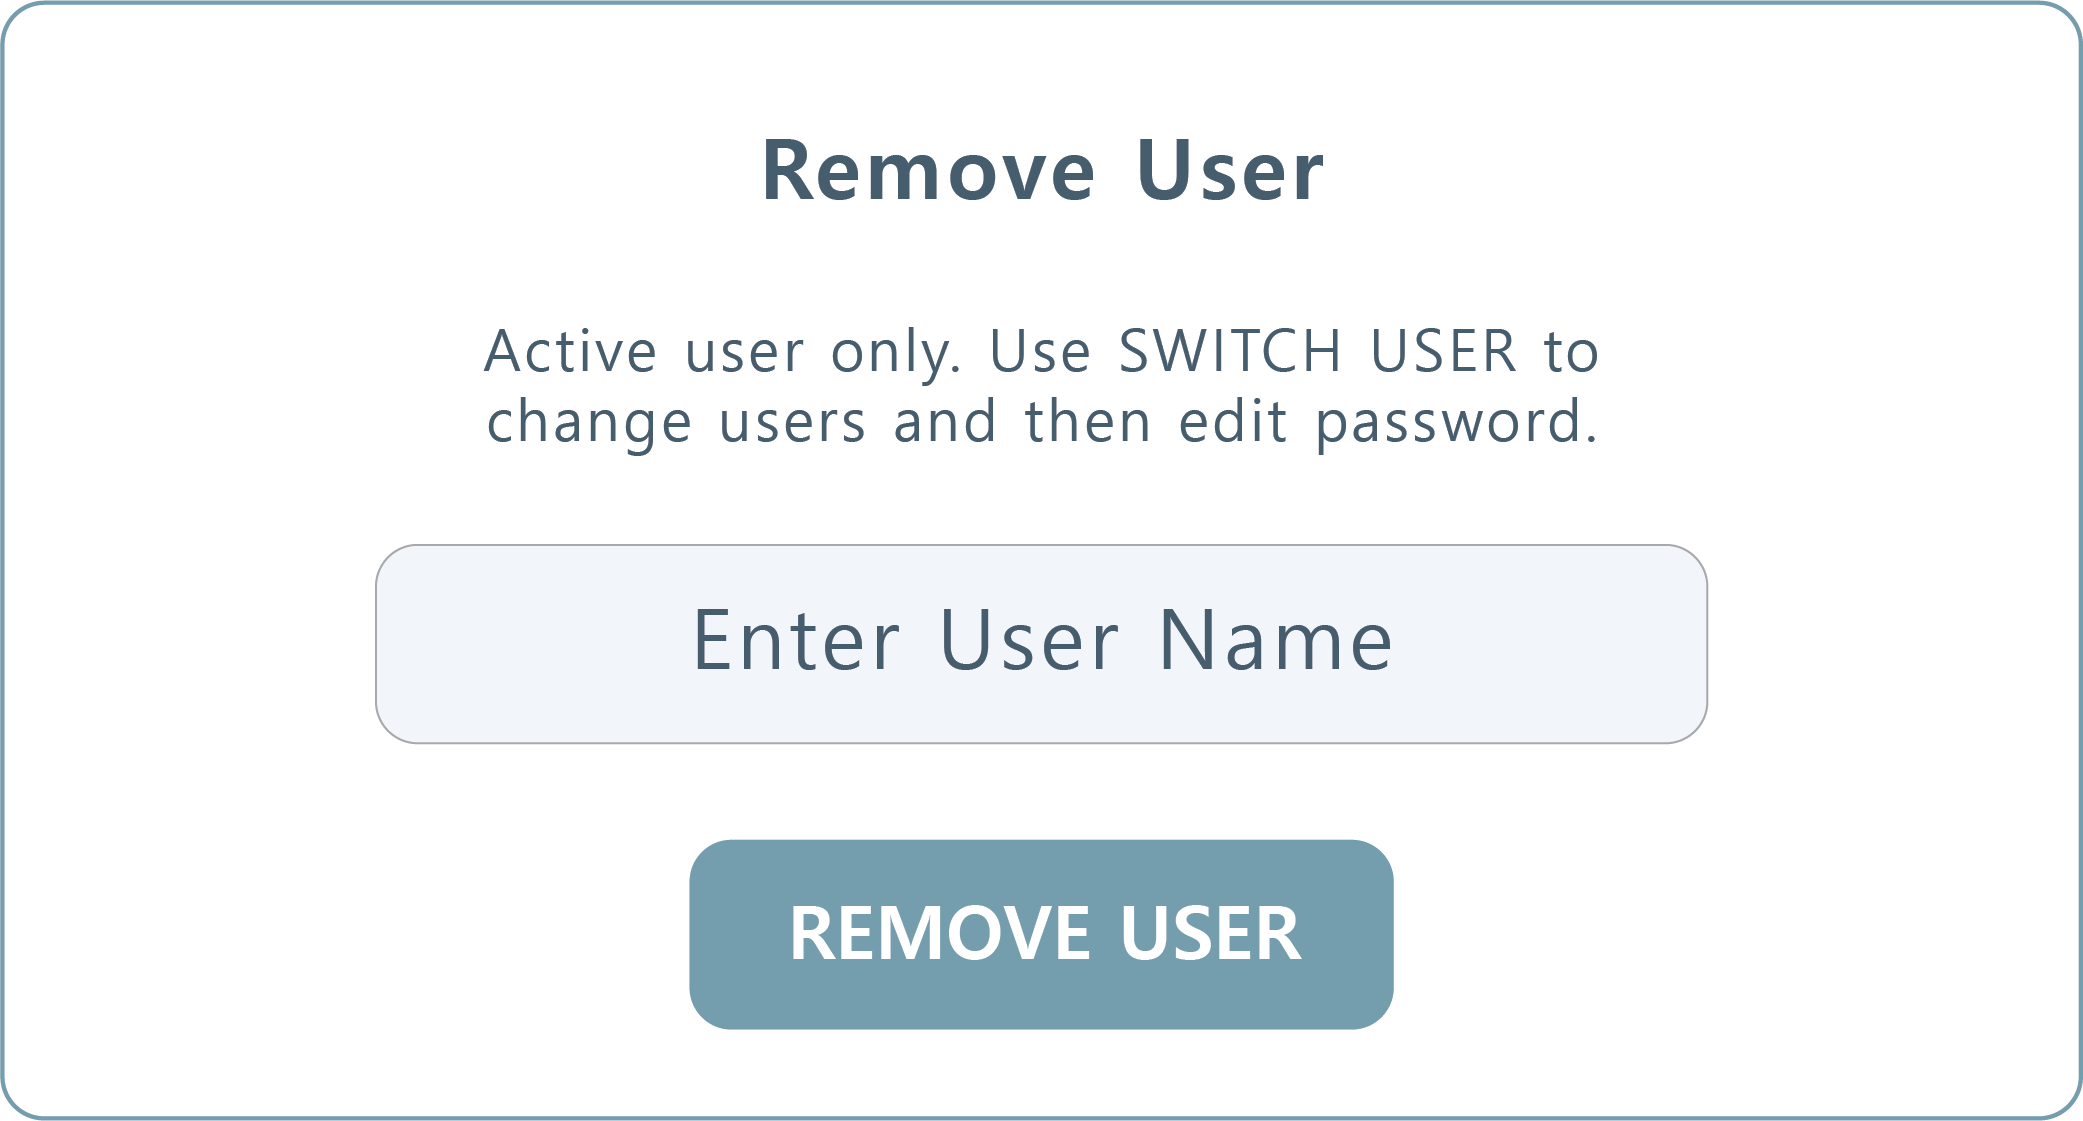
Remove User. If you need to remove a user's access, please make sure they are logged in currently and then type their user name here to remove them from the system. Rhythm Engineer can also perform this action at your request.
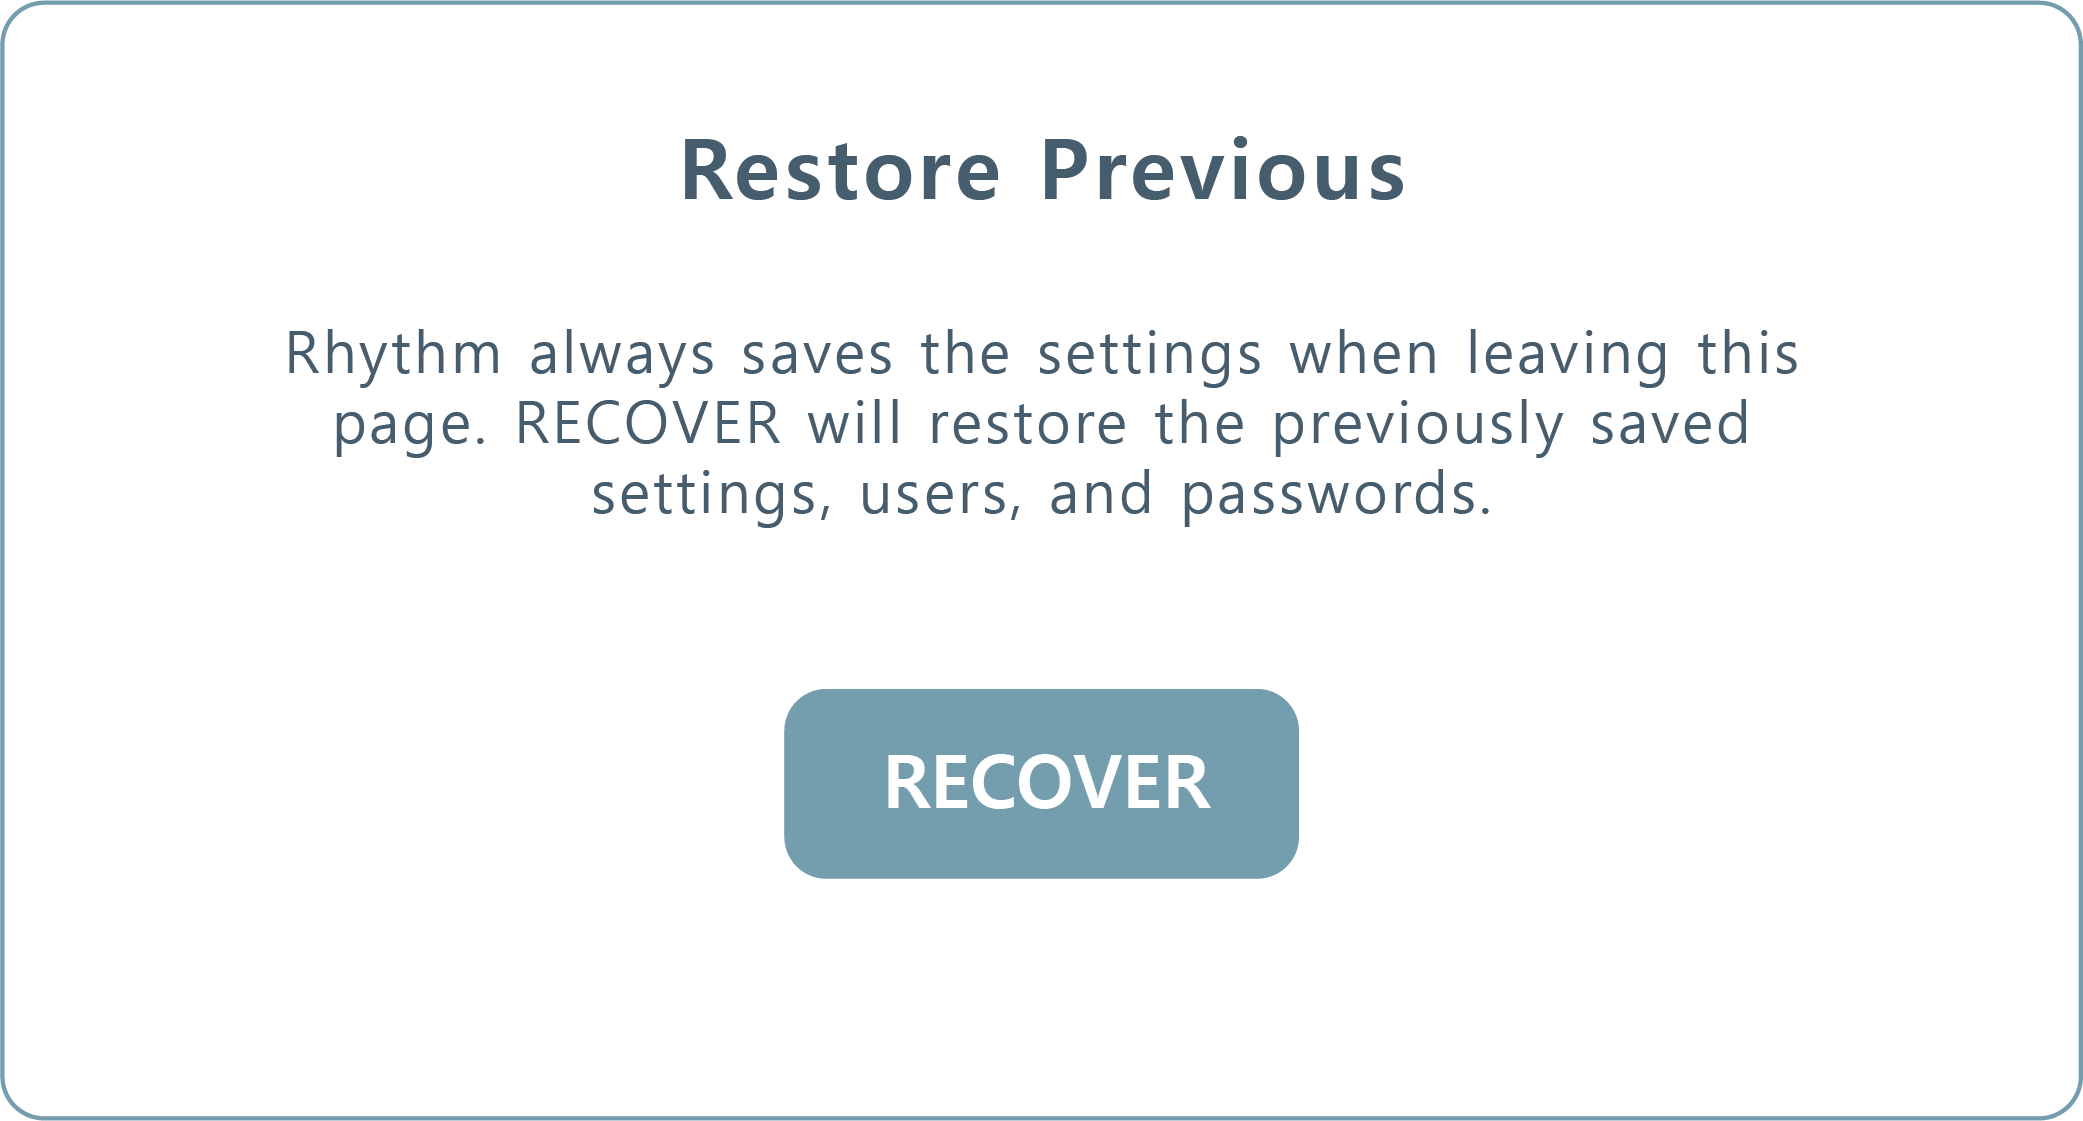
Restore Previous. The software will routinely backup the User Settings. If you would like to recover/restore your previously saved settings, press Recover.
Note - Each time this page is left, User Settings will be saved.
Note - Each time this page is left, User Settings will be saved.
5. pH/EC Configuration
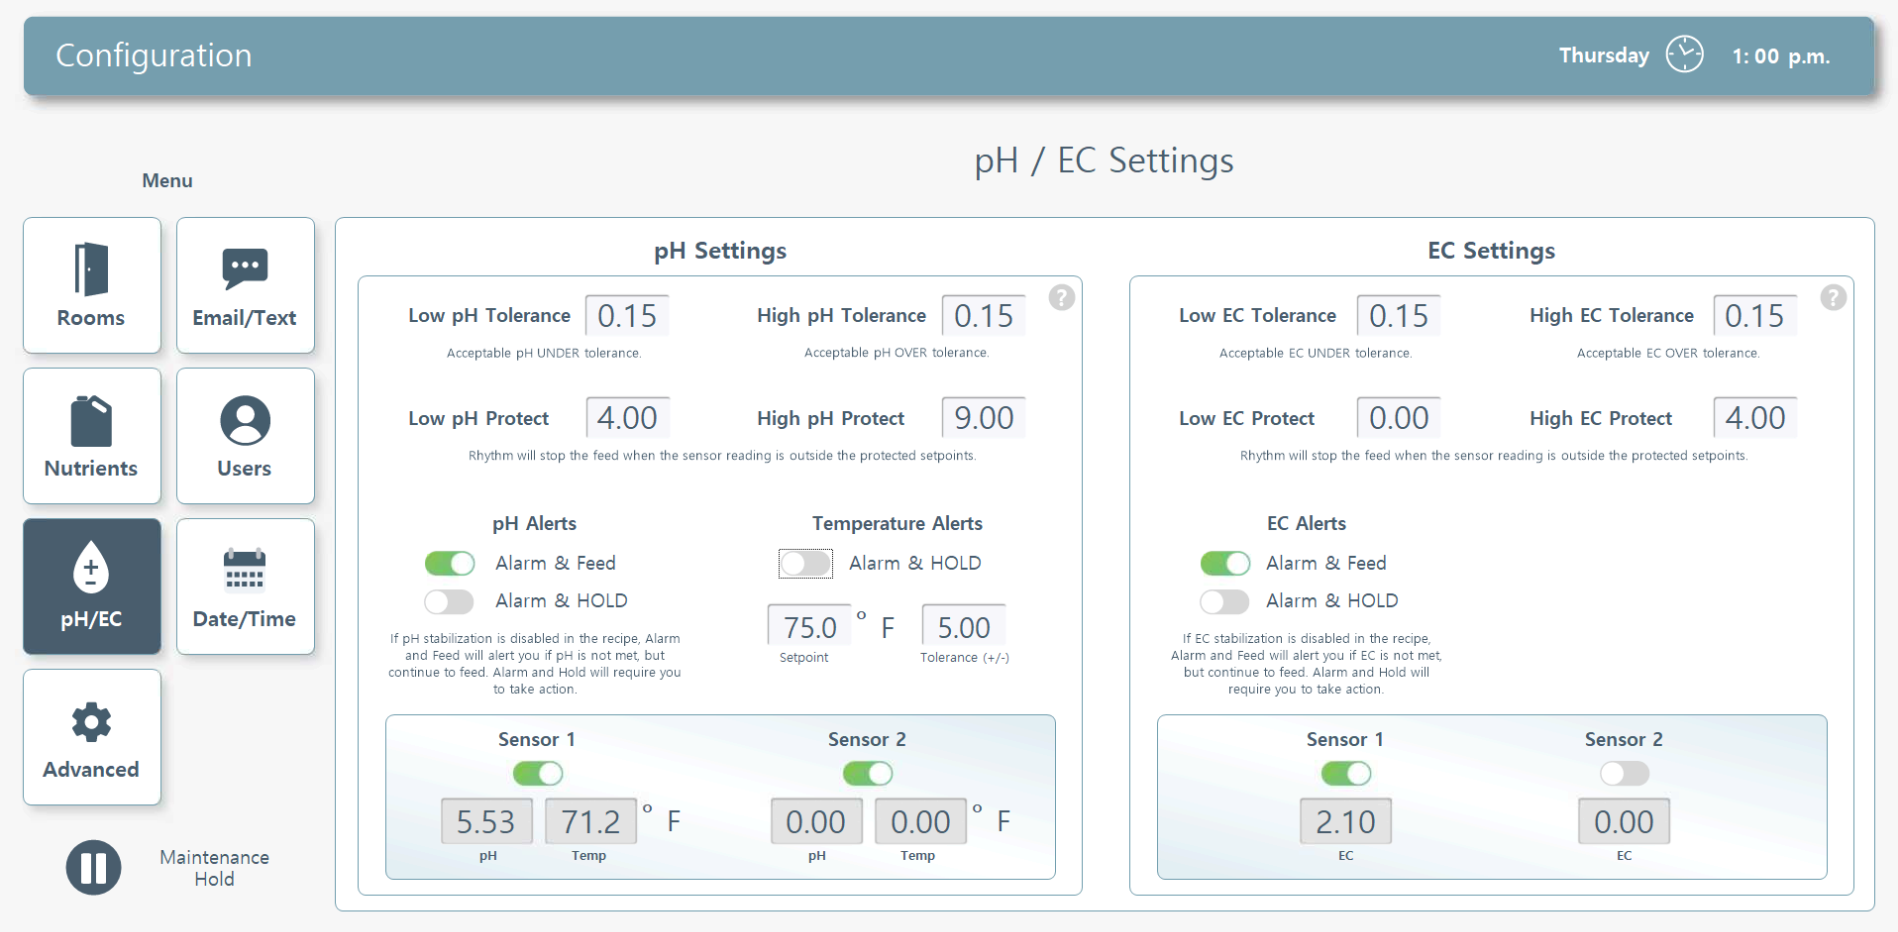

pH Settings. There are several pH settings you can edit to fine tune your stabilization process:
Low Tolerance. Your low tolerance is how much UNDER your desired pH (set in the recipe) you're willing to accept as a PASS i.e. if you'd like your recipe to feed at 6.0 pH, a .20 low tolerance will PASS your recipe if it achieves 5.8 pH.
High Tolerance. Your high tolerance is how much OVER your desired pH you're willing to accept as a PASS i.e. if you'd like your recipe to feed at 6.0 pH, a .10 high tolerance will PASS your recipe if it achieves 6.1 pH.
Low Protect. Your low protect setting will stop the feed completely when the sensor reading is outside the protected setpoints. Feeds reaching these settings will NEVER feed regardless of "Alarm and Feed/Hold" settings.
High Protect. Your high protect setting will stop the feed completely when the sensor reading is outside the protected setpoints. Feeds reaching these settings will NEVER feed regardless of "Alarm and Feed/Hold" settings.
pH Alerts. Use this toggle to decide how you'd like the system to proceed in the case it doesn't achieve pH stabilization:
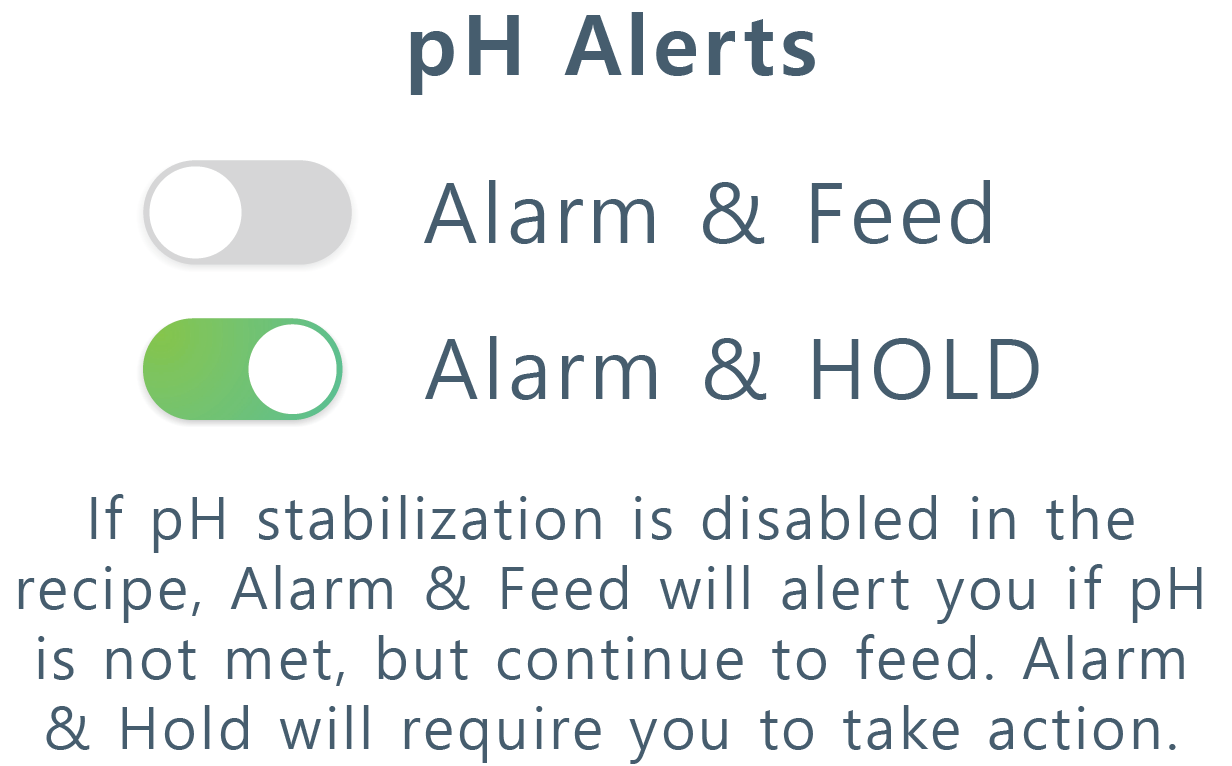
Alarm and Feed. This means if the machine does not achieve stabilization, it will display an alarm, notify you via email/text, and continue feeding.
Alarm and Hold. This means if the machine does not achieve stabilization, it will display an alarm, notify you via email/text, and HOLD until action is taken.
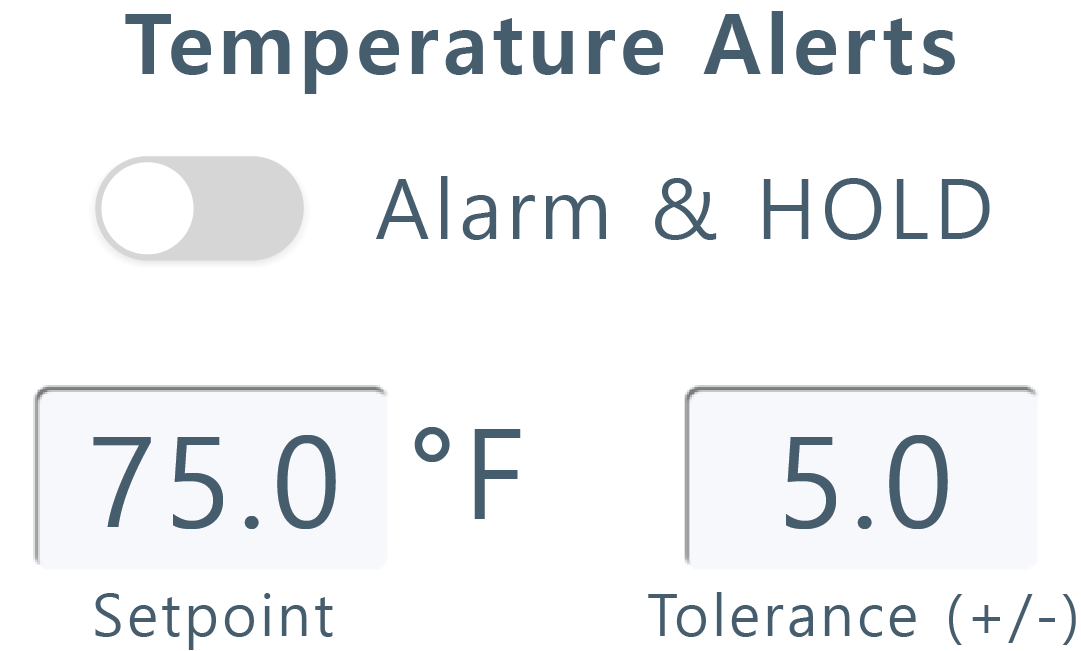
Temperature Alerts. Use this toggle for "Alarm & HOLD" if you'd like the system to hold feeding if the water temperature setpoint and tolerance is not met.
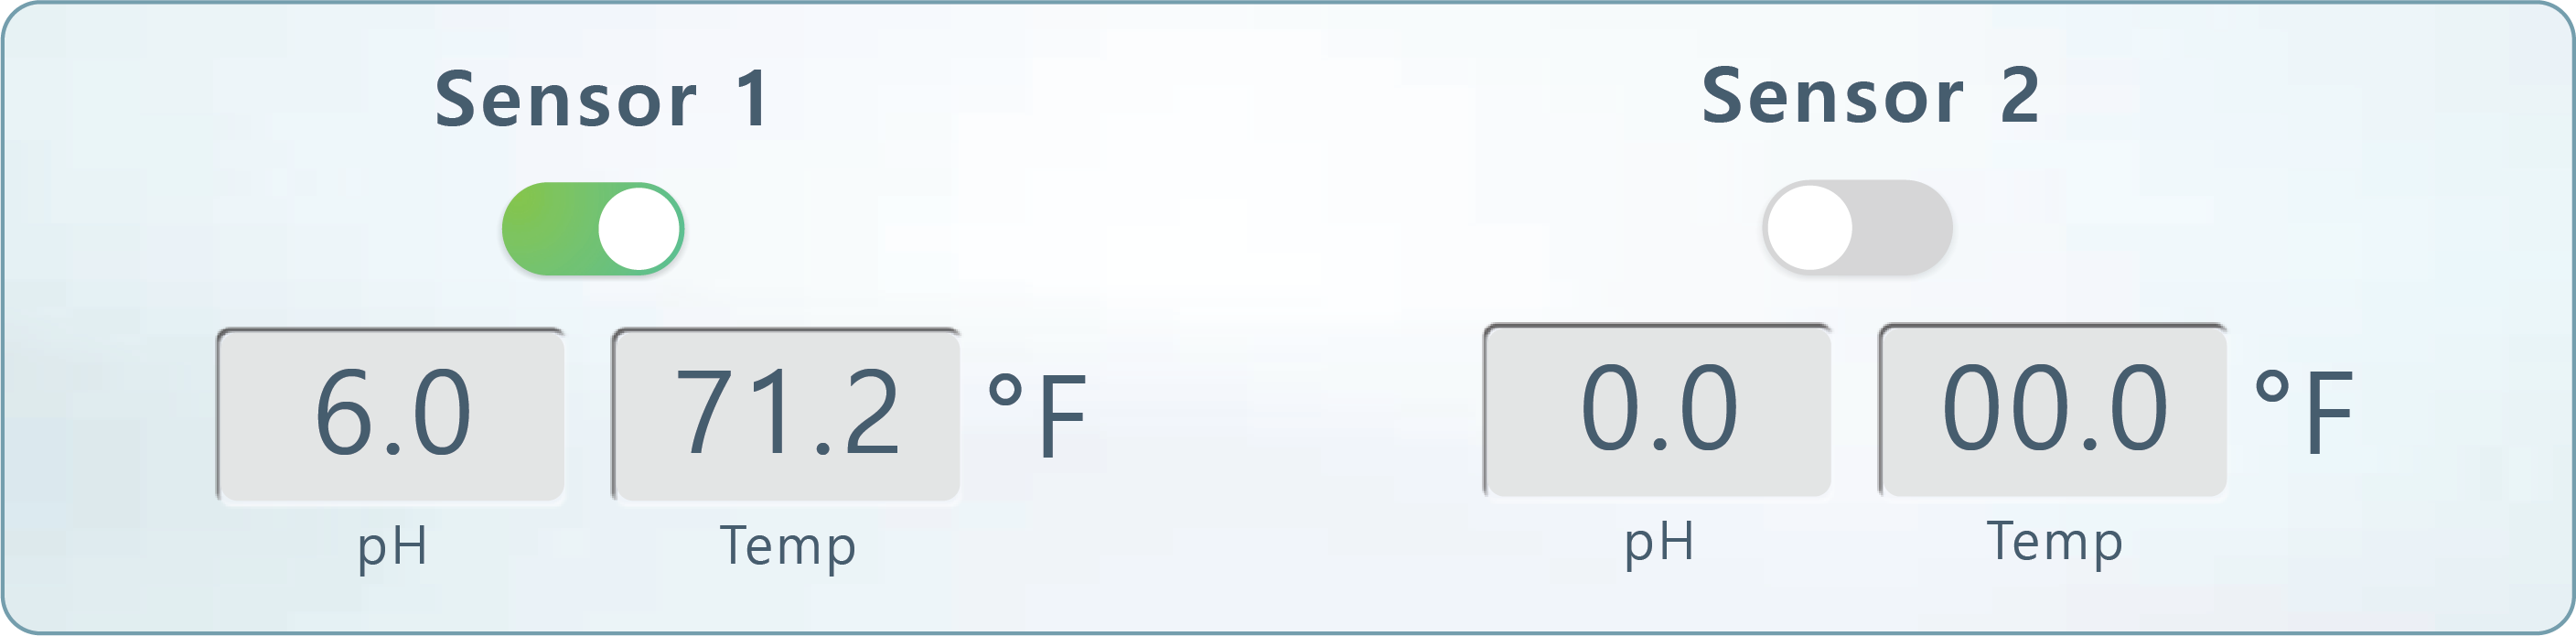
Your machine is equipped with redundant pH sensors. You can enable or disable one of them in case one of the sensors is faulty and you need the machine to read from a certain sensor only by using the toggle to the left. If both sensors are off, sensor 1 will be used.
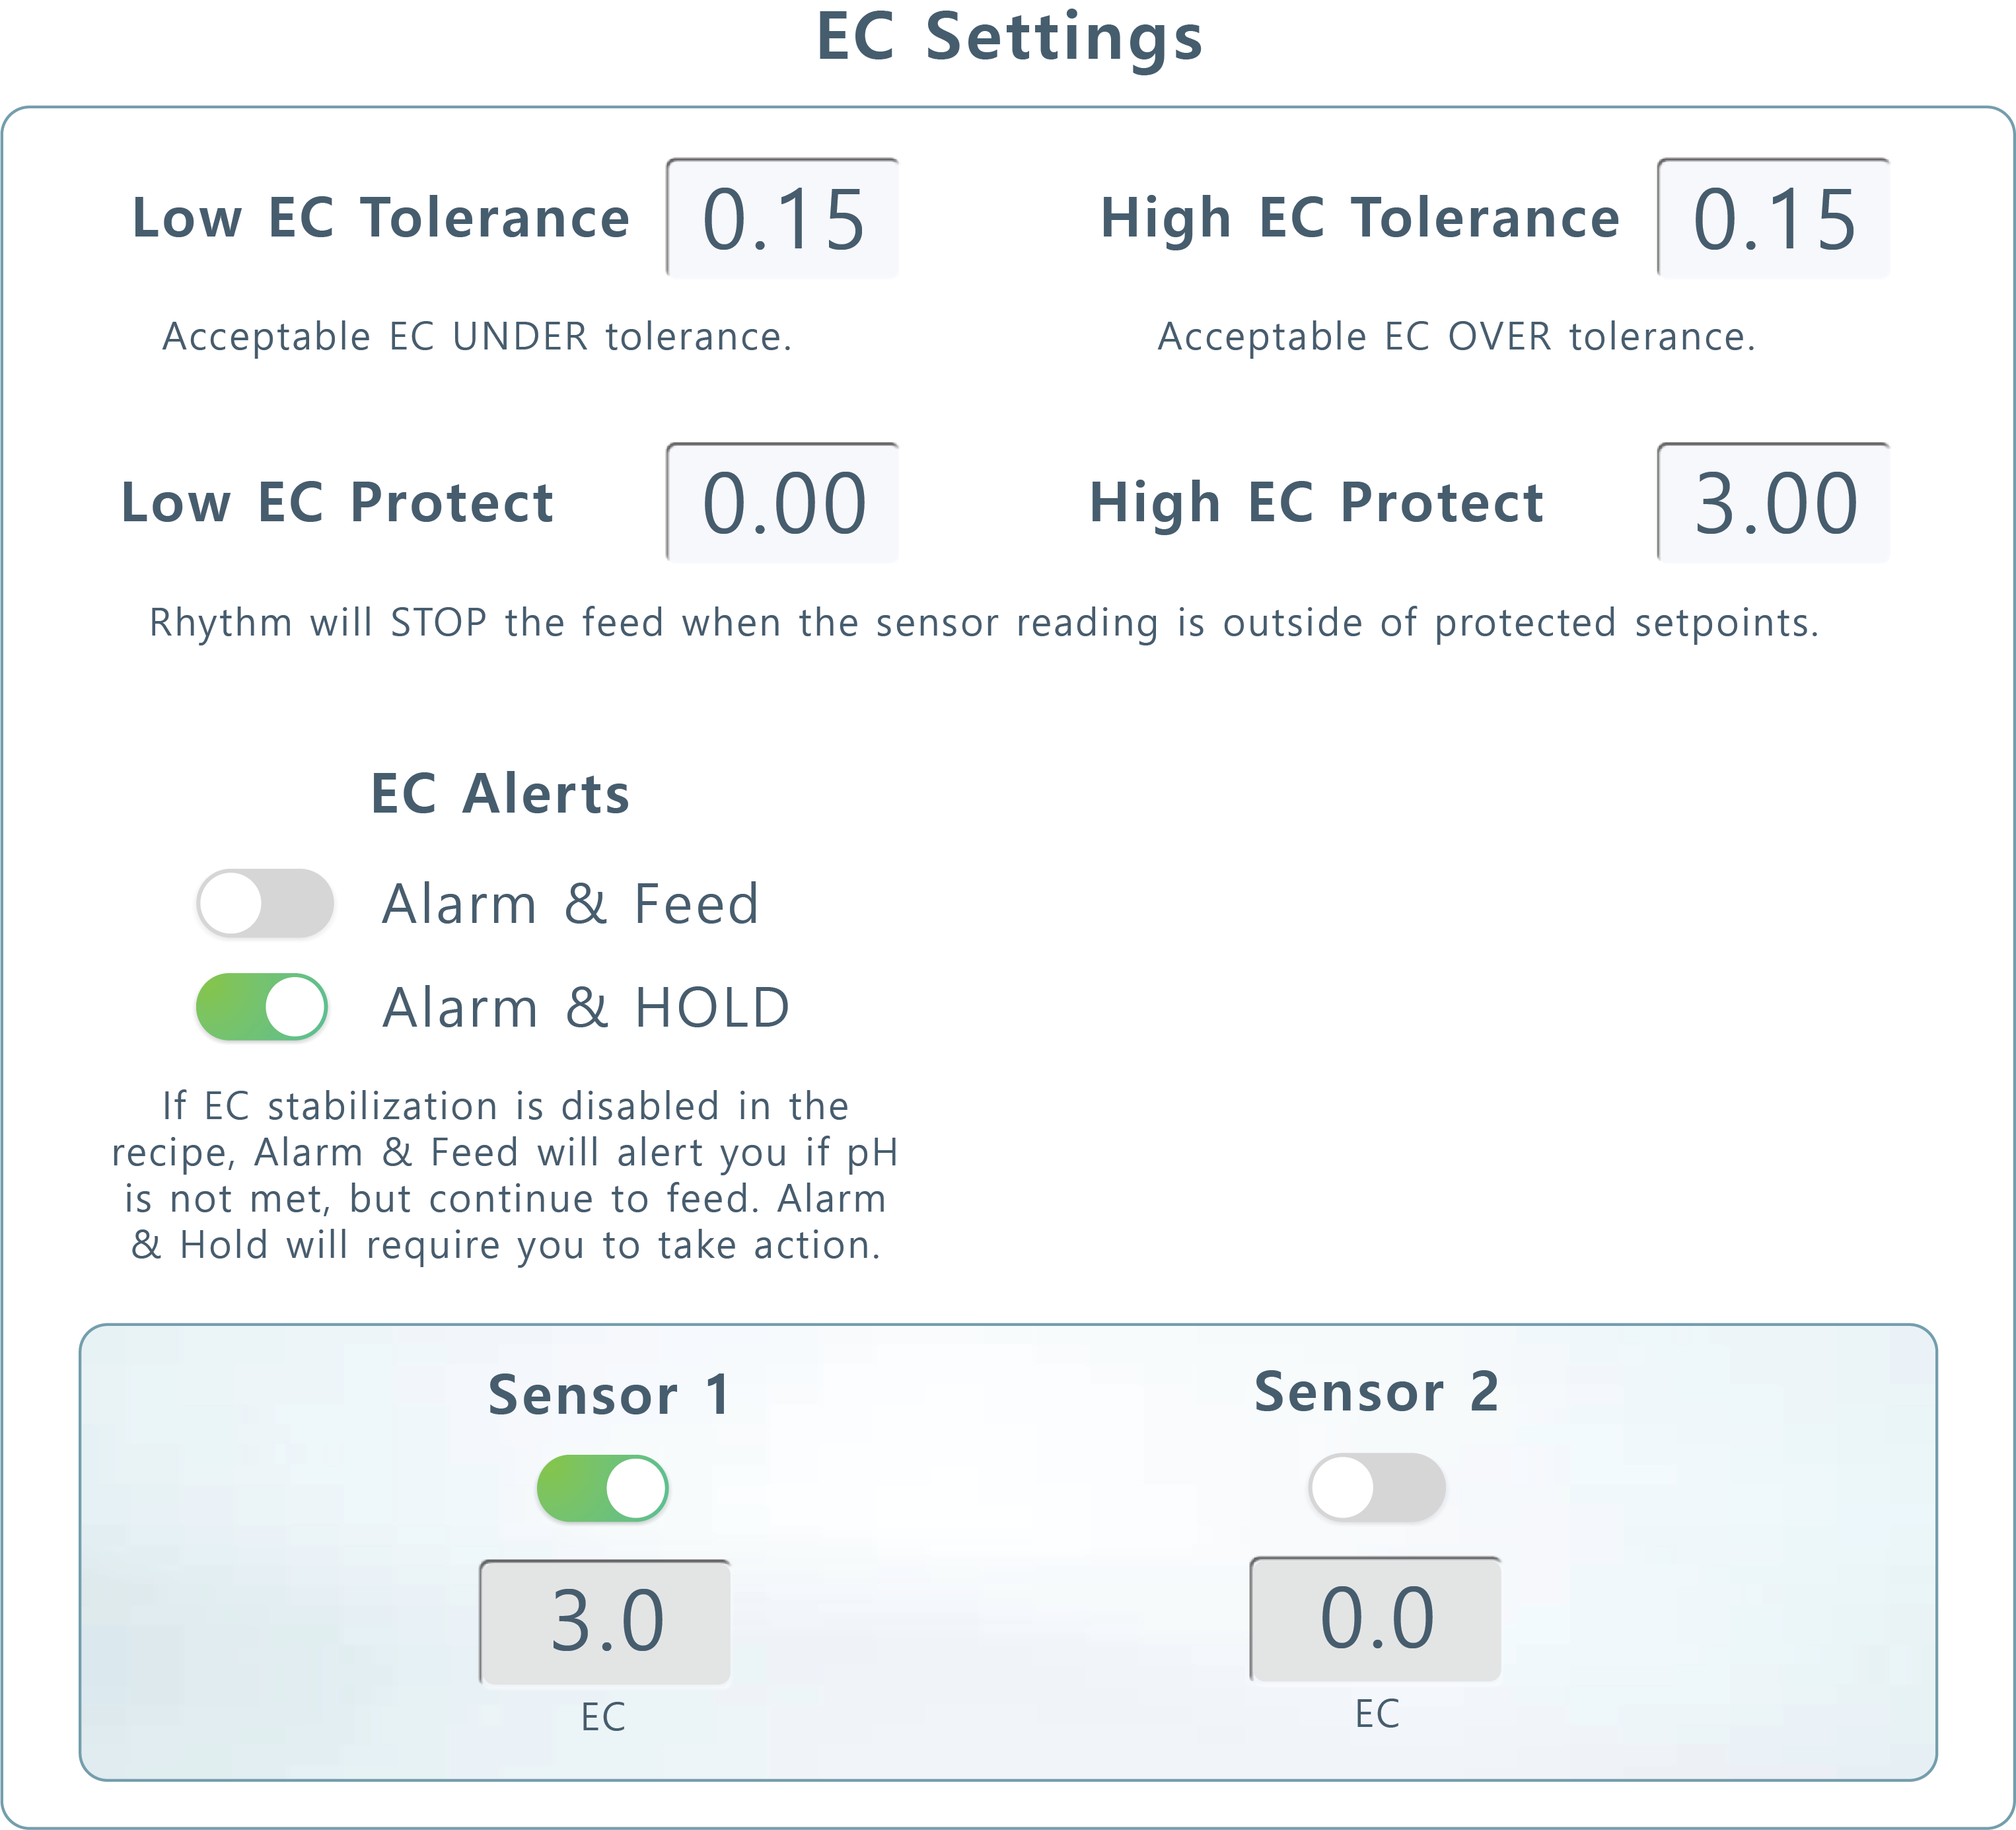
EC Settings. There are several EC settings you can edit to fine tune your stabilization process:
Low Tolerance. Your low tolerance is how much UNDER your desired EC you're willing to accept as a PASS i.e. if you'd like your recipe to feed at 1.2 EC, a .20 low tolerance will PASS your recipe if it achieves 1.0 EC.
High Tolerance. Your high tolerance is how much OVER your desired EC you're willing to accept as a PASS i.e. if you'd like your recipe to feed at 2.1 EC, a .10 high tolerance will PASS your recipe if it achieves 2.2 EC.
Low Protect. Your low protect setting will stop the feed completely when the sensor reading is outside the protected setpoints. Feeds reaching these settings will NEVER feed regardless of "Alarm and Feed/Hold" settings.
High Protect. Your high protect setting will stop the feed completely when the sensor reading is outside the protected setpoints. Feeds reaching these settings will NEVER feed regardless of "Alarm and Feed/Hold" settings.
EC Alerts. Use this toggle to decide how you'd like the system to proceed in the case it doesn't achieve EC stabilization:
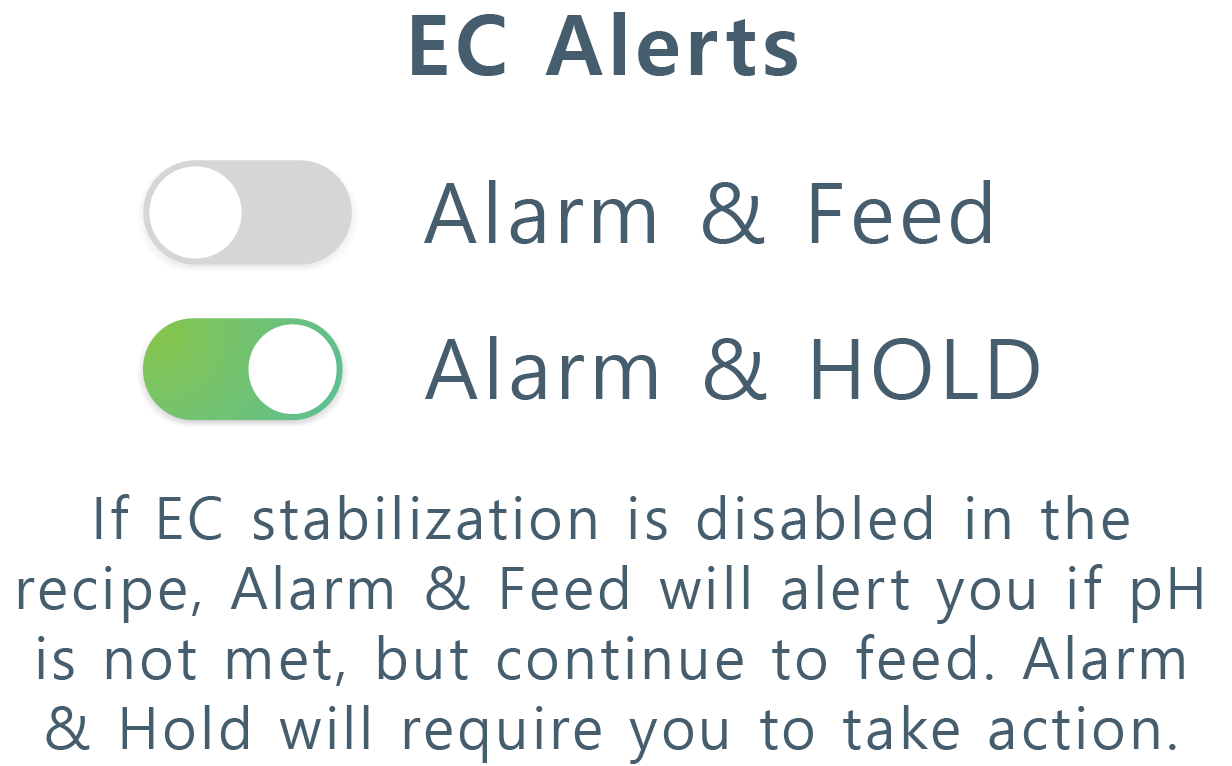
Enabling EC Alerts will apply "Alarm and Feed." This means if the machine does not achieve stabilization, it will display an alarm, notify you via email/text, and continue feeding.
Disabling EC Alerts will apply "Alarm and Hold." This means if the machine does not achieve stabilization, it will display an alarm, notify you via email/text, and HOLD until action is taken.
Your machine is equipped with redundant EC sensors. You can enable or disable one of them in case one of the sensors is faulty and you need the machine to read from a certain sensor only by using the toggle to the left. If both sensors are off, sensor 1 will be used.

6. Date/Time Configuration
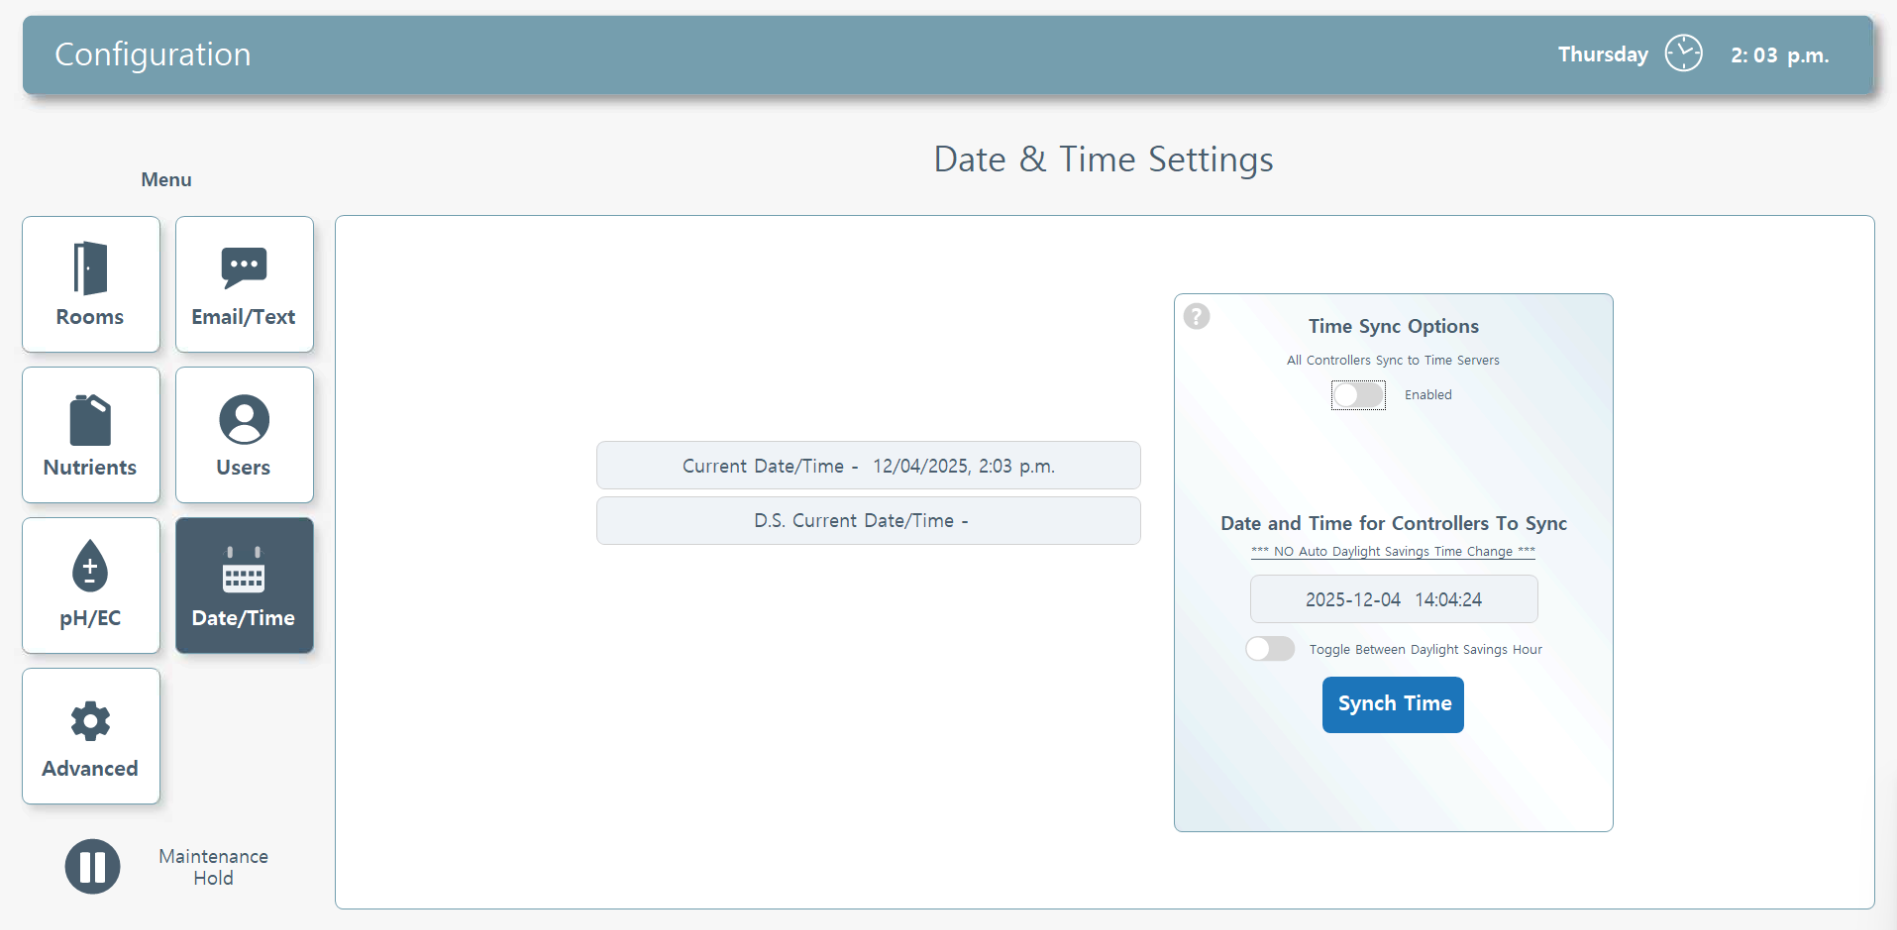
Date Configuration. You can edit the date and time by toggling Enable under Time Sync Options and manually overriding the details. The Rhythm system uses military time.
Note - DS Current time denotes Day Storage controller times and lets us know the function of the PLCs. Please let us know if these times are off.
You can toggle here for Daylight Savings Time as well. Please note this process is NOT automatic.
Note - DS Current time denotes Day Storage controller times and lets us know the function of the PLCs. Please let us know if these times are off.
You can toggle here for Daylight Savings Time as well. Please note this process is NOT automatic.
7. Advanced Configuration
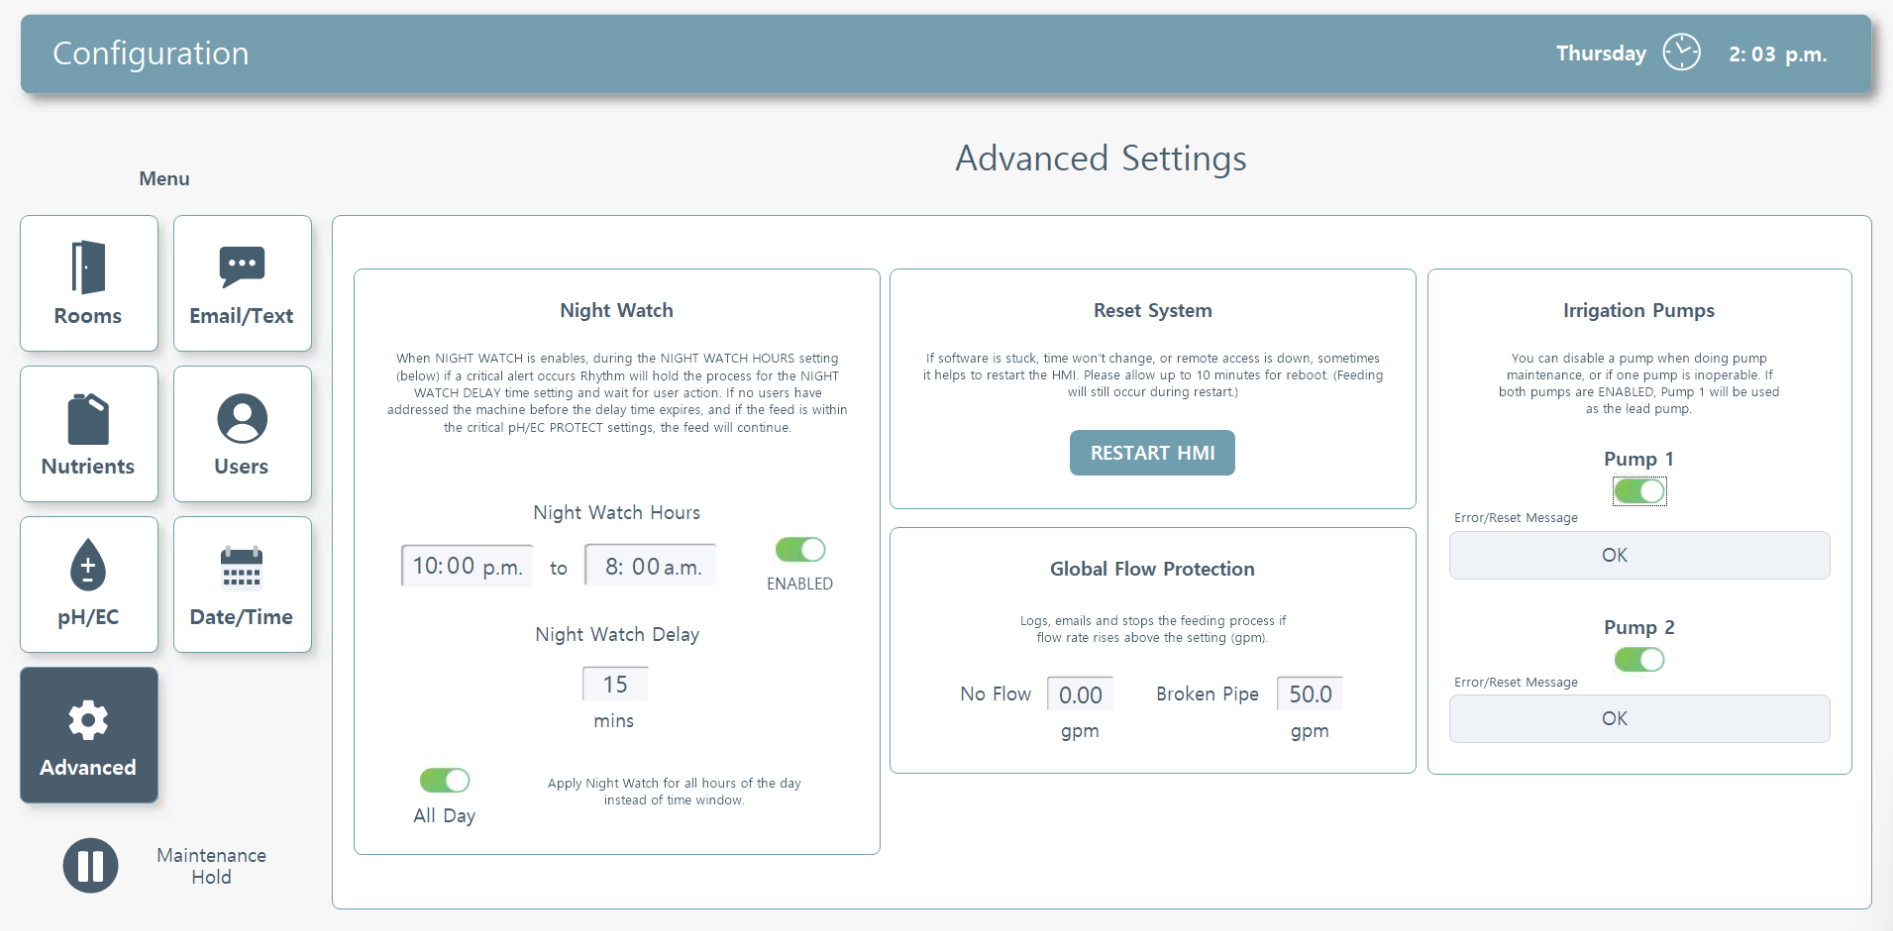
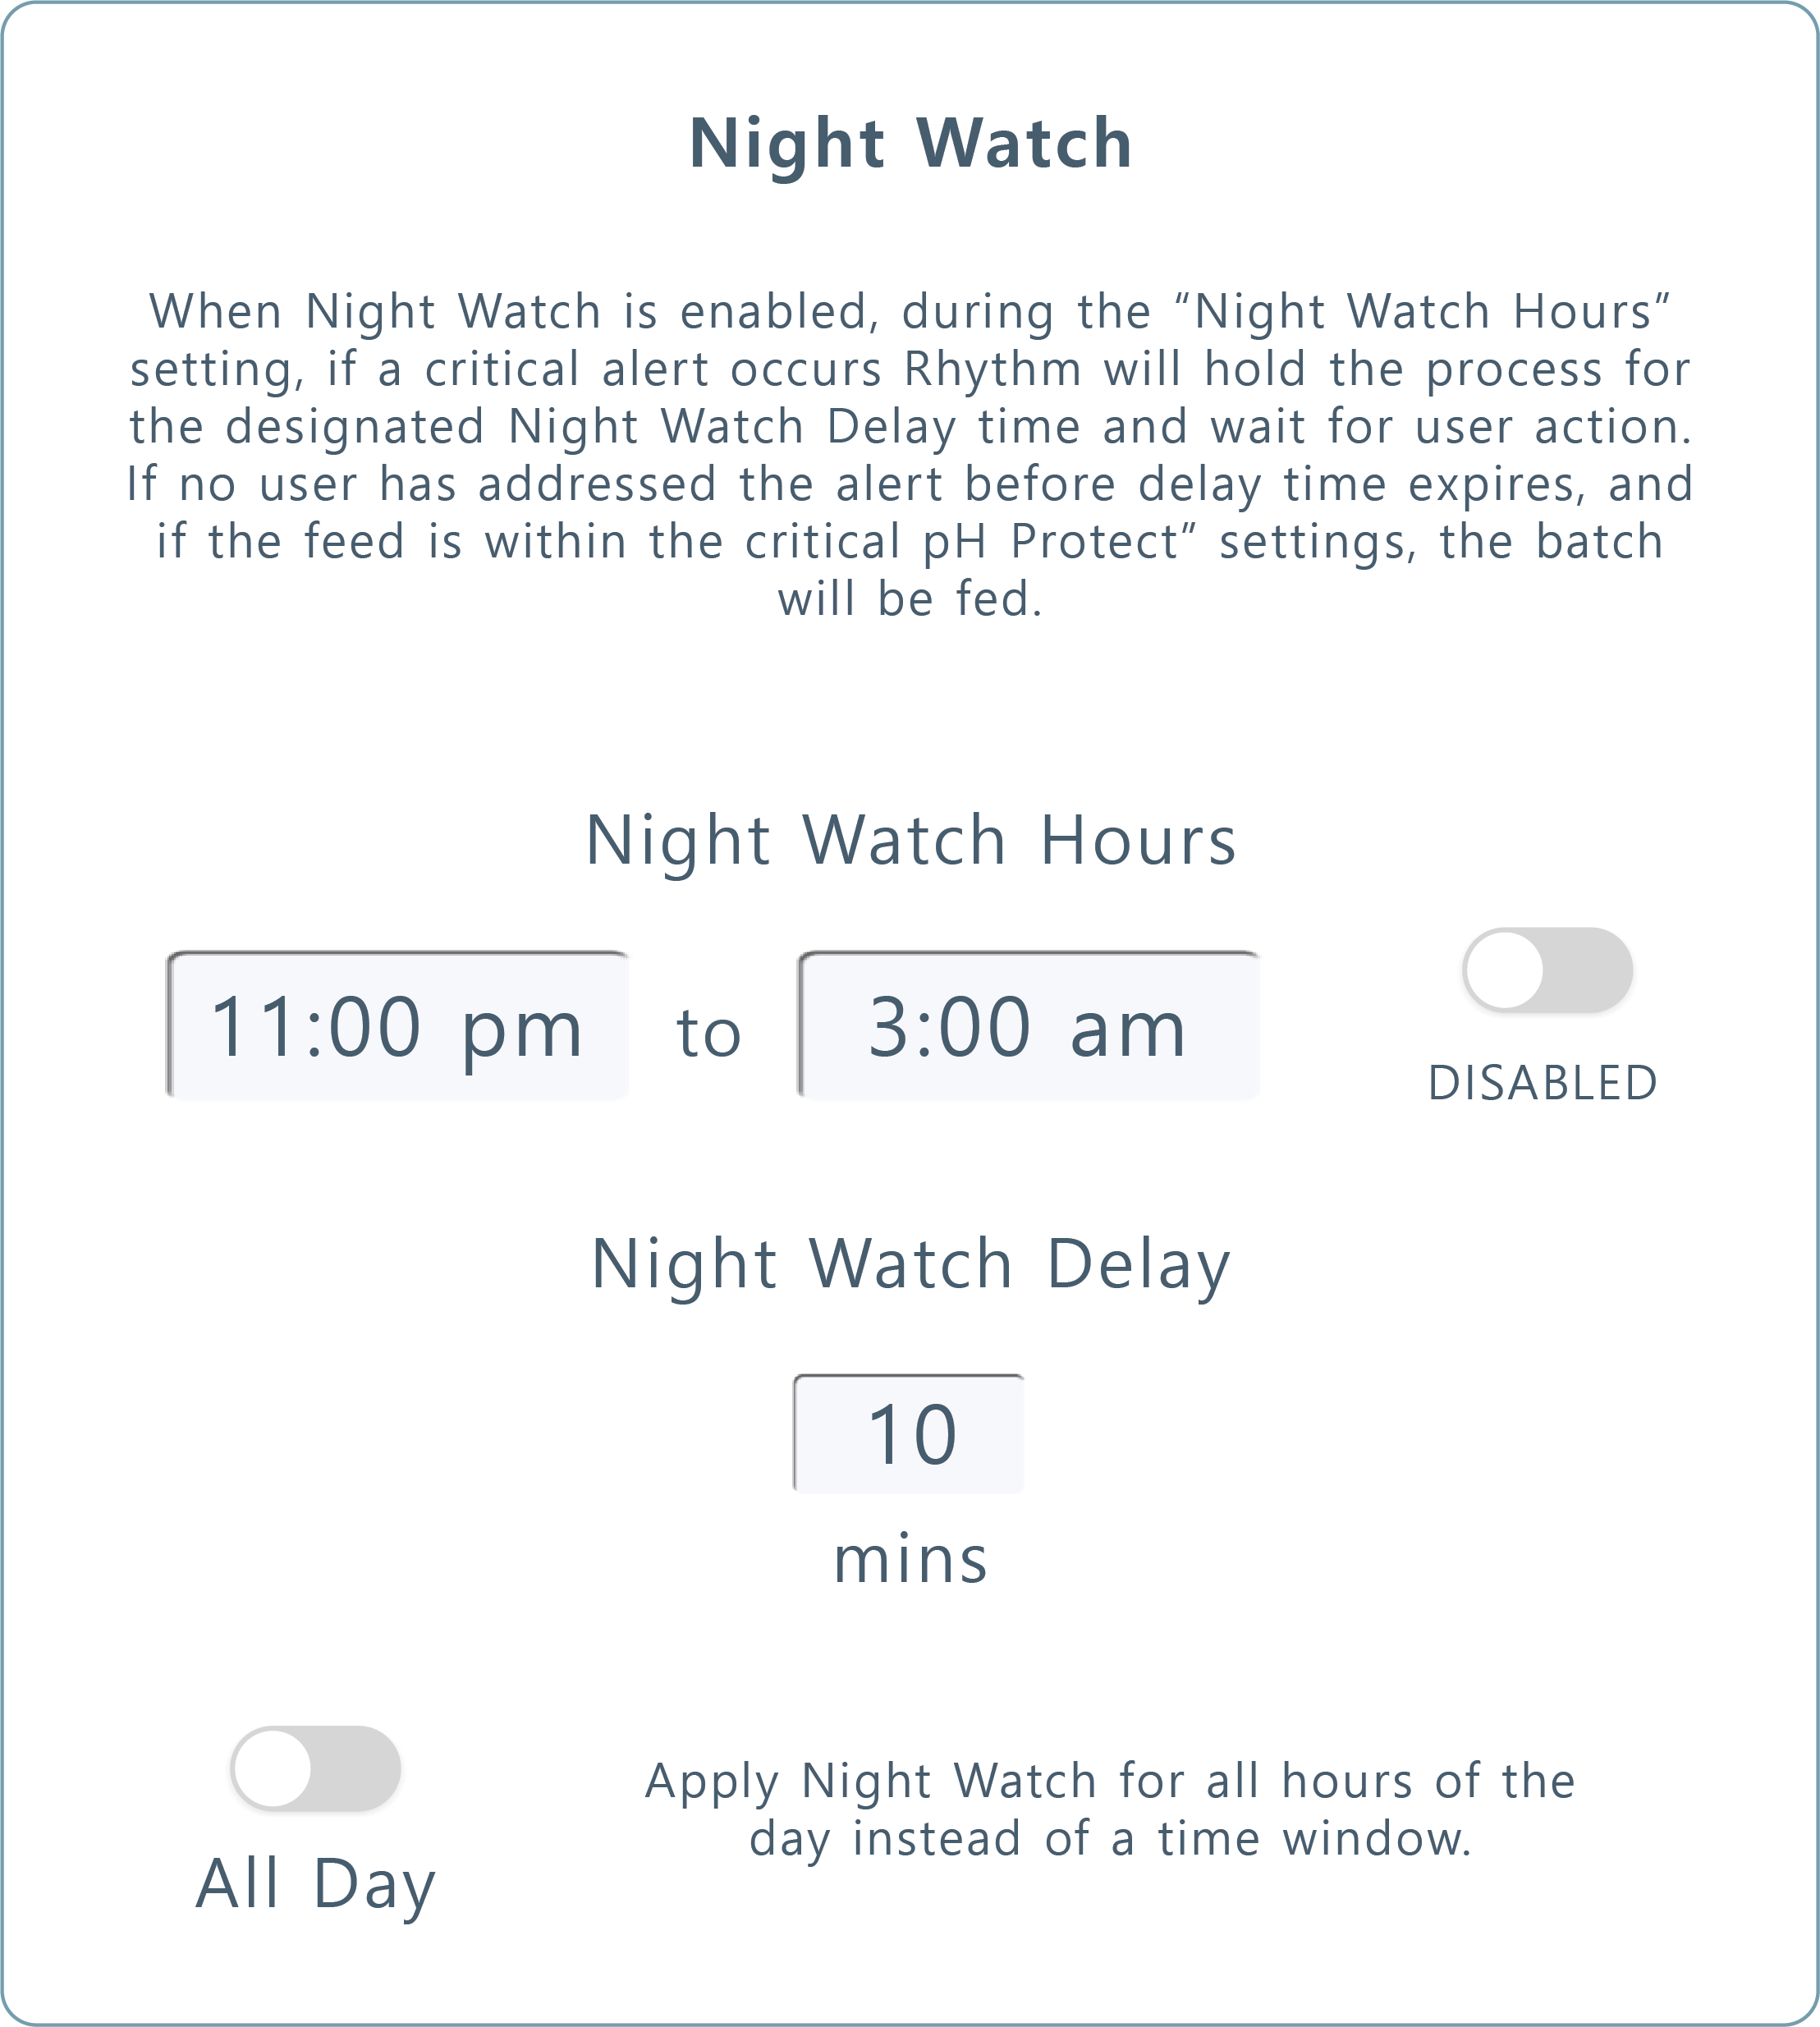
Night Watch. When night watch is enabled, during the Night Watch Hours setting, if a critical alerts occurs, Rhythm will hold the process for the Night Watch Delay time setting and wait for user action. If no users have addressed the machine before the delay time expires, and if the feed is within the critical pH/EC protect settings, the feed will continue.
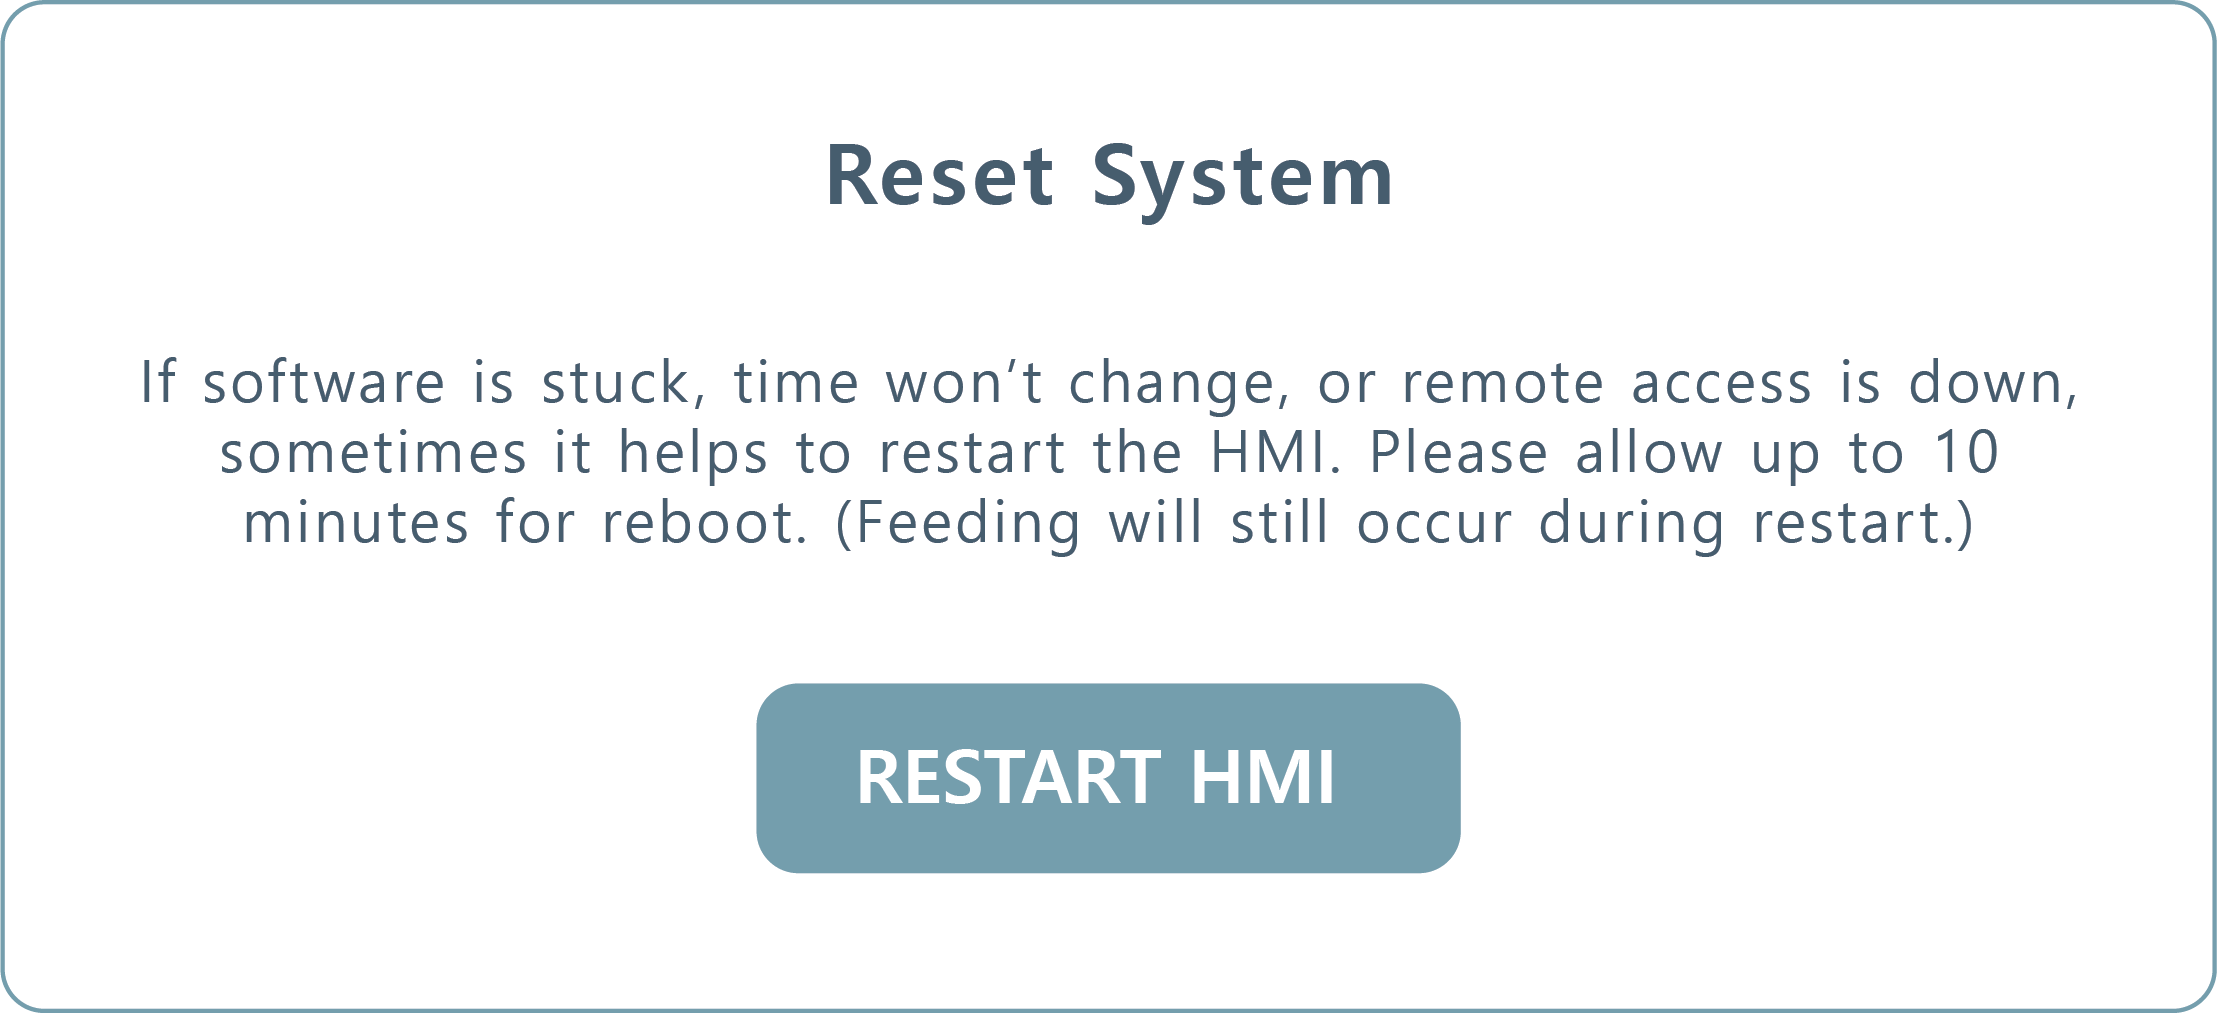
Reset System. If your software is stuck, the time won't change, or remote access is down, sometimes it helps to restart the HMI. Please allow up to 10 minutes for reboot. Feeding will still occur during the restart.
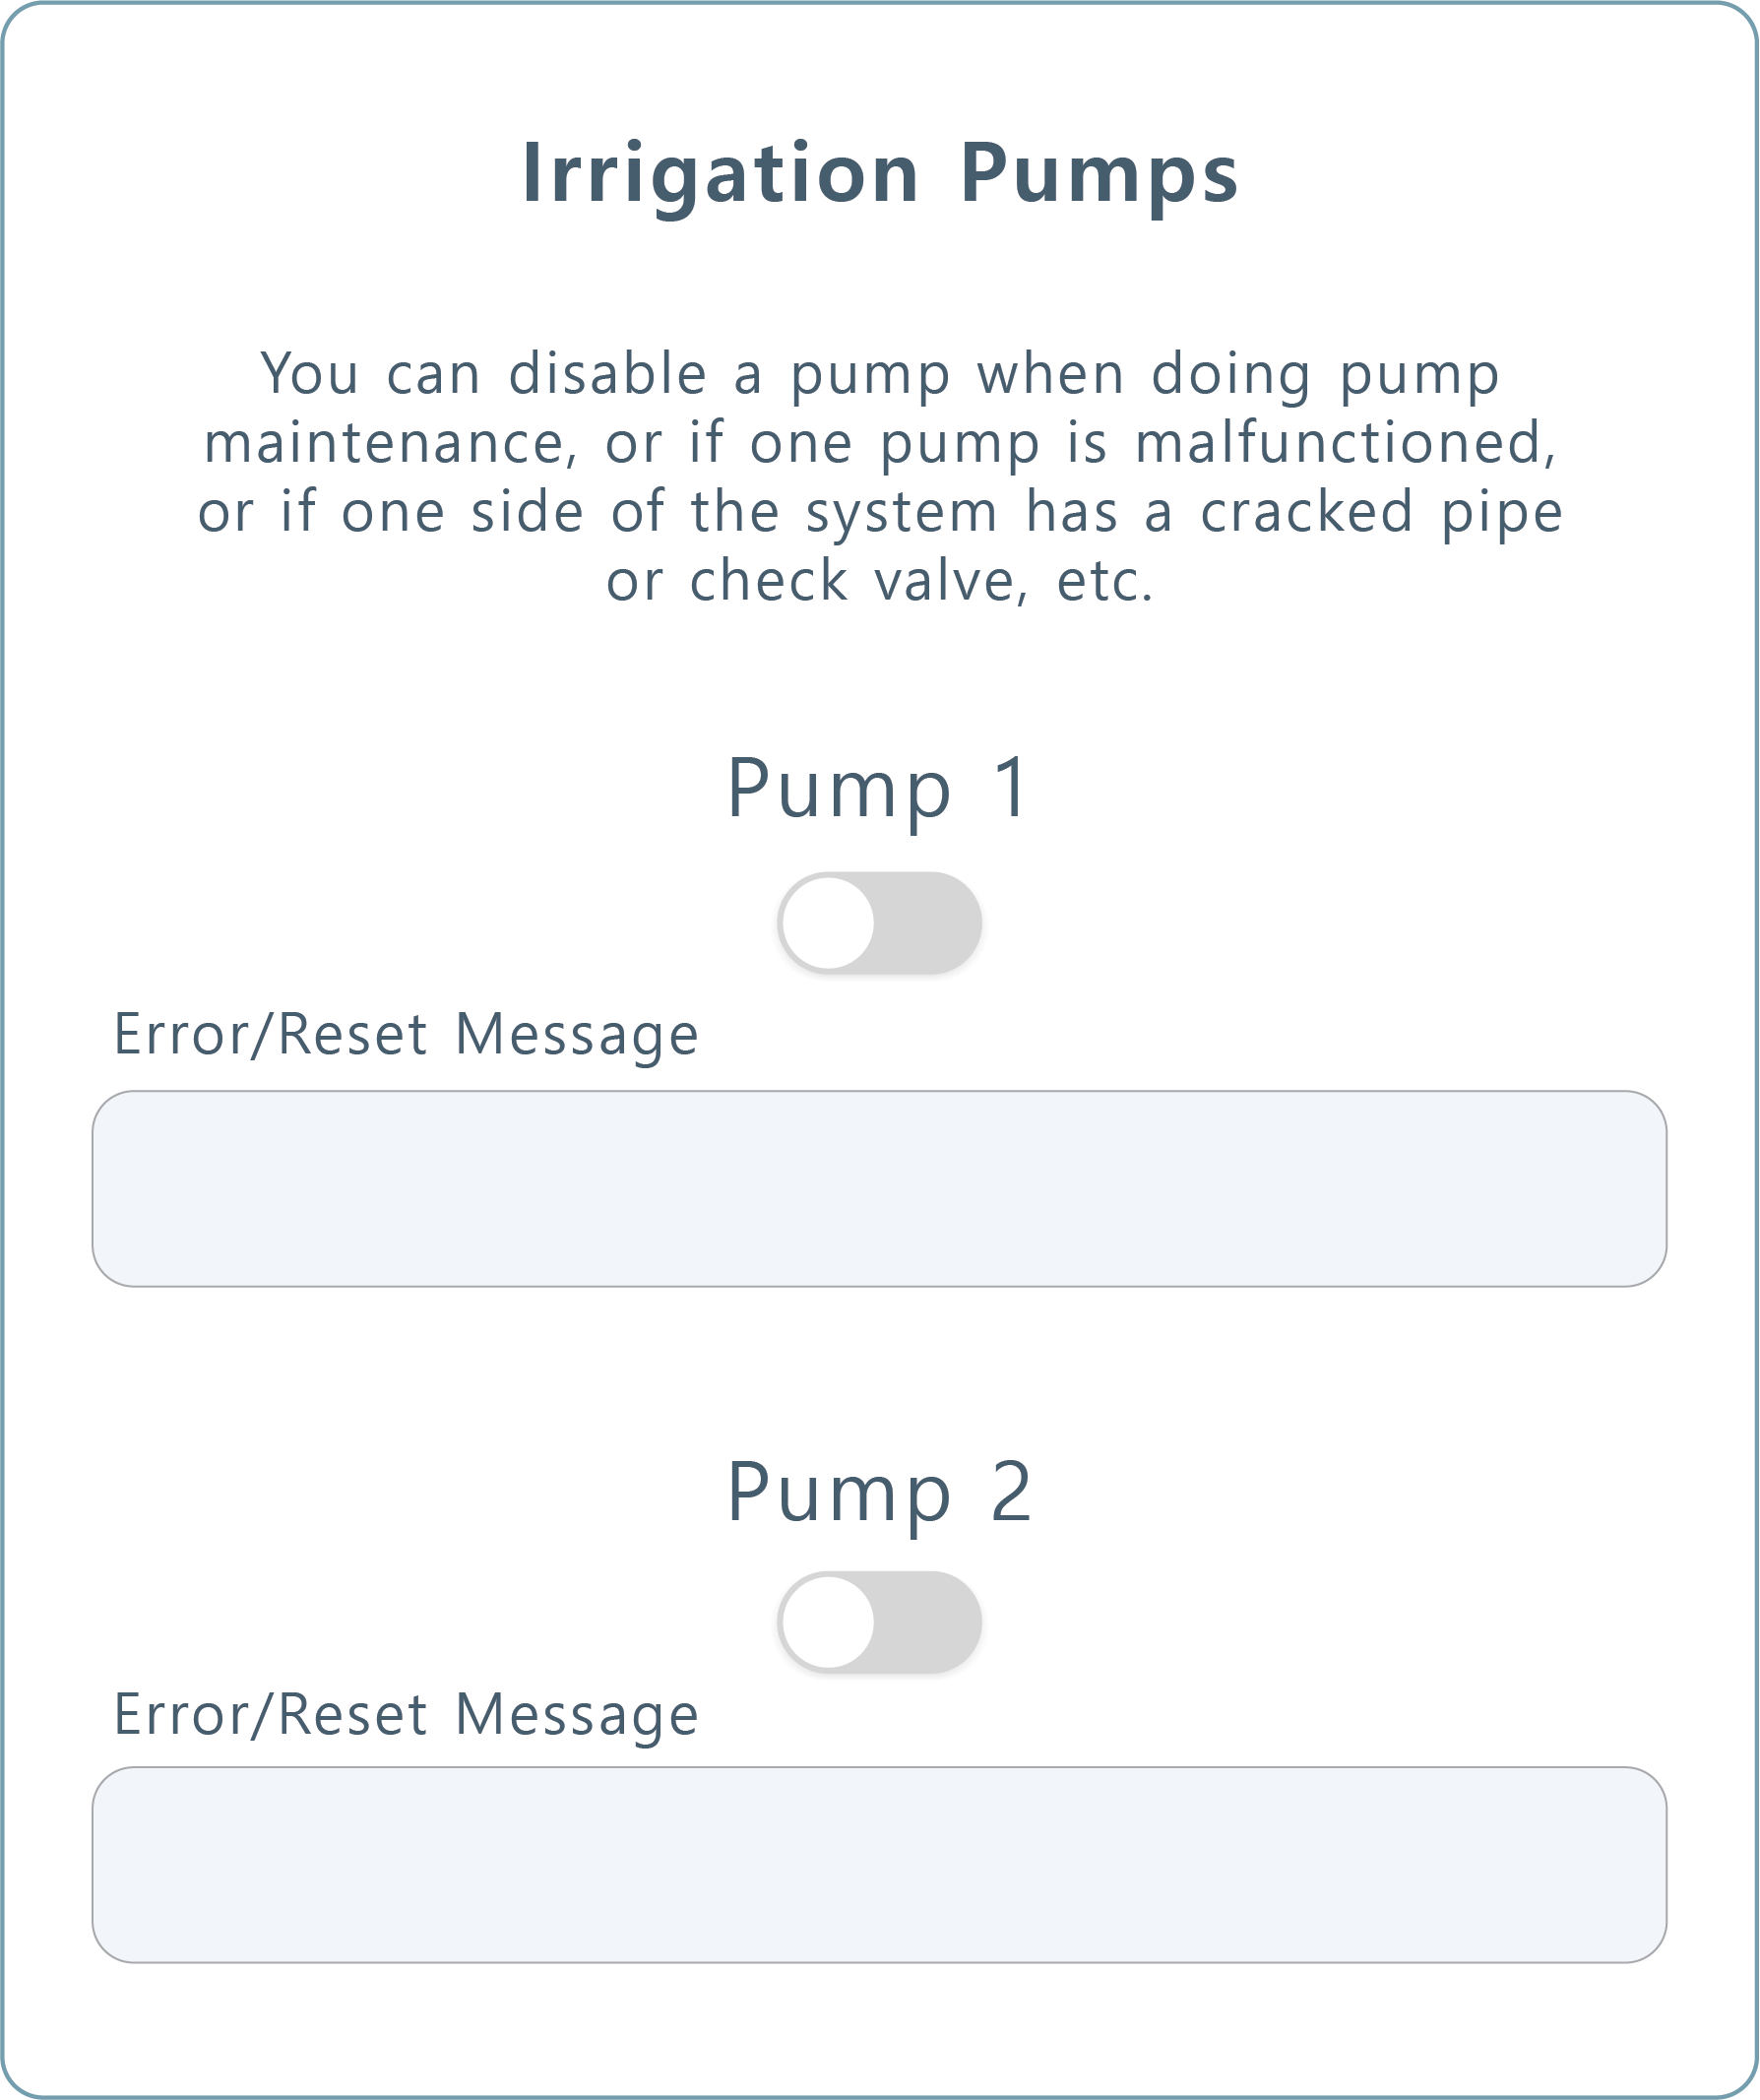
Irrigation Pumps. You can disable one of your main irrigation pumps. This is useful when doing pump maintenance, in the case that one pump is malfunctioned, if one side of the system has a cracked pipe or check valve, etc.
Please confirm with Rhythm engineers which pump on your system is #1 and which is #2.
Error messages may display here as well in case of any malfunctions.
Please confirm with Rhythm engineers which pump on your system is #1 and which is #2.
Error messages may display here as well in case of any malfunctions.

Global Flow Protection. This setting overrides room level flow settings. In the case a feed reaches the No Flow or Broken Pipe gpm's, the system will log, email, and stop the feeding process.


.svg)