
SOFTWARE USER GUIDE
Main Overview Screen
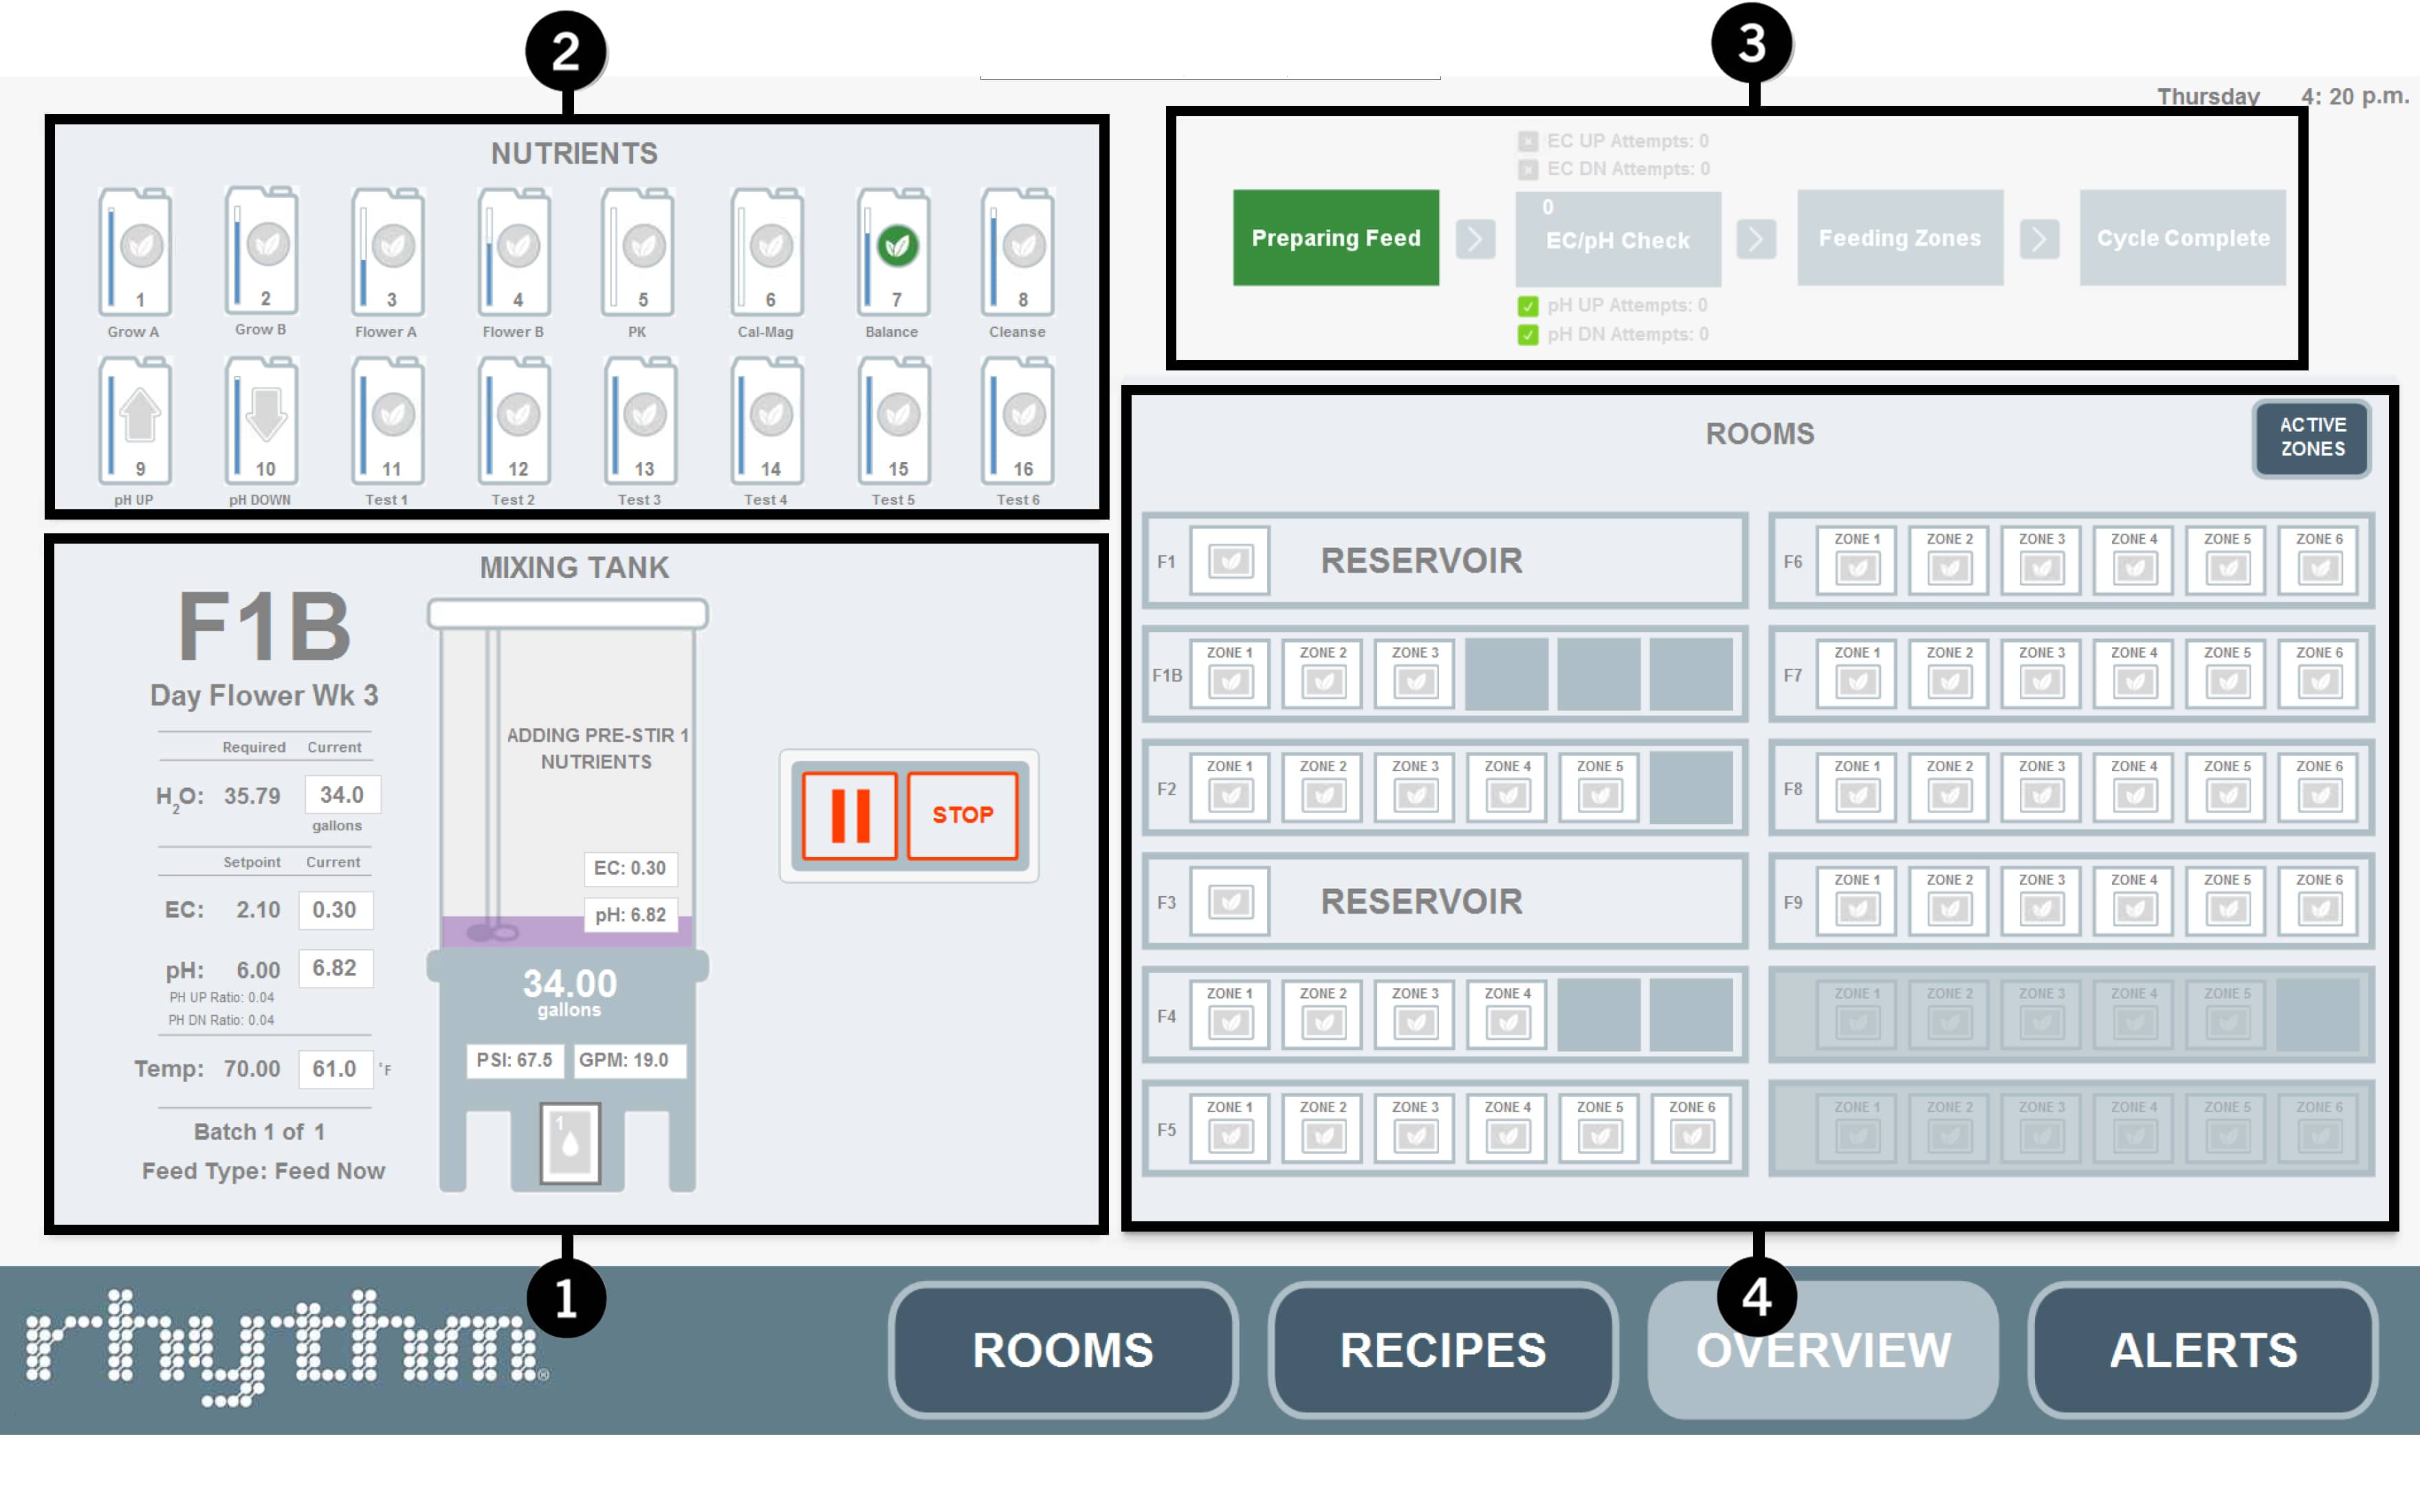
Click the corresponding number icon to jump to its section.

Mixing Tank Status

Nutrient Status

Stabilization

Zone/Room Status
1. Mixing Tank Status

Room & Recipe Name. When the machine is preparing a batch, the name of which room it is preparing a batch for will appear here. The first line is the room name and the second line is the recipe which is being prepared.
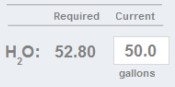
Water Status & Requirements. When preparing a batch, the machine will call for a certain amount of water that you set in the recipe. This number will appear under the "Required" column. As the tank fills, the amount of water currently inside the tank will appear under the "Current" column.

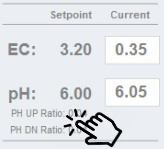
EC & pH Setpoint & Requirements. When preparing a batch, the machine will reference your recipe to determine the EC and pH it should try to reach. These numbers will fall under the "Setpoint" column. Once the tank finishes filling with water and dosing nutrients, it will reach the EC/pH Stabilization process, where it will first read the values inside the tank using your sensors:
• If the EC is too low, the machine will add the nutrient you designated as "Flower Base" or "Veg Base" at the designated ratio located at Rhythm Logo > Configuration > pH/EC > EC Base Ratio.
• If the EC is too high, the machine will add plain water to try and buffer the value.
Note: If you disabled EC stabilization in the recipe, and the machine does not achieve stabilization here, it will either "ALARM and FEED" or "ALARM and HOLD" (depending on your global settings in Rhythm Logo > Configuration > pH/EC > EC Alerts.
• If the pH is too low, the machine will start dosing pH up at the designated ratio in the recipe on PAGE 2 or on the Main Overview Page override section (see image below).
• If the pH is too high, the machine will start dosing pH down (or whatever is in the 'pH down' nutrient allocation i.e. some growers may want to use Silica instead of pH down) using the same ratios as noted above.

• A green outline around the "Current" values show that the EC/pH value has been stabilized and passed the bandwidth criteria set by your recipe.
When both boxes are outlined green, the batch will begin to feed.
When both boxes are outlined green, the batch will begin to feed.
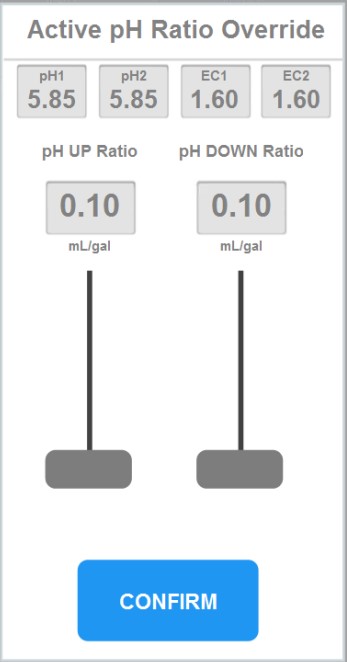
Ratios. These ratio values are the amounts in mL of pH up or pH down the machine will use when trying to stabilize the batch. Touch the section as noted in the image below to change these values while a recipe is mixing.
Important!
Clicking this section will bring up a pop up menu called "Active pH Ratio Override". Changes made here will ONLY affect the current batch and will reset after completion. This is helpful when dialing in the ratios for new recipes.
Clicking this section will bring up a pop up menu called "Active pH Ratio Override". Changes made here will ONLY affect the current batch and will reset after completion. This is helpful when dialing in the ratios for new recipes.
Temperature. The temperature inside your tank is measured by the pH sensor. The current temperature will display under the "Current" column and your setpoint under the "Setpoint" column. You can change your temperature setpoint by going to Rhythm Logo > Configuration > Process > Feeding Temperature.
Note: The setpoint is just a guide for email notifications. Rhythm cannot change the temperature, it will just email you when the temperature goes outside of the bandwidth you set. (i.e. it will email you if the temperature goes below 60F degrees or above 80F for example.)
Feed Type Status. Text displayed here will list the batch quantity you set in the recipe and the type of feed currently mixing.
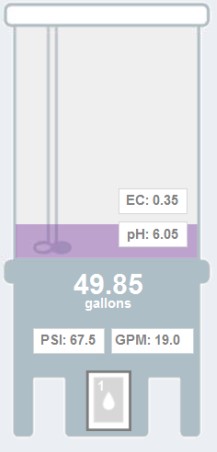
Tank Status. The tank icon shows a live view of your tank status. The current pH and EC values are shown on the tank.
Once the machine starts watering, the tank icon will change to display:
Once the machine starts watering, the tank icon will change to display:
• The purple inside the tank shows a visual representation of water filling up your tank. The numerical gallons will also display.
• The mixer icon will begin to spin once the machine's mixer is stirring the contents.
• The PSI displays the system pressure (pounds per square inch) at the machine. The pump will dynamically manage pressure based on configured room settings. Pressure is also important to monitor during troubleshooting.
• The GPM displays the system flow rate in gallons per minute. The system will maintain specific flow rates for recirculation and dump cycles. When feeding a room, the flow rate is not controlled by Rhythm, but rather by the quantity and type (GPH) of emitters in the feeding zone. During feeding cycles, the flow rate should be monitored to ensure the emitters are flowing correctly. Flow is also important to monitor during troubleshooting.

• The water droplet icon represents your irrigating pumps. When it is blue in color, this means the pump is ON. The number 1 shows that Pump #1 (the left pump) is on. Pump #2 is the backup pump and will only activate if Pump #1 faults or needs to primed (UNLESS you deactivate pump #1 altogether in CONFIGURATION settings).
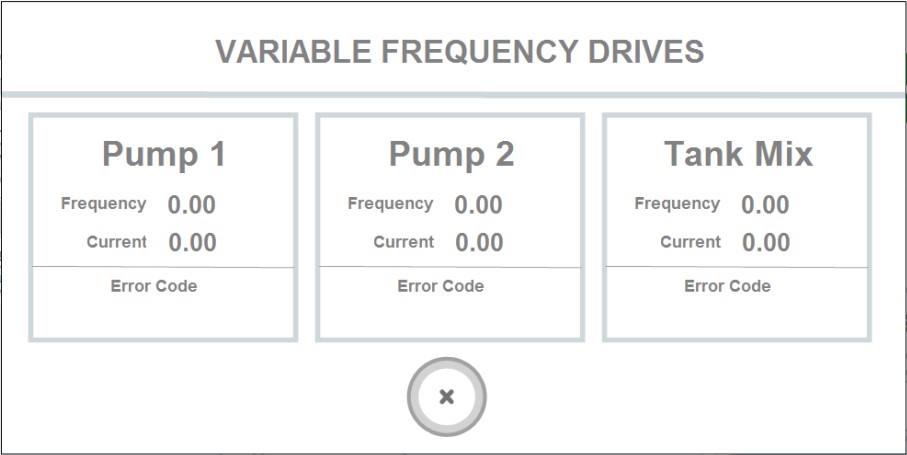
Clicking on the pump icon will display the "Variable Frequency Drives" popup which is only for Rhythm engineer use. This helps us diagnose certain pump issues.
Clicking on the pump icon will display the "Variable Frequency Drives" popup which is only for Rhythm engineer use. This helps us diagnose certain pump issues.
• When the recirculating icon appears, this means the agitation valve is ON and working to agitate, or circulate your mixture through the lines to maintain consistency and extra mixing. This can also be activated when working in MANUAL MODE.
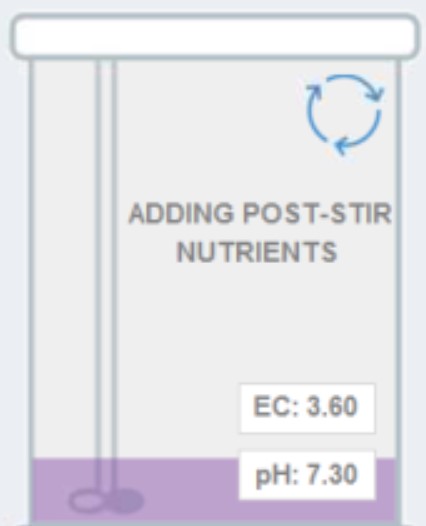
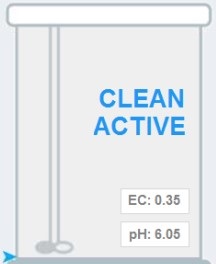
• Text will appear inside the tank under 3 circumstances:

If your recipe calls for 'pre-stir' nutrients, this text will appear before main nutrients are dosed.
If your recipe calls for 'post-stir' nutrients, this text will appear after stabilization.
Clean Active text will appear after the batch has delivered to your zone and the system is flushing out remaining mixture in the lines.

Stop and Pause. You can stop or pause your system during the mixing process by pressing the red buttons next to the tank icon.
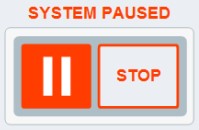
• This text will appear when the pause button is pressed. Functionality will not resume until the pause button is pressed again.
• When the "STOP" button is pressed:
• When the "STOP" button is pressed:


• You will first see a popup called "Stop Active Feeding?" Once you confirm, a popup called "Feeding on Hold" will appear. If you press "resume," the contents inside the tank will not move. If you select "send to dump," the system will send everything currently in the tank/inline to the dump. If another feed is scheduled after this, it will automatically begin once the dump is complete.
2. Nutrient Status
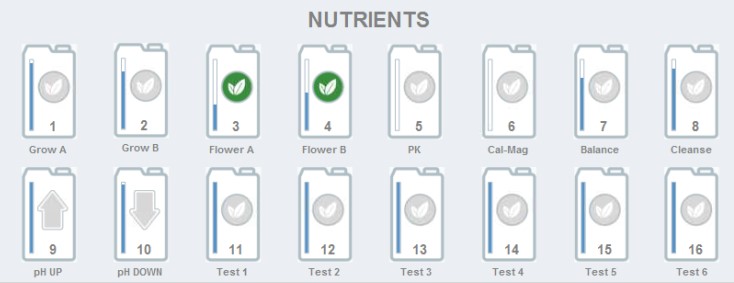
Nutrient Container Icons. Your nutrient containers will appear here as icons. The first icon correlates with the nutrient you have placed in dosing pump #1's position, and so on.
Note: For multi-batch systems, the nutrient icon in first place will correlate to dosing pump #1 for tank 1 (position 1A). The nutrient icon in second place will correlate to dosing pump #1 for tank 2 (position 1B). Therefore, the grouping will display as follows: 1A, 1B, 2A, 2B, 3A, 3B, etc.
You can change the name, dosing priority, pump type, volume, EC calculations, and calibration settings by going to Rhythm Logo > Configuration > Nutrients. Please see CONFIGURATION for full details.

• While actively feeding, the leaf icon will turn green, signifying that the nutrient is currently being dosed. The volume indicator to the left side lets you know how much volume is left inside the container. In order for Rhythm to know this, you must manually enter the volume every time you change or alter the containers. You can edit the volume of the containers in CONFIGURATION or from the main overview screen, you can click directly on the nutrient icon and a popup will appear:
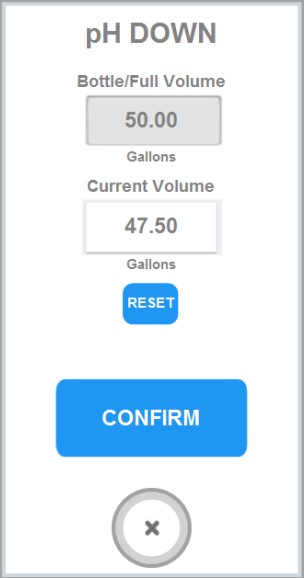
Enter the container's true size under "Bottle/Full Volume" and enter the current estimated volume under "Current Volume" and press confirm.
3. Stabilization
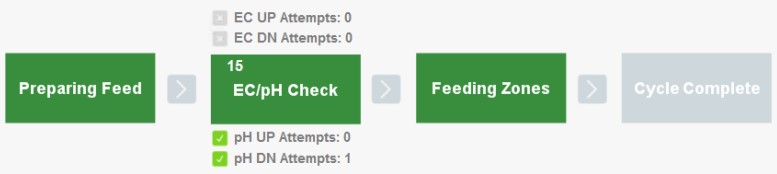
pH and EC Stabilization. You will see 3 steps in the process of your batch making. They are:

• Preparing Feed. The system will start by filling the tank with fresh water. Usually after 10 gallons (varies per customer), the mixer will initiate to stir contents and the dosing will begin (pre-stir nutrients first, then regular nutrients). The length of time for this process will vary depending on batch volume, number of nutrients, pre/post options, dosing pump sizing, nutrient dosage, etc.

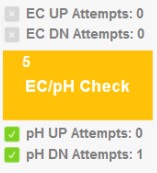
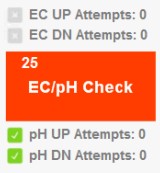
• EC/pH Check. After water and nutrients have been added, the system will begin the stabilization process. It will run the mixture through the system lines and check EC value first. The EC value will either pass or fail. See the above section titled "EC & pH Setpoint Requirements" for pass or fail scenarios. In the event of a PASS value, the EC box will outline green and move to pH.
The pH stabilizing process will first check the initial values. It will then begin dosing pH up or down in the mL you indicated in ratios (See EC/pH Setpoint Requirements > Ratios above). The number of attempts will display in text above and below the "EC/pH Check" icon.
The pH stabilizing process will first check the initial values. It will then begin dosing pH up or down in the mL you indicated in ratios (See EC/pH Setpoint Requirements > Ratios above). The number of attempts will display in text above and below the "EC/pH Check" icon.
Important!
When you start to use your software for the first time, you will need to spend some time dialing in the pH ratios. Depending on the complexity of your nutrient program or type, this may take a lot of tweaking. Ideally, you will want to have the "Attempts" value be 0 which results in a perfect mixture. However, this can't always be the case so try running test batches to obtain a value LESS THAN 2.
When you start to use your software for the first time, you will need to spend some time dialing in the pH ratios. Depending on the complexity of your nutrient program or type, this may take a lot of tweaking. Ideally, you will want to have the "Attempts" value be 0 which results in a perfect mixture. However, this can't always be the case so try running test batches to obtain a value LESS THAN 2.
The number in the upper left corner is the countdown number for how many seconds the batch will agitate while the pH is being checked. The GF probes generally suggest this number to be 200 seconds but you can lower it if you'd like to speed up the process. You can do this by going to Rhythm Logo > Configuration > pH/EC > Agitation Time.
During setup, you must go to Rhythm Logo > Configuration > pH/EC > Cycle Attempts and set the maximum number of attempts the stabilization should reach before it alerts you. For example, if you set a max cycle attempts for pH to 6, the machine will try 6 times to achieve your set pH. If it does not achieve this, it will fault with the "Critical Alerts" popup below.
During setup, you must go to Rhythm Logo > Configuration > pH/EC > Cycle Attempts and set the maximum number of attempts the stabilization should reach before it alerts you. For example, if you set a max cycle attempts for pH to 6, the machine will try 6 times to achieve your set pH. If it does not achieve this, it will fault with the "Critical Alerts" popup below.
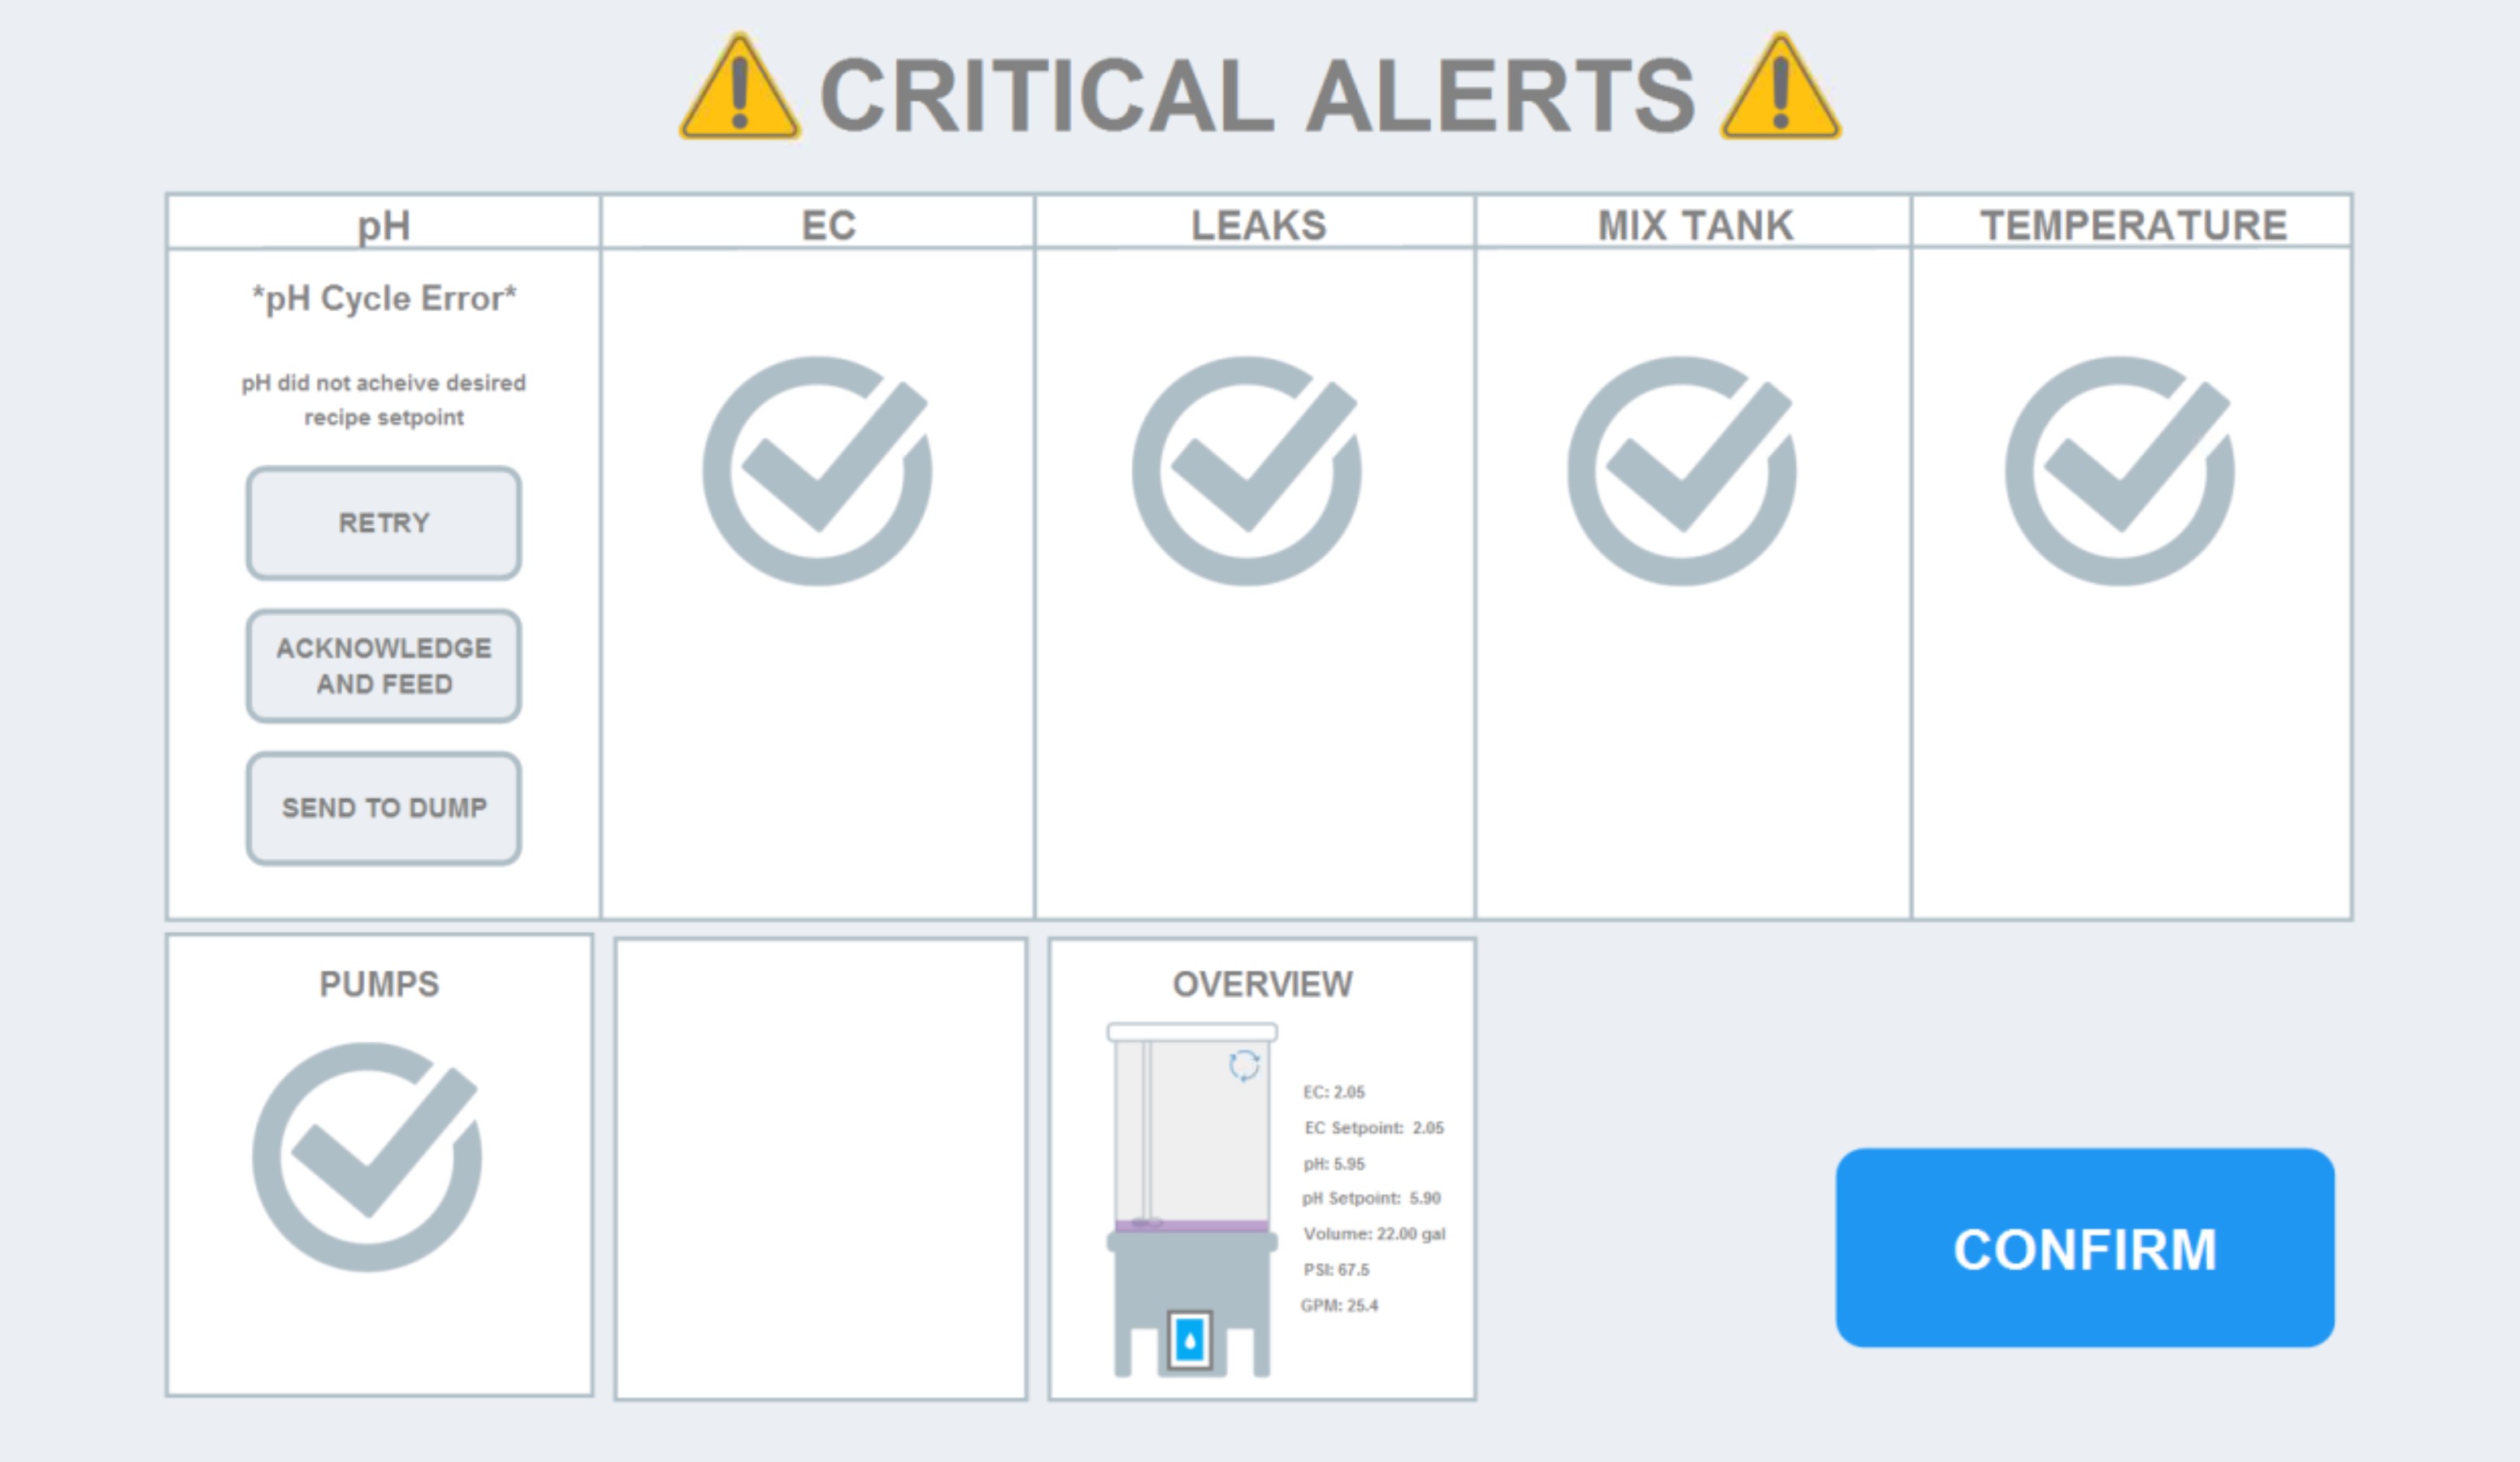
Critical pH Alerts. pH cycle error will appear if the machine does not achieve pH stabilization. Click "Retry" to retry again. Click "Acknowledge and Feed" to resume feeding despite the faulty pH value. Click "Send To Dump" to throw the feed away and begin the next feed in the queue.
The "Critical Alerts" popup will display UNTIL YOU TAKE ACTION. This is important to know because it can hold up the entire facility's schedule if the alert is not acknowledged. You can change this setting so that the machine will automatically dump the contents and resume the feeding queue after "x" amount of minutes by going to Rhythm Logo > Configuration > Process > Process Management> Dump delay (mins). Select the toggle first and then set the number of delay minutes.
The "Critical Alerts" popup will display UNTIL YOU TAKE ACTION. This is important to know because it can hold up the entire facility's schedule if the alert is not acknowledged. You can change this setting so that the machine will automatically dump the contents and resume the feeding queue after "x" amount of minutes by going to Rhythm Logo > Configuration > Process > Process Management> Dump delay (mins). Select the toggle first and then set the number of delay minutes.

• Skipping Stabilization. You can bypass or skip the stabilization process by pressing the "Preparing Feed" or "EC/pH Check" icons themselves to reveal the popup below. Click confirm.


• Feeding Zones. Once your stabilization has completed, the system will start feeding the rooms/zones or filling the designated reservoir. While this icon is green, you can check the "Zone/Room Status" to see which zones are actively watering.
4. Zone/Room Status
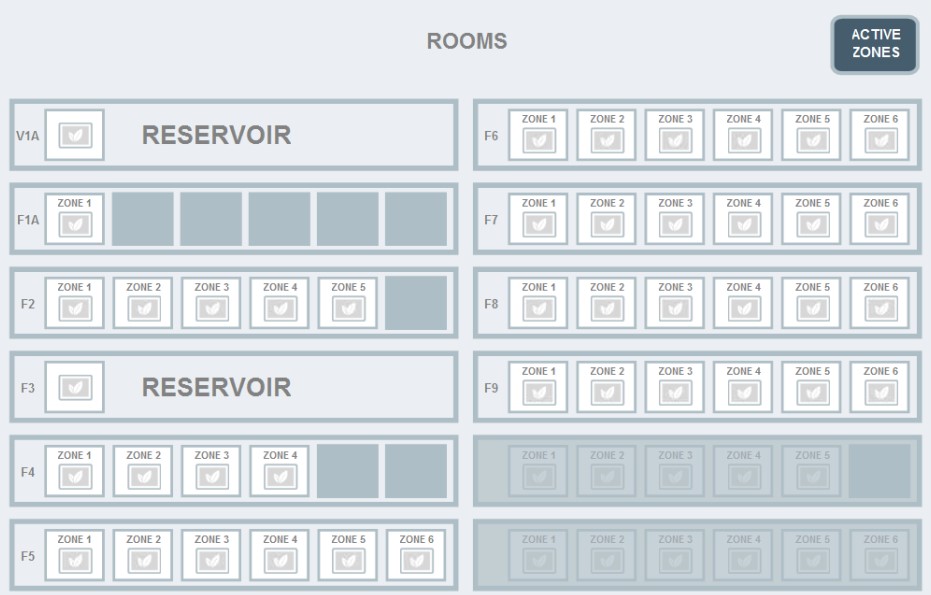
Rooms. Your rooms will appear here as boxes with the leaf icon inside. When a room or reservoir is actively watering, the box with the designated room name will outline in green. Within each room, the zones will also display active watering by a green leaf highlight. In the example below, the first zone (e.g. table 1) in Room F5 is currently watering.


Active Zones. Press the "Active Zones" button to reveal a popup which allows you to select the zones you'd like to water. Zones outlined in green will water. You can also activate zones on the room level by going to Rhythm Logo > Configuration > ROOM # > Enable/Disable Zones.

Note: If you activate/deactivate the zones from the MAIN OVERVIEW SCREEN while a recipe is running, the change will only affect the current room feeding and WILL RESET the next time this specific room waters. You must manually change it again, or change the active zones from the CONFIGURATION screen if you want the zones to remain ON or OFF.


.svg)